
Documentation
What is snill.ai?
Section titled “What is snill.ai?”Custom business software from a conversation.
Snill lets you describe what your business needs in plain language — and generates a complete internal system in seconds. You get structured data, dashboards, forms, a REST API, and an AI assistant that can query and update your data.
It’s built for founders, consultants, and operators who need custom software but don’t want to build it from scratch or duct-tape together a stack of SaaS tools.
What’s included
Section titled “What’s included”Every Snill app comes with the following out of the box — no add-ons, no integrations to wire up:
- AI-generated apps — describe what your business does, get a complete system instantly.
- Relational data model — collections, indexed lookups, calculated fields, and server-side filtering.
- Dashboards & custom pages — KPIs, charts, tables, and configurable views.
- AI Data Assistant — ask questions in plain language, get real answers and reports.
- Multi-user with roles — invite your team, control access per collection and per field.
- REST API for every app — with an auto-generated OpenAPI 3.0 spec, no extra setup.
- Outbound webhooks & triggers — HMAC-signed events to integrate with anything.
- Activity log & version history — full audit trail with one-click schema rollback.
- Import & export — CSV and JSON, for migration and backups.
- Themes — change the look and feel with a single setting.
How it works
Section titled “How it works”- Describe your business — tell the AI what you need. “I run a consulting firm and need to track clients, projects, time entries, and invoices.”
- Review the result — Snill generates a complete data model with collections, fields, relationships, dashboards, and navigation.
- Start using it — your app is live immediately. Add records, view dashboards, invite team members.
- Refine as you go — ask the AI to make changes (“add a status field to projects”) or use the visual editor to tweak fields, layouts, and settings.
Tip
The AI and the visual editor produce the same output. You can switch between them freely — edits from either are fully compatible.
Creating your first app
Section titled “Creating your first app”From idea to working app in under a minute.
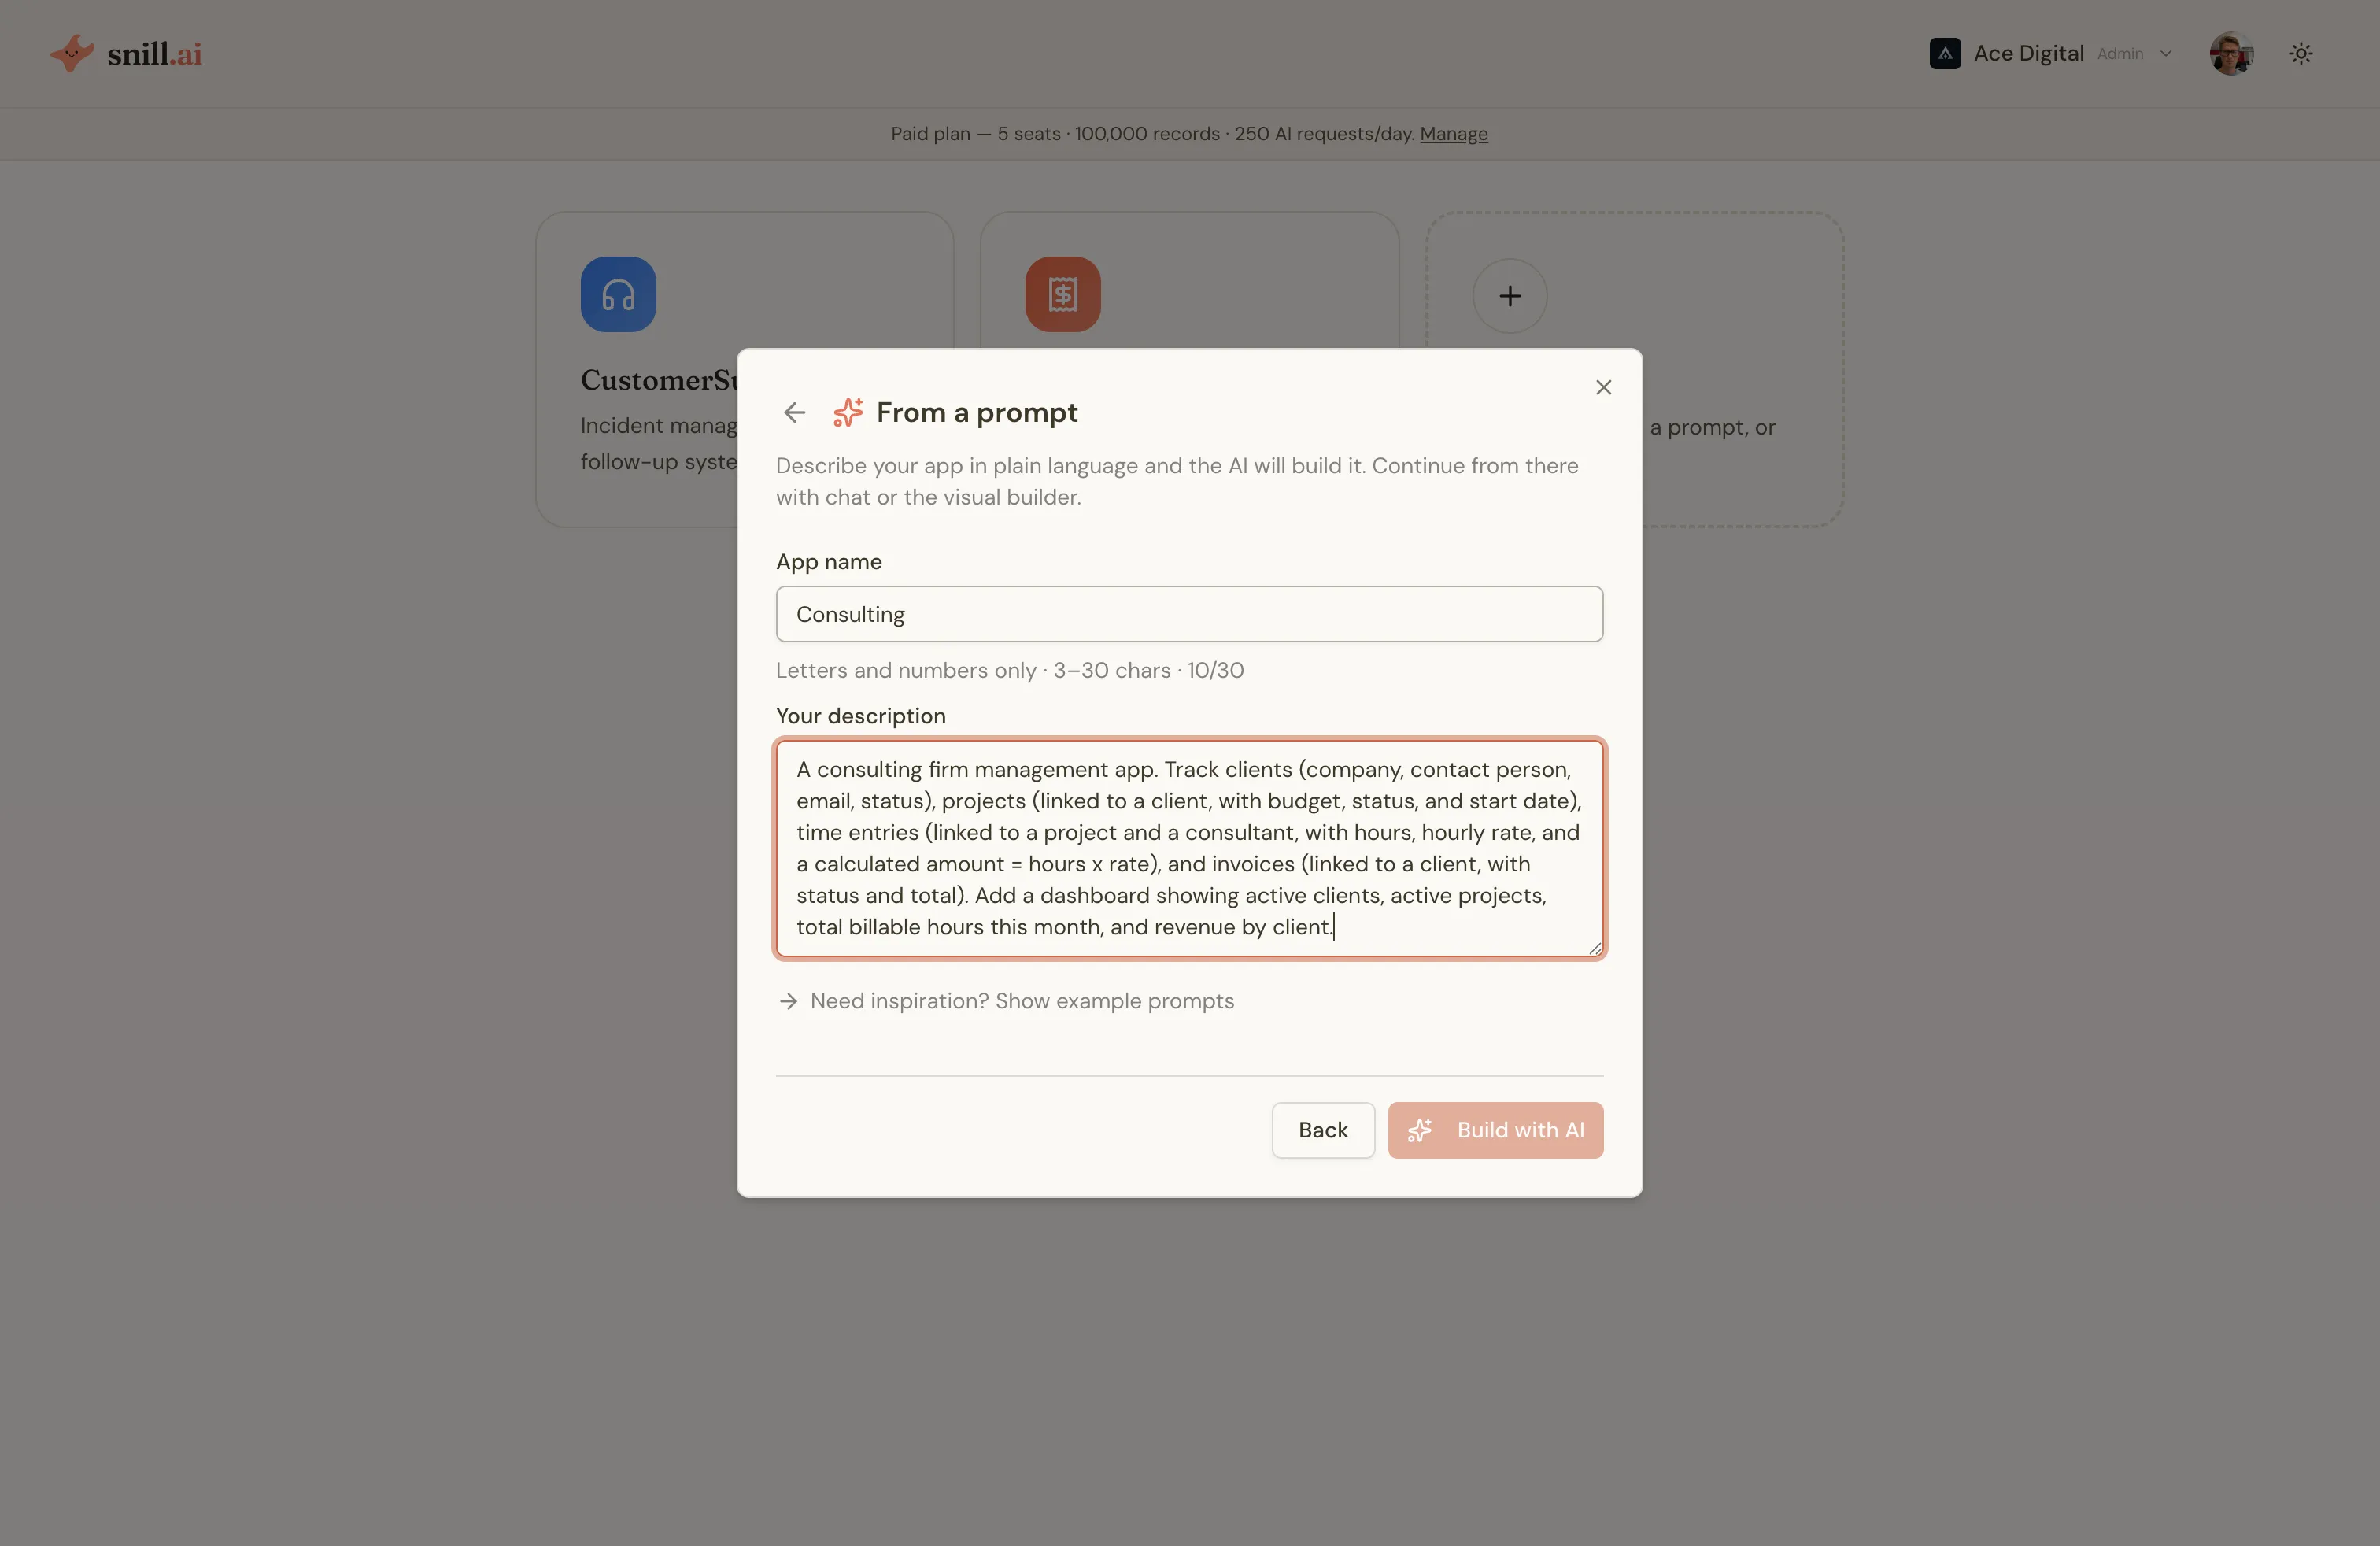
When you sign in to snill.ai, you’ll see a text field where you describe what you need. Be as specific or as vague as you like — the AI handles the details.
What to write
Section titled “What to write”Describe your business domain and what you want to track. Good prompts include the types of things you manage and how they relate to each other:
- “I run a property management company. I need to track properties, tenants, leases, and maintenance requests.”
- “We’re a recruitment agency. Track candidates, job openings, interviews, and placements.”
- “Personal CRM for my consulting business — clients, projects, invoices, and time tracking.”
What you get
Section titled “What you get”The AI generates a complete app with:
- Collections — one for each type of thing you mentioned (e.g. properties, tenants)
- Fields — appropriate fields for each collection with the right types and formats
- Relationships — connections between collections (e.g. a tenant belongs to a property)
- A dashboard — summary stats and charts based on your data
- Navigation — a sidebar with links to each collection and the dashboard
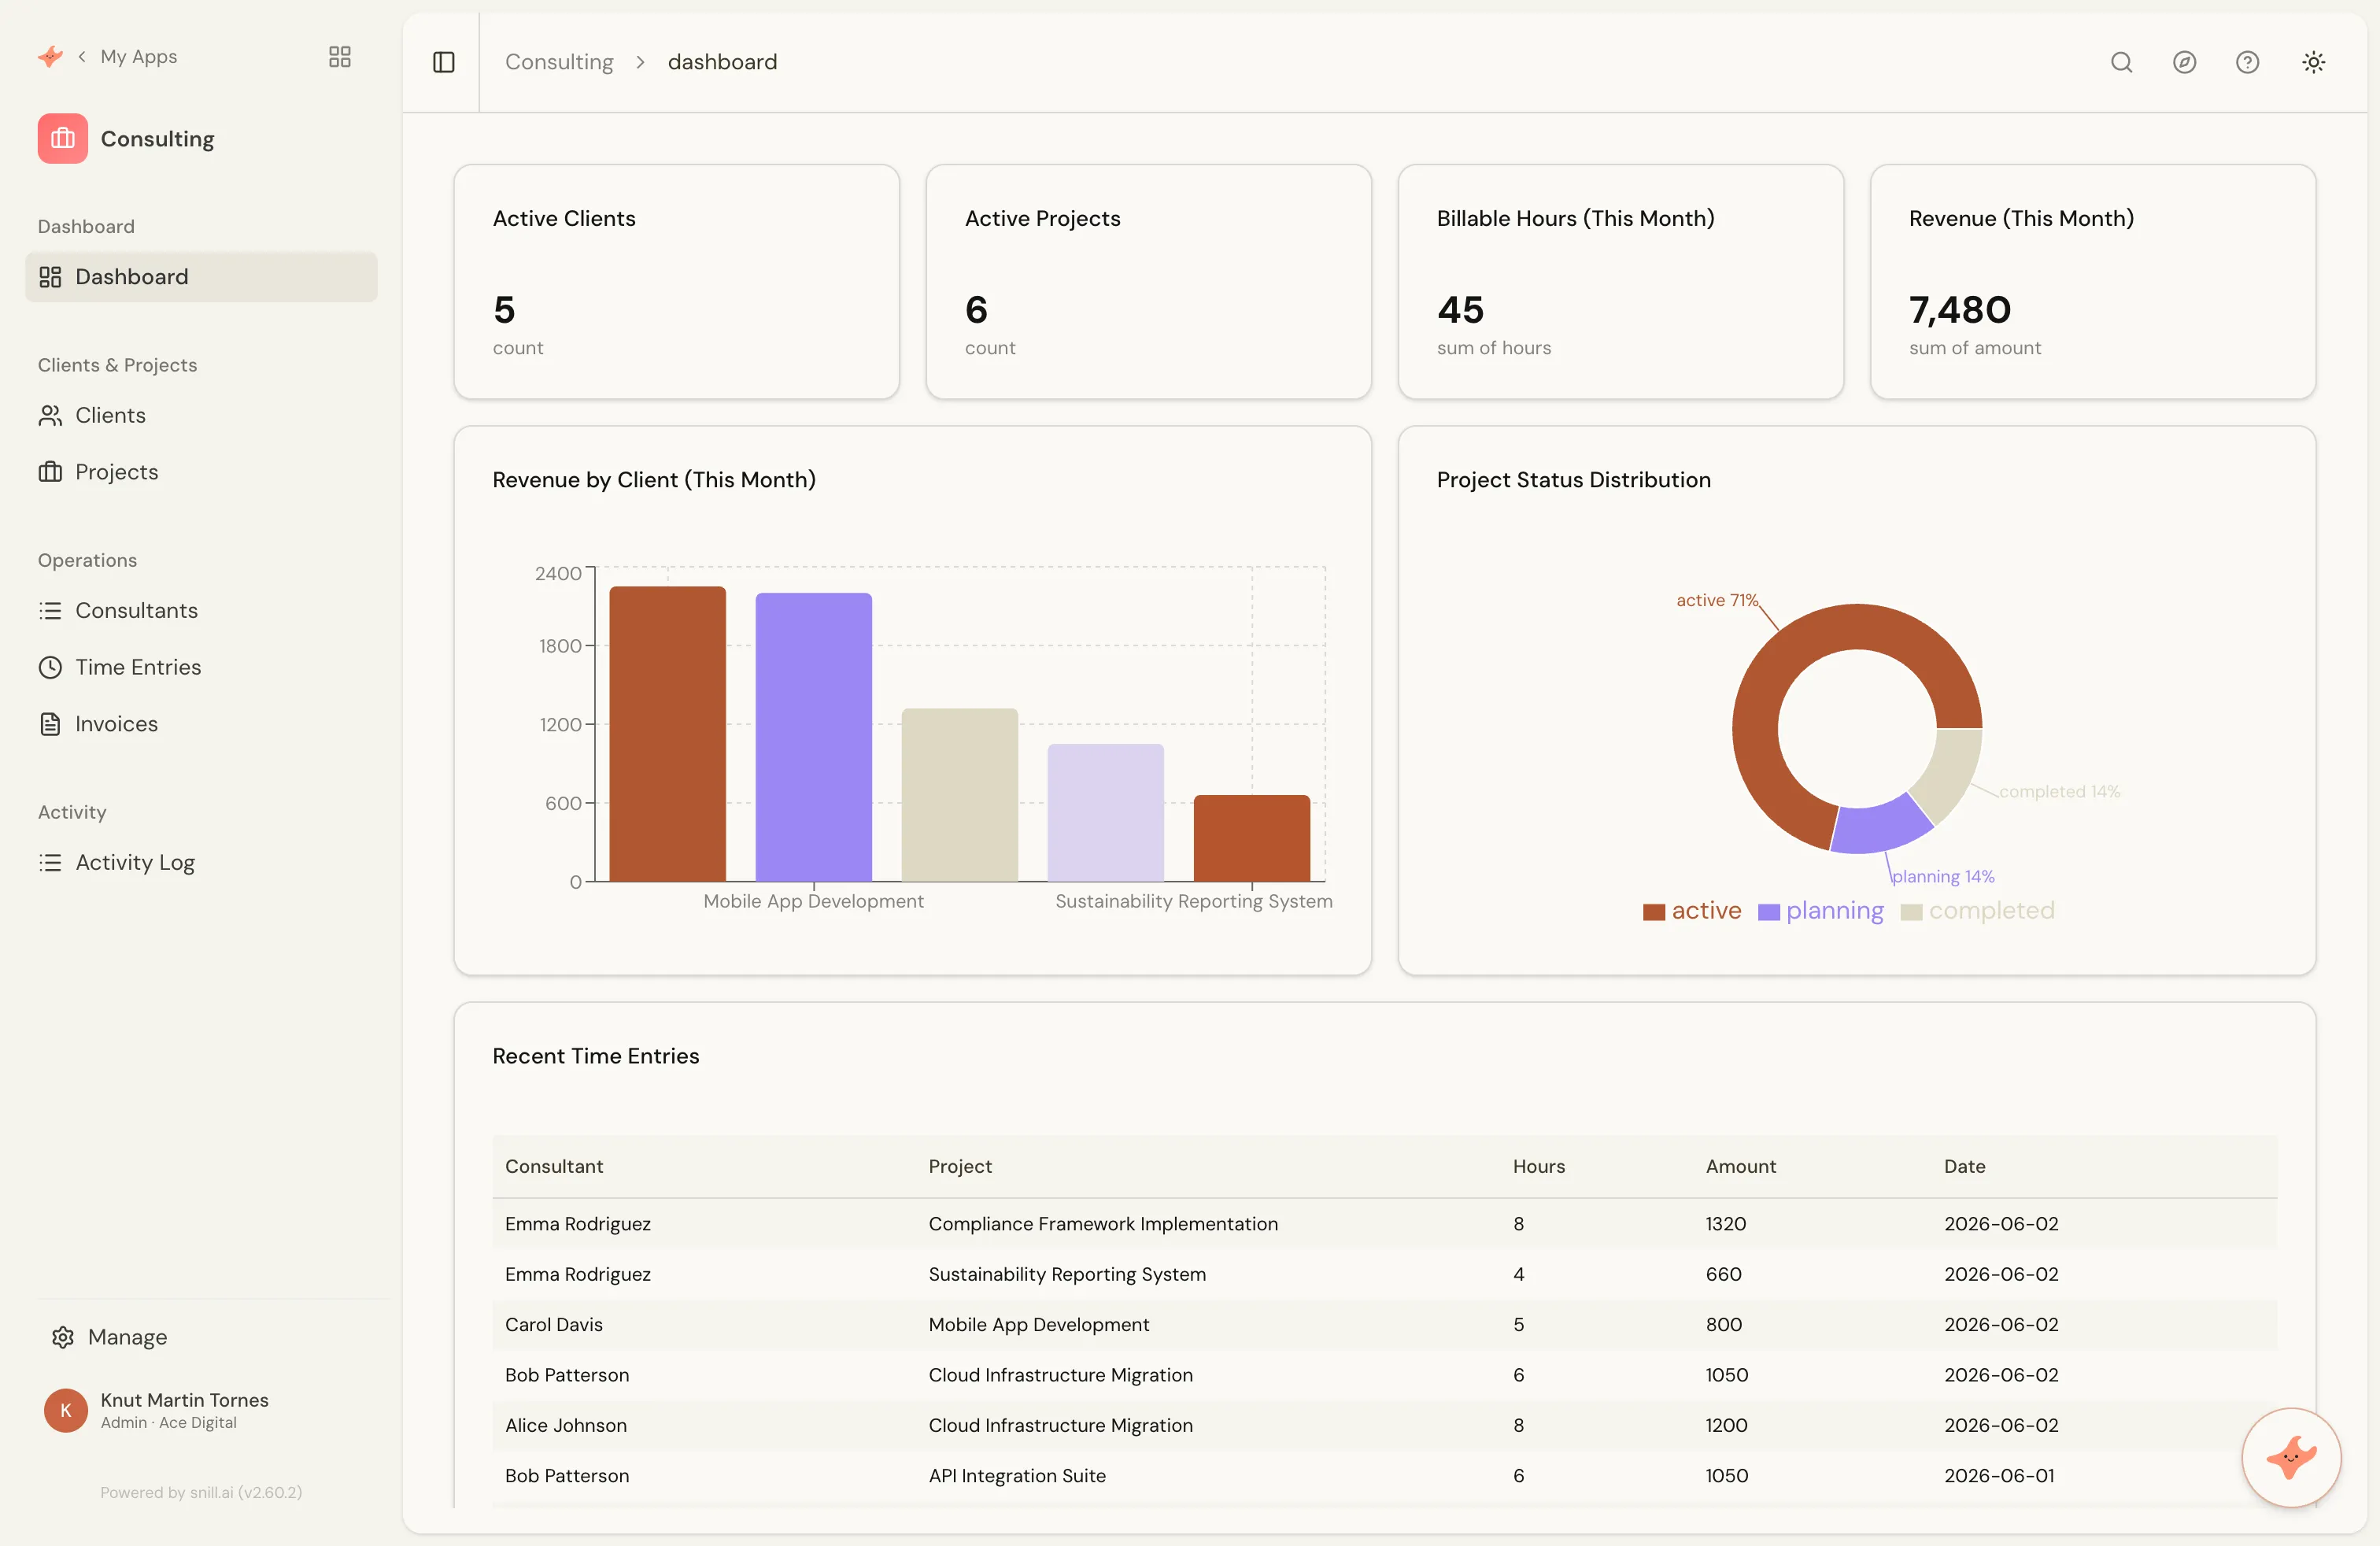
Everything is editable. You can rename fields, add new collections, change the dashboard — either through the AI chat or the visual Appmodel Editor.
Collections
Section titled “Collections”The building blocks of your app — each one holds a type of data.
A collection is like a database table or a spreadsheet tab. It holds records of the same type — for example, a “Customers” collection holds customer records, and an “Invoices” collection holds invoices.
Each collection has:
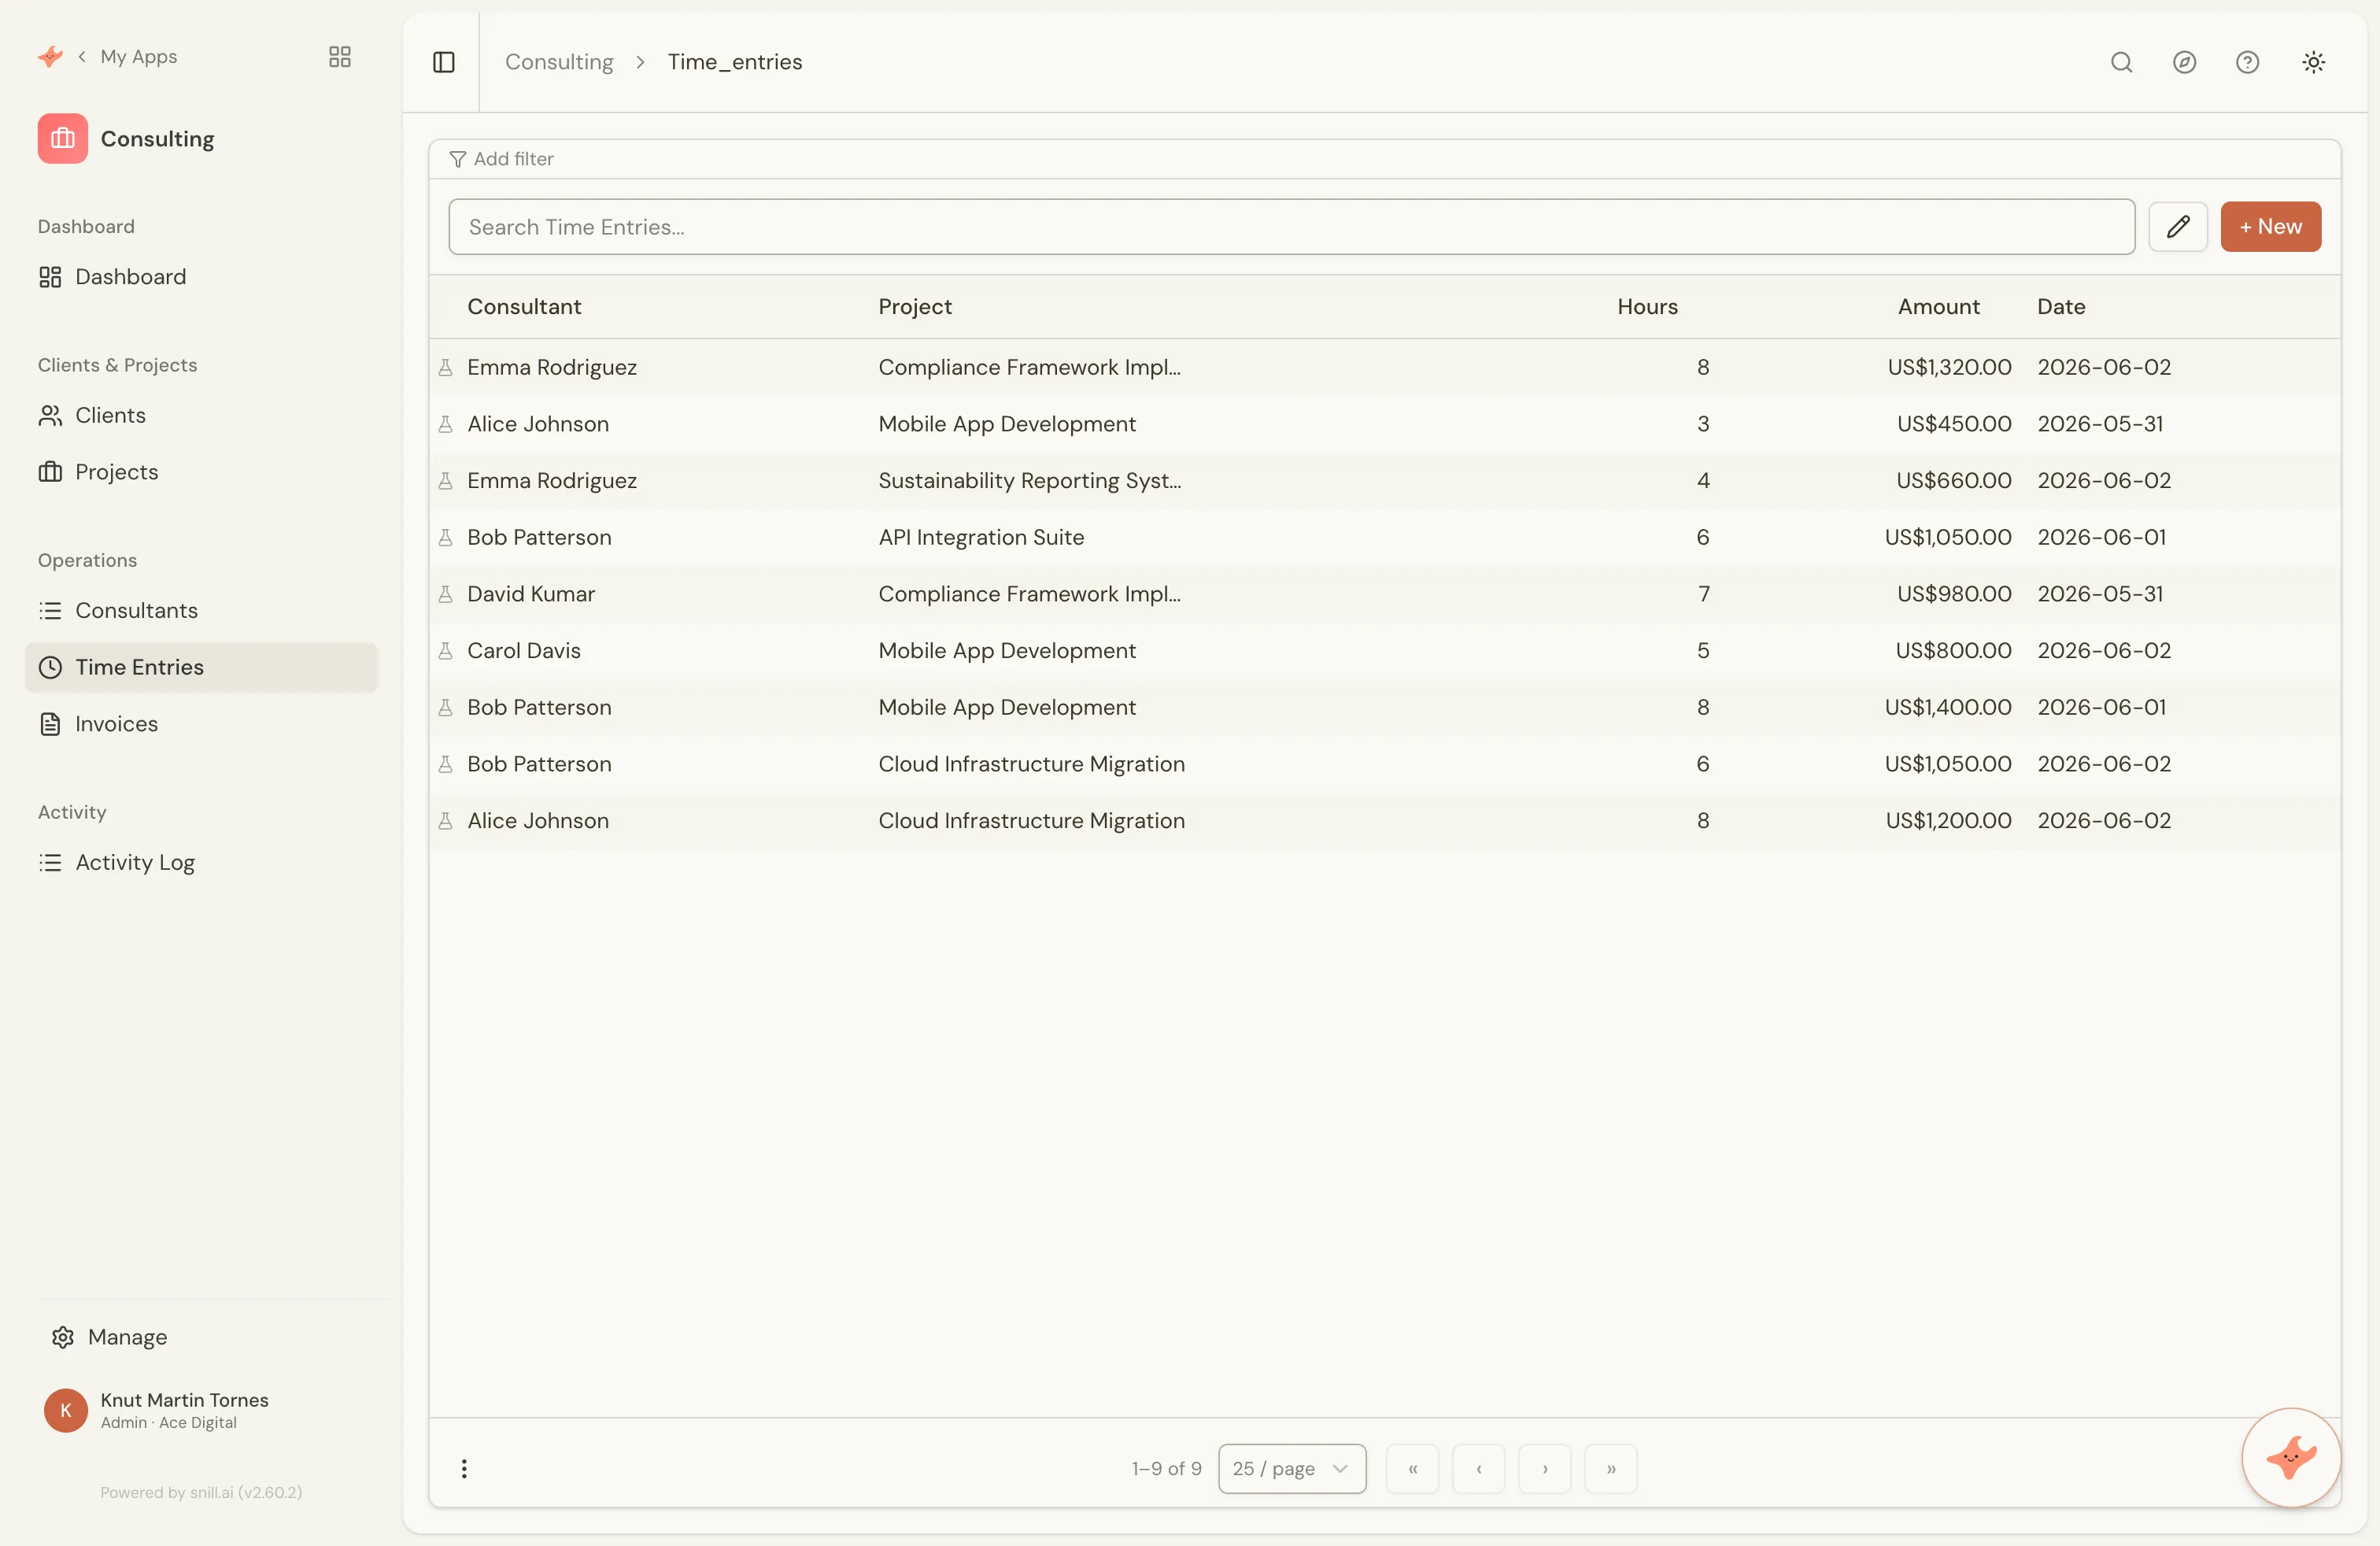
- A list view — a table showing all records with searchable, sortable columns
- A detail view — a form for viewing and editing a single record
- Fields — the properties each record has (name, email, amount, date, etc.)
You control which fields appear as columns in the list view, which fields are searchable, and how records are sorted by default. Each collection also has a singular label (e.g. “Customer” for the “Customers” collection) used in buttons and form titles like “Add Customer”.
Board (Kanban) view
Section titled “Board (Kanban) view”Any collection with a single-choice field — a status, stage, or priority — can also be shown as a drag-and-drop board. Each option becomes a column (in the order you defined them, with an “Uncategorized” column for records that don’t have a value yet), and every record is a card you can drag between columns. Users switch between Table and Board with a toggle above the list.
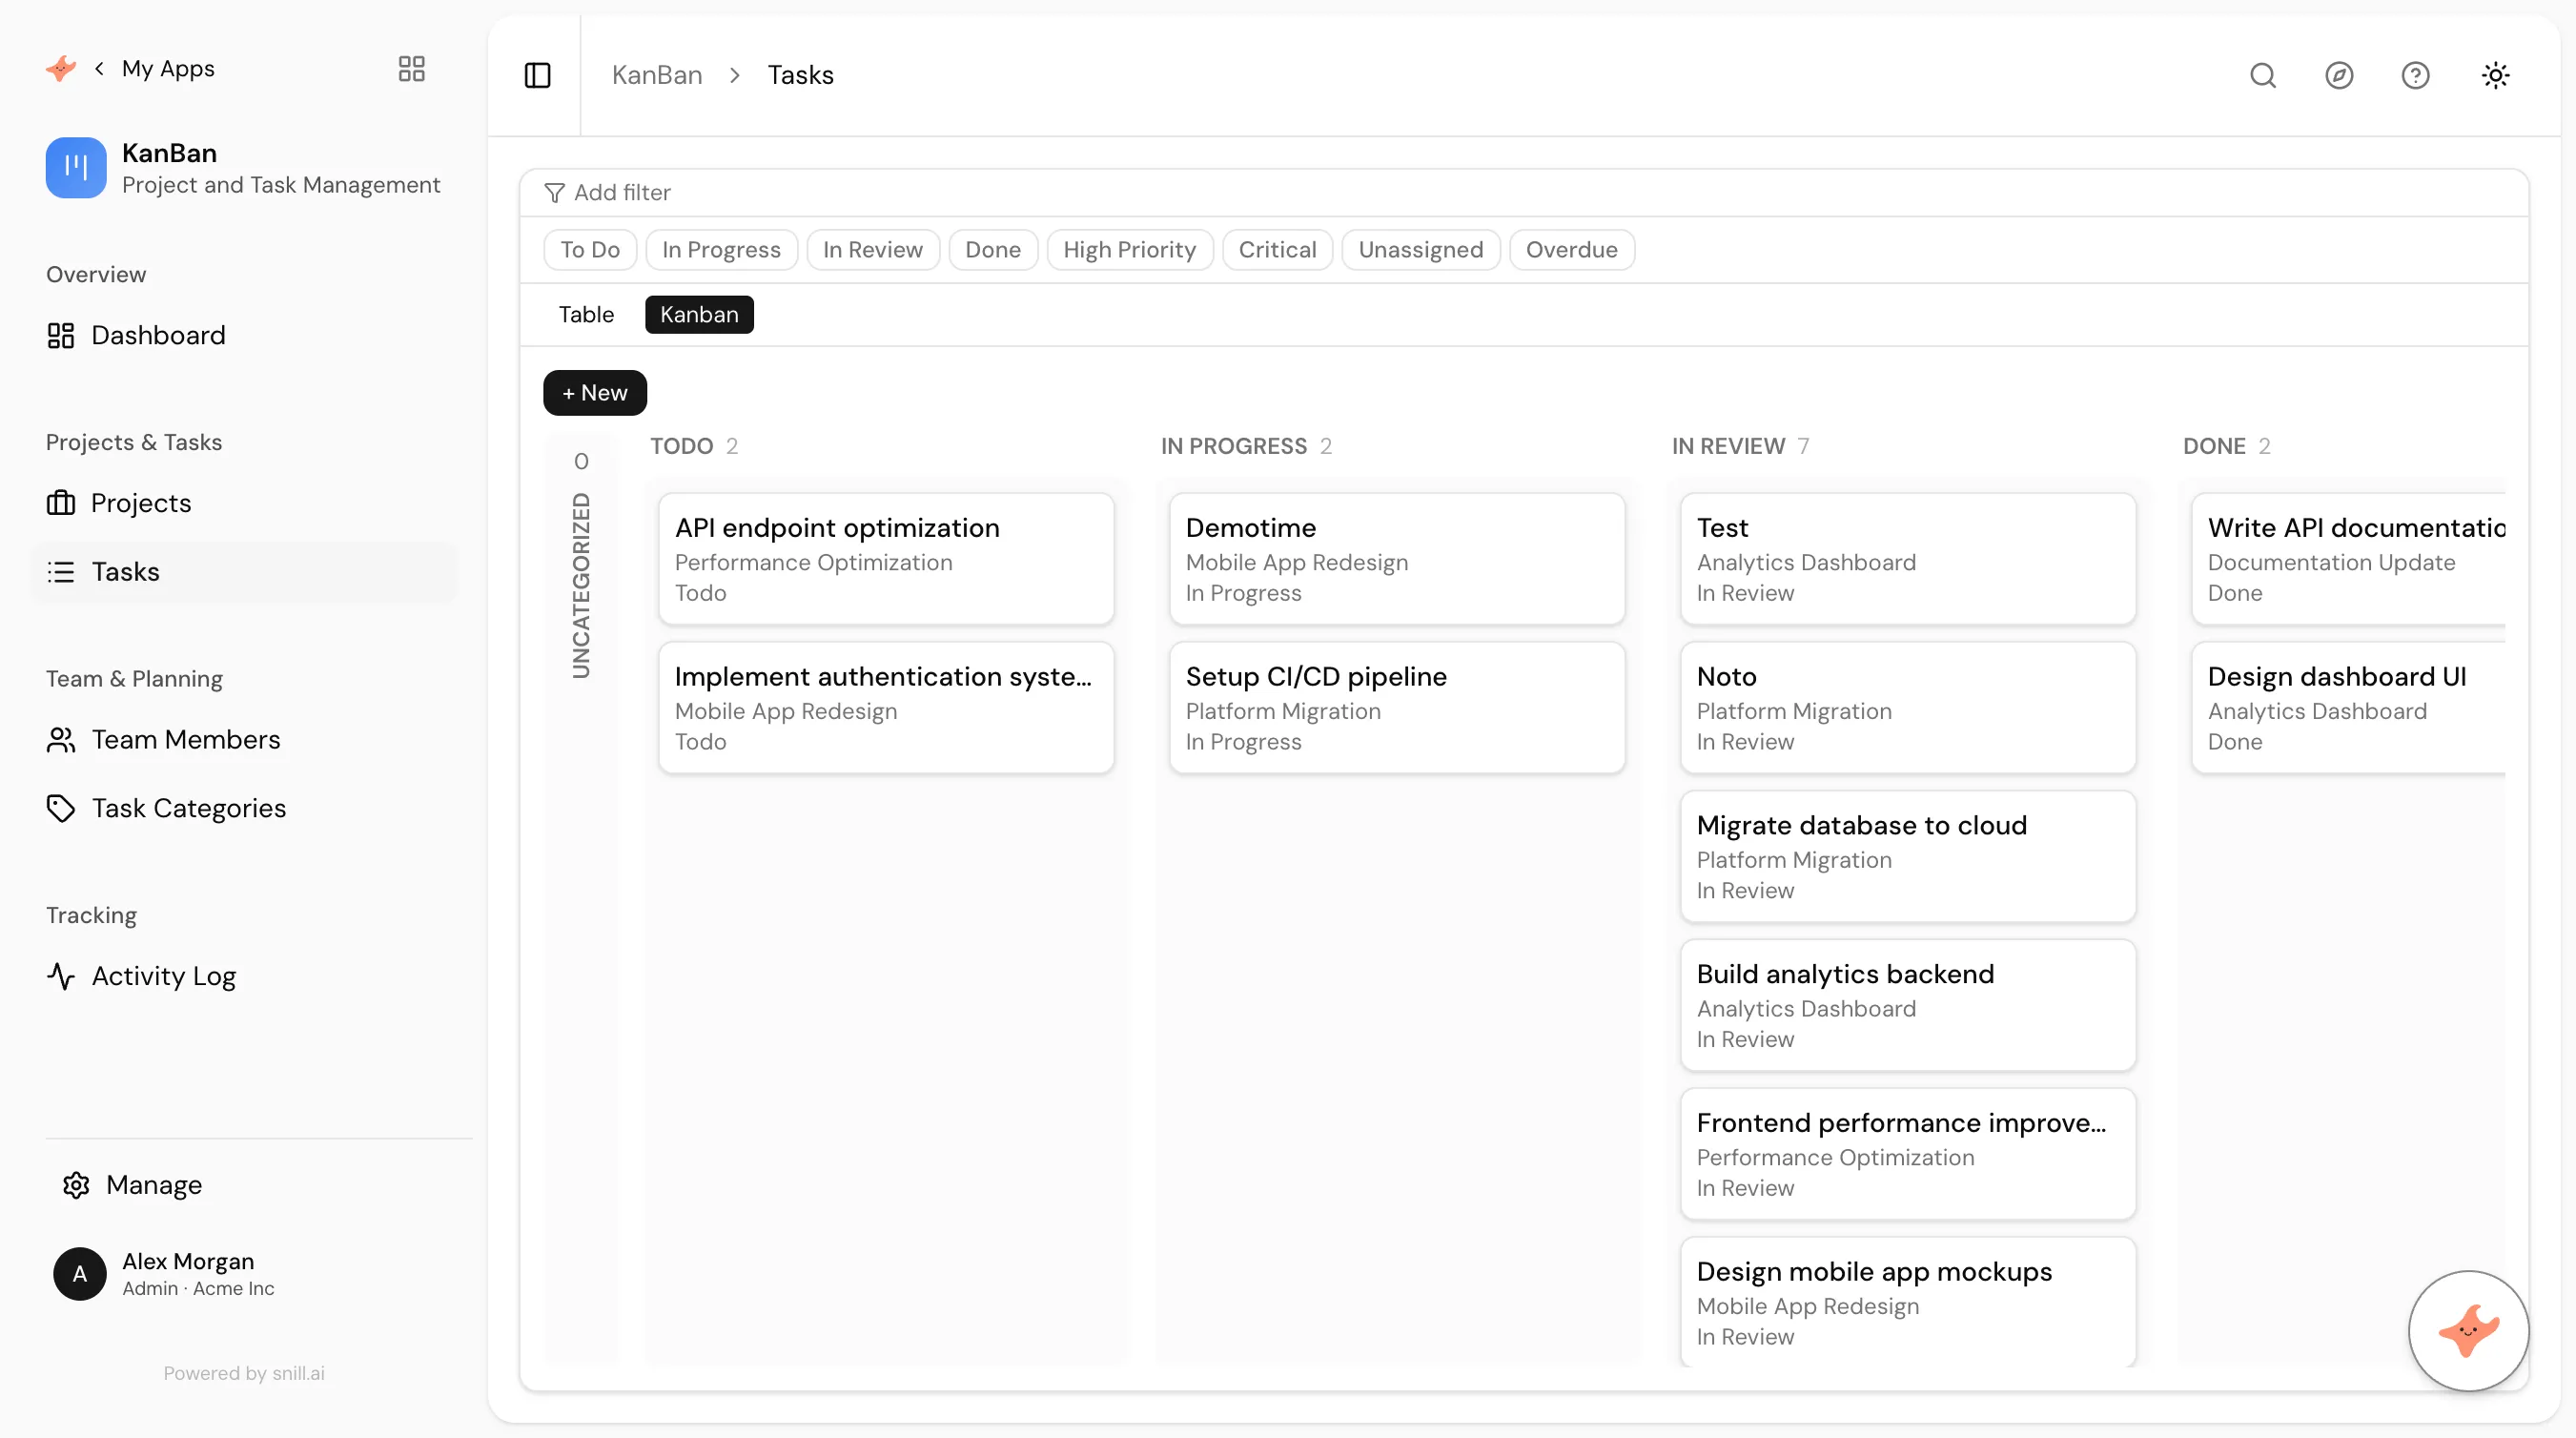
- Dragging a card to another column updates that record’s field — so moving a task from “To do” to “Done” just sets its status. If the field is part of a workflow, only allowed moves are accepted; an invalid drag snaps back.
- Reordering cards within a column sticks — the board remembers the order you arrange them in.
- Each card shows the collection’s list fields, and a + New button on the board opens the create form.
Customizing the cards
Section titled “Customizing the cards”By default a card shows its first few list fields, but you can shape exactly what each card displays: a title and subtitle, color-coded badges (a status or priority pill, colored by conditional formatting), extra labeled fields, and an avatar (initials for the assigned person). Boolean fields show as a small colored dot so a glanceable “paid / overdue” reads at card size, and a card can take on a subtle background tint driven by one of its fields. Describe what you want (“put the assignee and due date on task cards”) or arrange it in the Appmodel Editor.
Turn the board on by asking the AI (“show tasks as a board by status”) or in the Appmodel Editor — you just pick which single-choice field drives the columns.
Tip
Collection names are used in URLs and the API, so the AI picks short, descriptive names like customers, invoices, or time_entries.
Fields
Section titled “Fields”Define what each record contains — from text and numbers to dates and files.
Every collection has a set of fields that define the shape of its records. Each field has a type, a display label, and optional formatting.
Field types
Section titled “Field types”| Type | Description | Example |
|---|---|---|
| Text | Short or long text, email, URL | Name, description, website |
| Rich text | Formatted long text written in a WYSIWYG editor, stored as Markdown | Notes, briefs, case write-ups |
| Number | Decimal or whole number, with optional currency or percent format | Price, quantity, tax rate |
| Boolean | True/false checkbox | Active, paid, approved |
| Date / Time | Date, date-time, or time-only (HH:mm) | Due date, created at, shift start |
| Dropdown | Pick one from a fixed set of options | Status: draft, active, archived |
| Multi-select | Pick several from a set — shown as color-coded badges | Tags, skills, categories |
| Image / File | Upload an image or document | Photo, contract PDF |
| Lookup | A reference to a record in another collection | Customer on an invoice |
Special field behaviors
Section titled “Special field behaviors”- Default values — fields can pre-fill with today’s date, the current user, or a fixed value when creating a new record
- Unique — enforce that no two records have the same value (e.g. invoice numbers)
- Auto-generated — automatically create values like sequential IDs (
INV-001,INV-002) or unique identifiers - Hidden — keep a field in the data but hide it from forms (useful for system fields)
- Required — mark fields that must be filled in before saving
- Write-once — lock a field after the record is first saved. Useful for lookup fields like “Project” or “Customer” that shouldn’t change after creation.
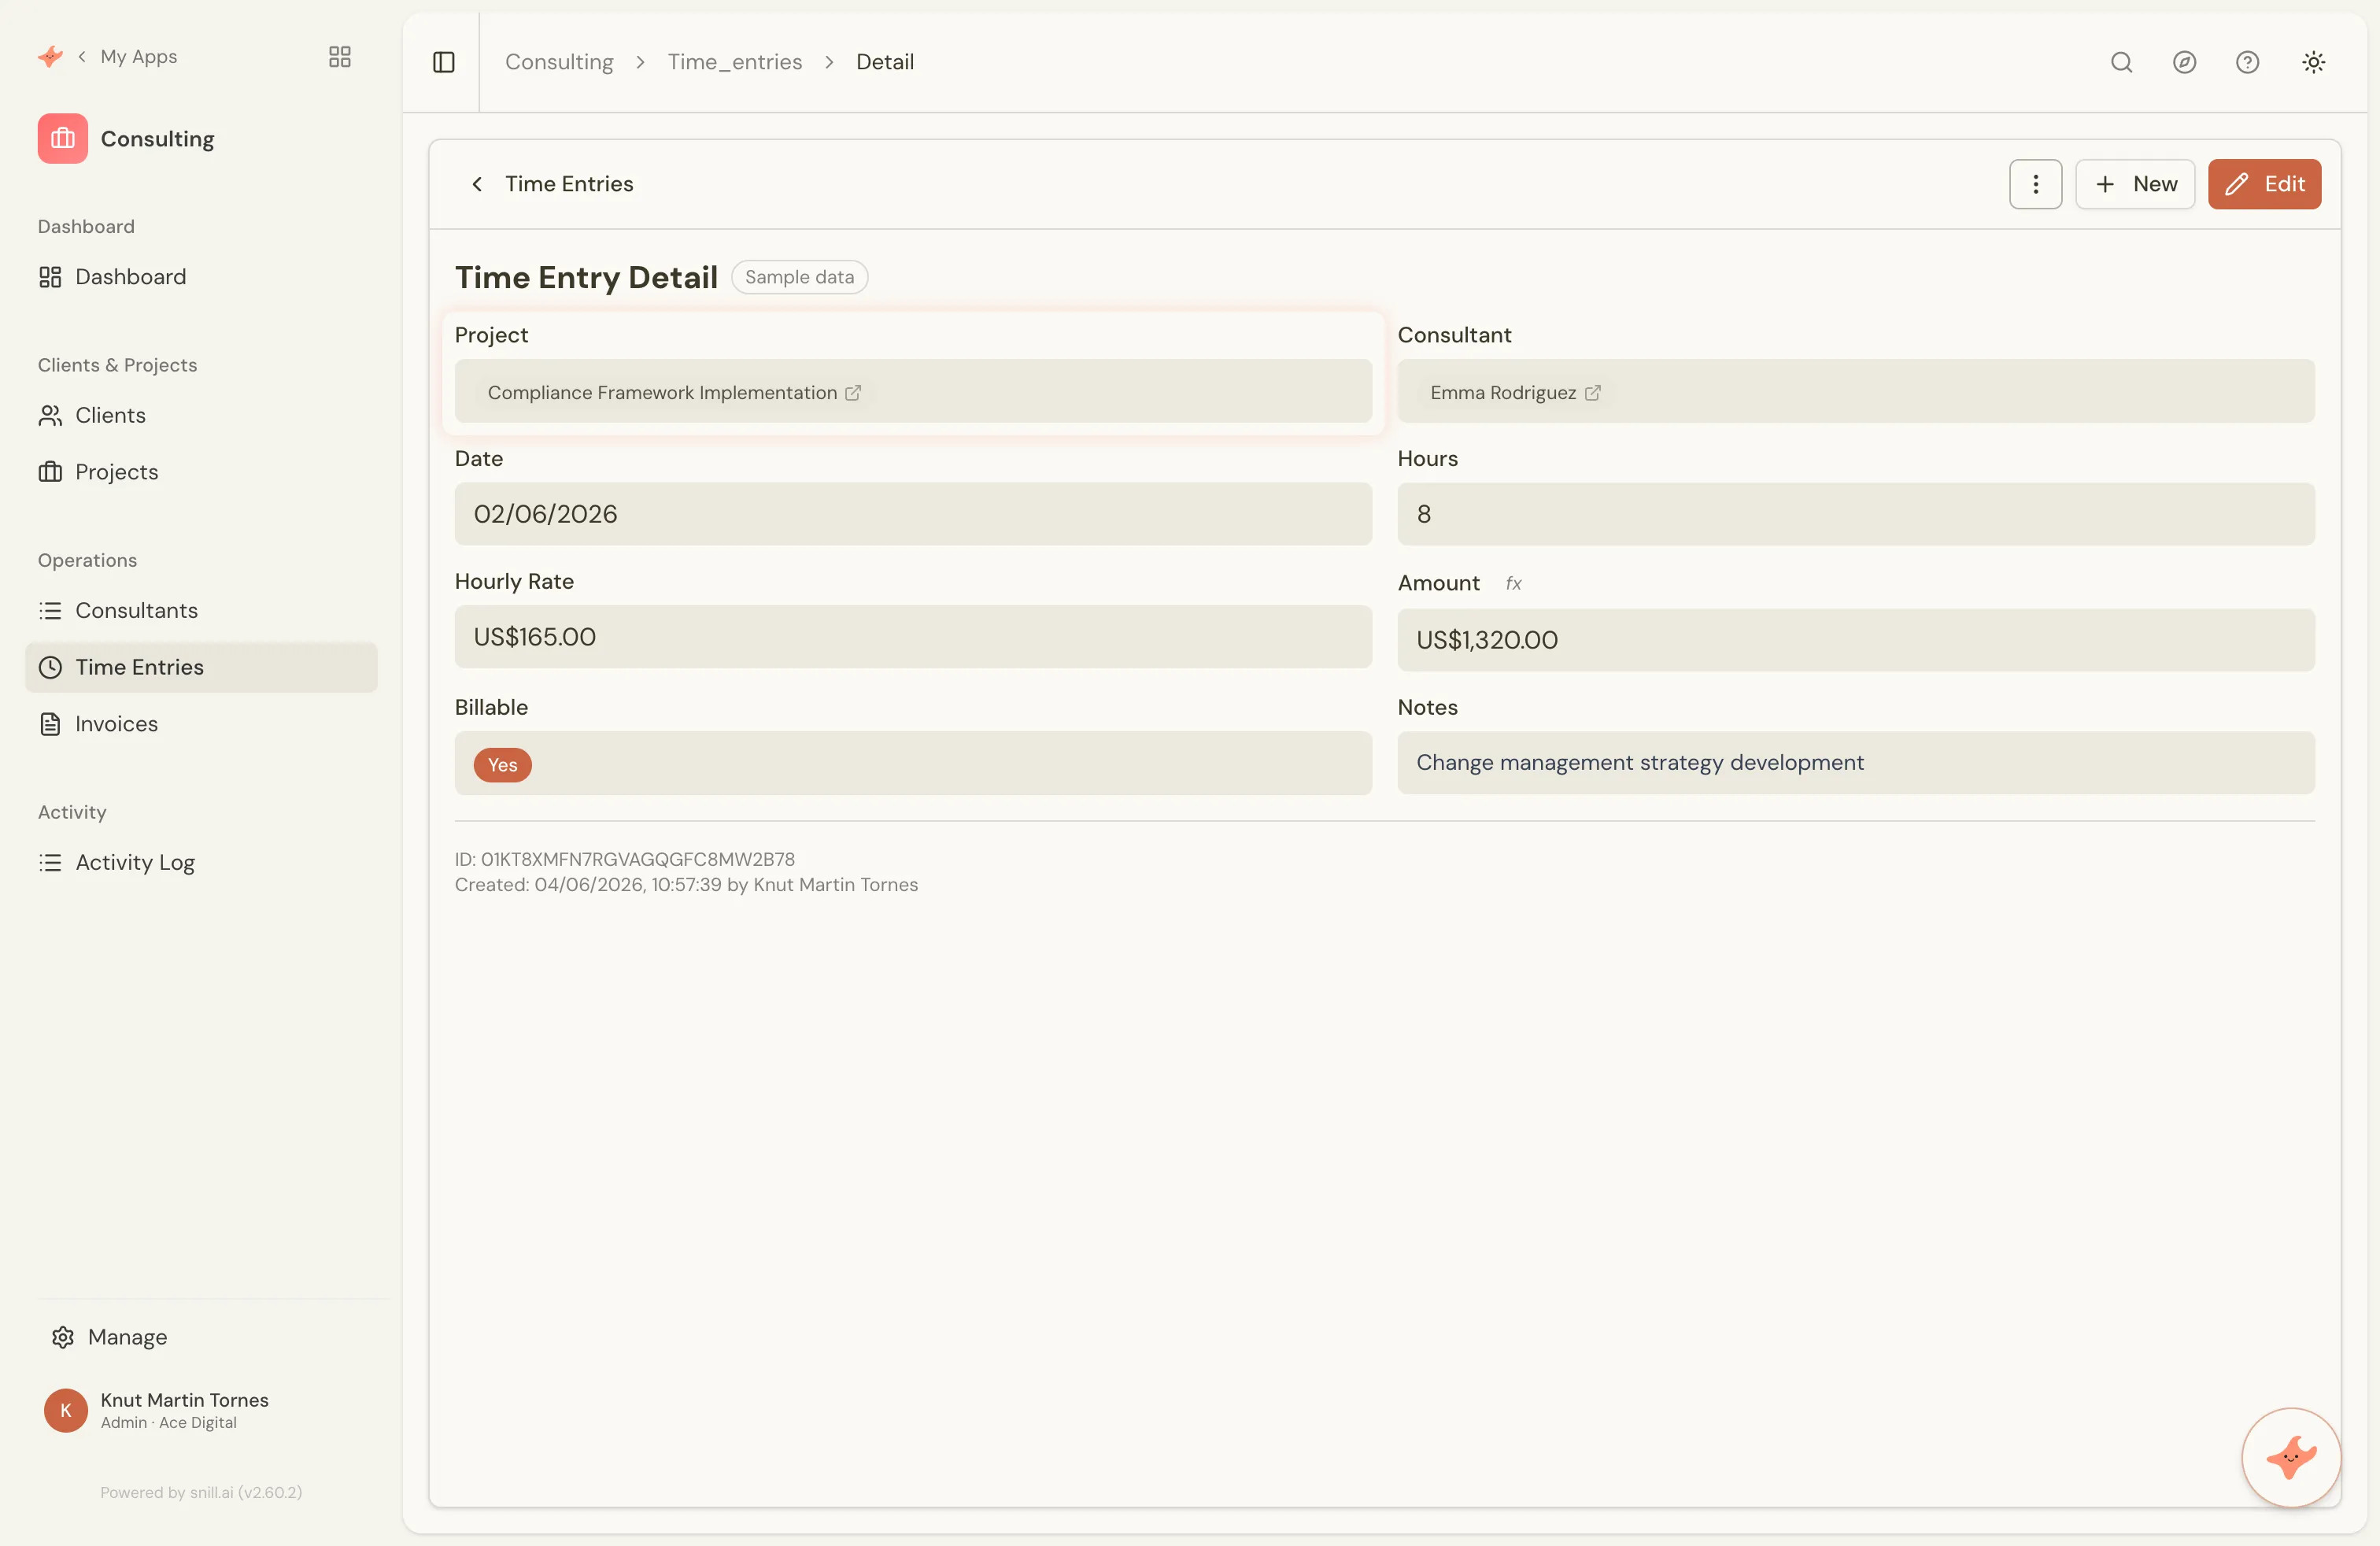
Amount (the fx marker).Rich-text (Markdown) fields
Section titled “Rich-text (Markdown) fields”Some content needs more than a plain line of text — meeting notes, a project brief, a case write-up. A rich-text field gives you a familiar WYSIWYG editor with headings, bold and italic, lists, links, and inline images, right inside the record form.
Behind the scenes it’s stored as plain Markdown, so your content stays portable and readable. That also means it travels cleanly over the REST API: a rich-text field reads and writes as an ordinary Markdown string, and templates can render it to HTML with {{md}}.
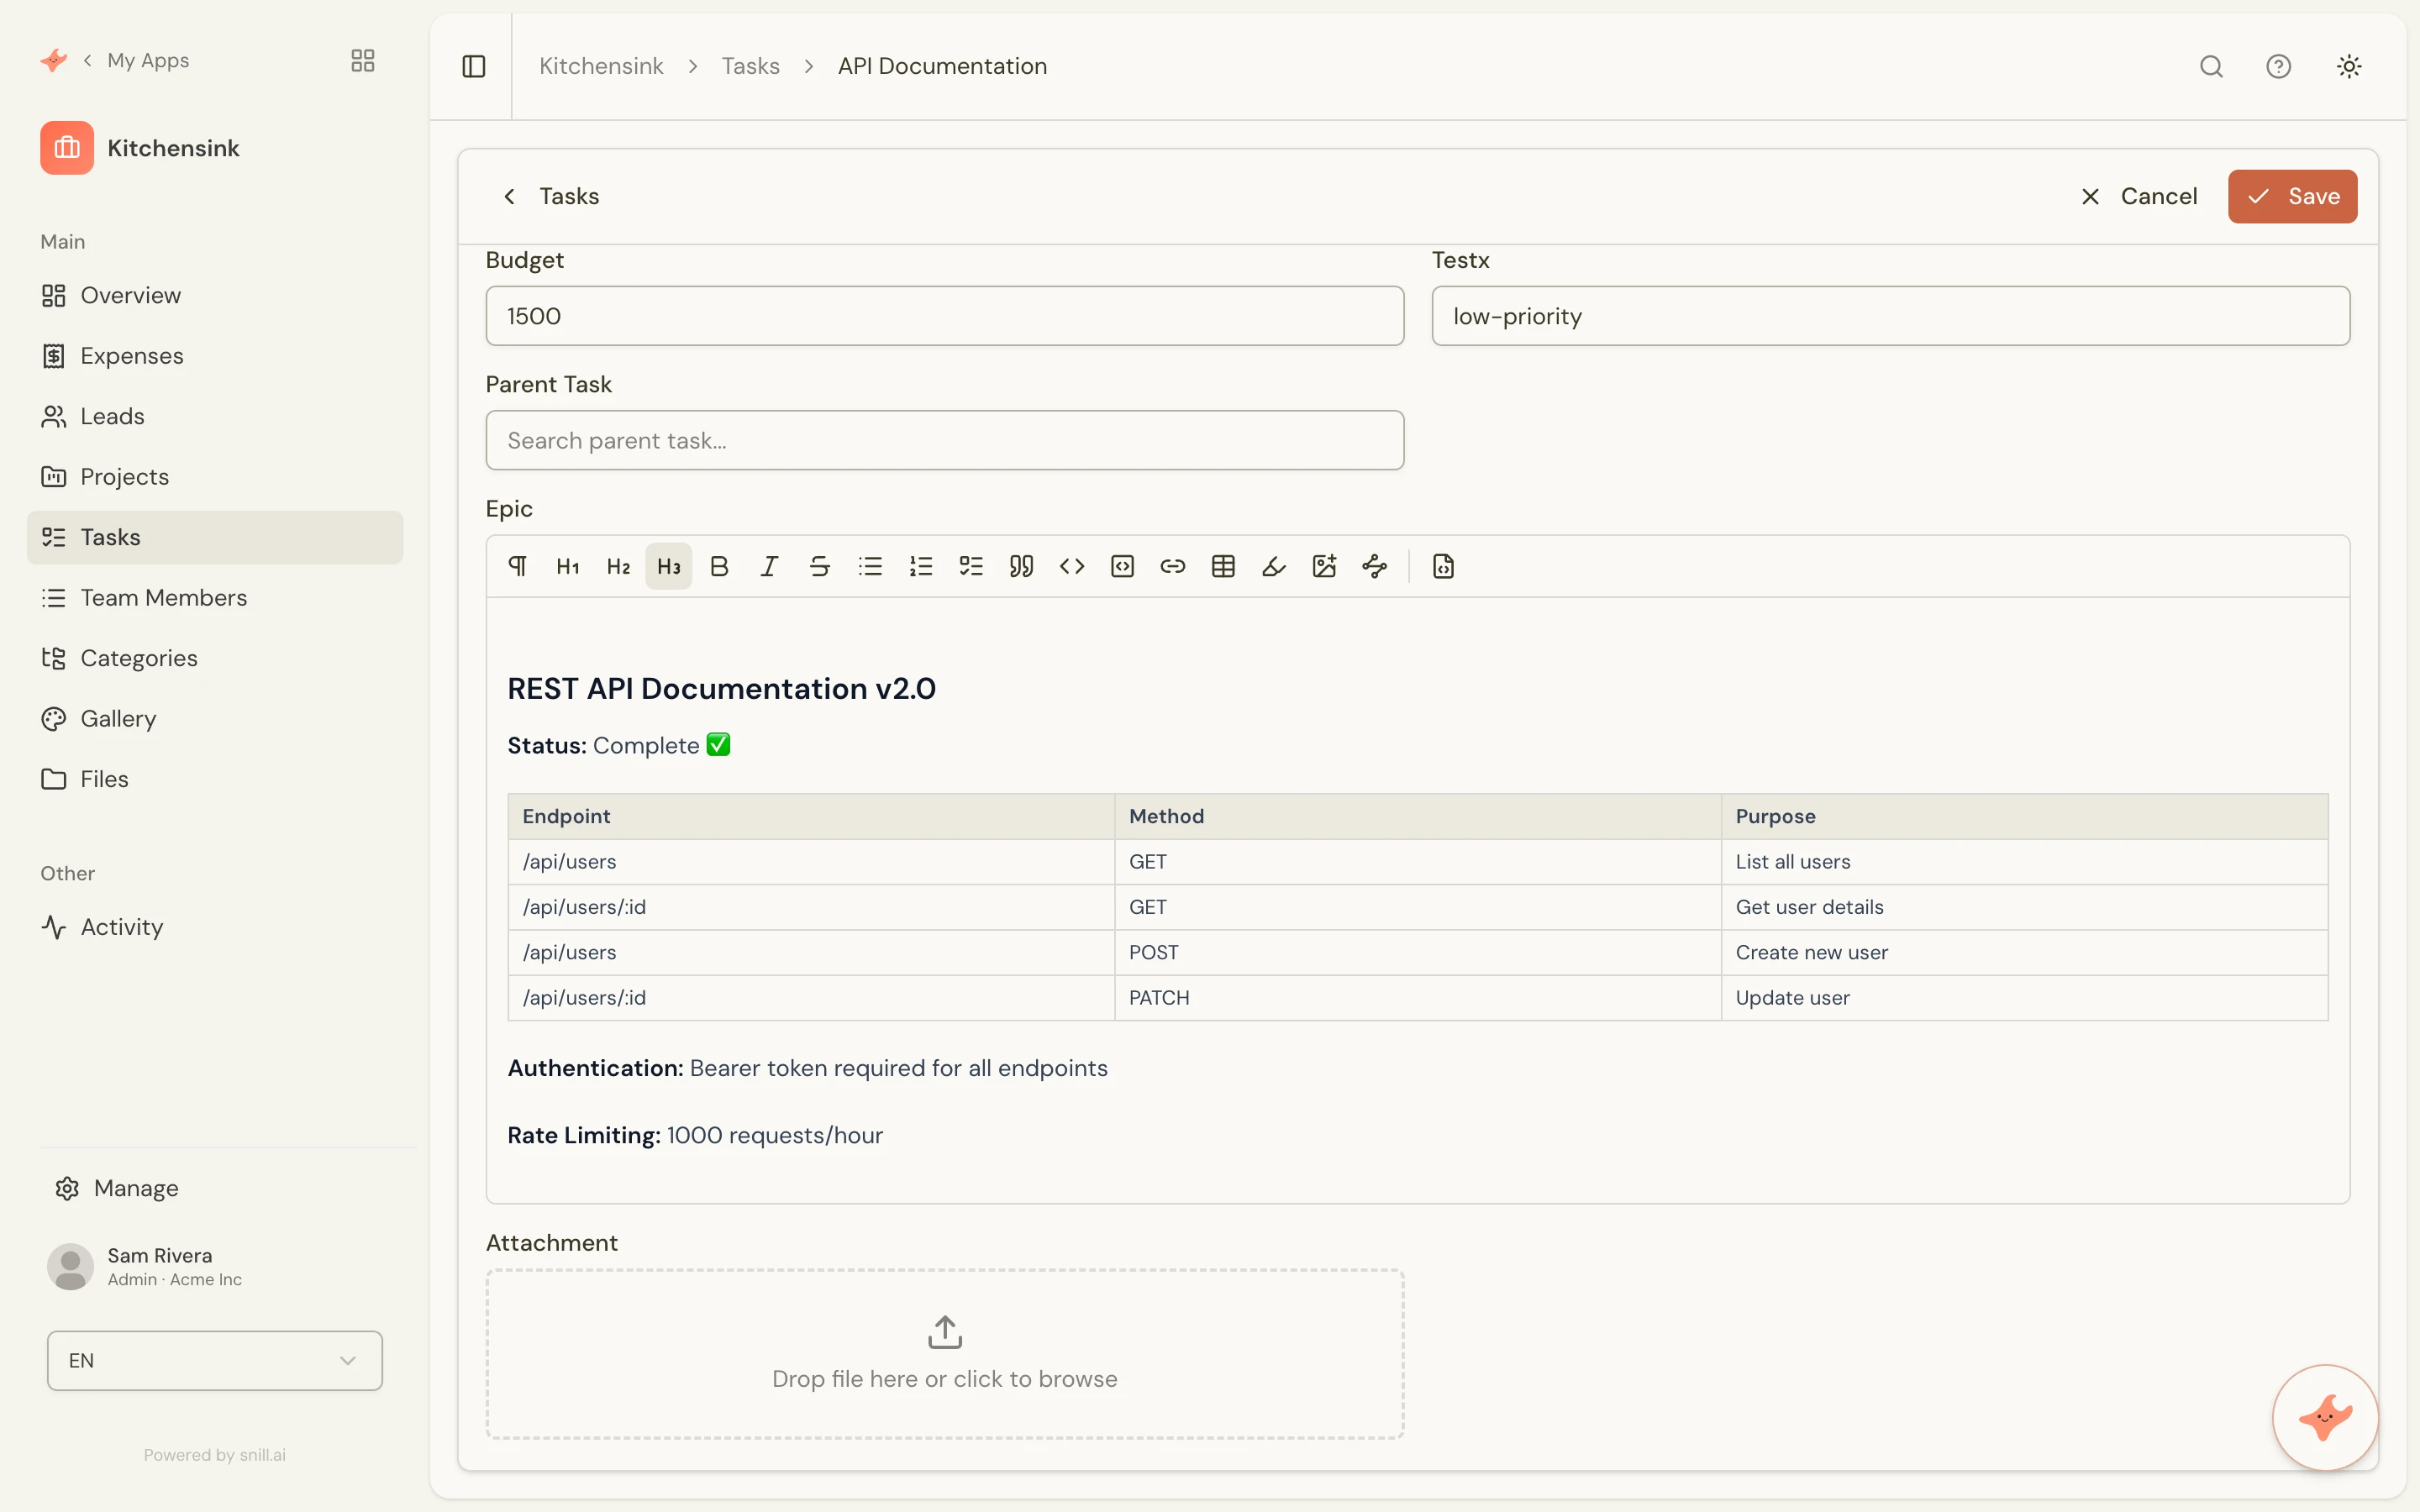
Turn a field into rich text by asking the AI (“make the notes field rich text”) or by setting its format in the Appmodel Editor.
Multi-select fields
Section titled “Multi-select fields”When one value isn’t enough — a contact with several skills, a task with multiple tags — a multi-select field lets a record hold any number of options from a set. The chosen values render as color-coded badges in the list and on the record, and you can edit them inline without opening the form. Their labels translate with the rest of the app’s languages, while the stored values stay stable. You can filter a list to records that have any of several values, so “show everything tagged urgent or blocked” is one click.
Relationships
Section titled “Relationships”Connect your collections so data flows between them naturally.
Most business data is connected — invoices belong to customers, tasks belong to projects, employees work in departments. Snill supports several relationship patterns:
Single lookup
Section titled “Single lookup”The most common type. A field in one collection points to a record in another. For example, an invoice has a customer lookup field that links to the Customers collection. In the form, this renders as a searchable dropdown.
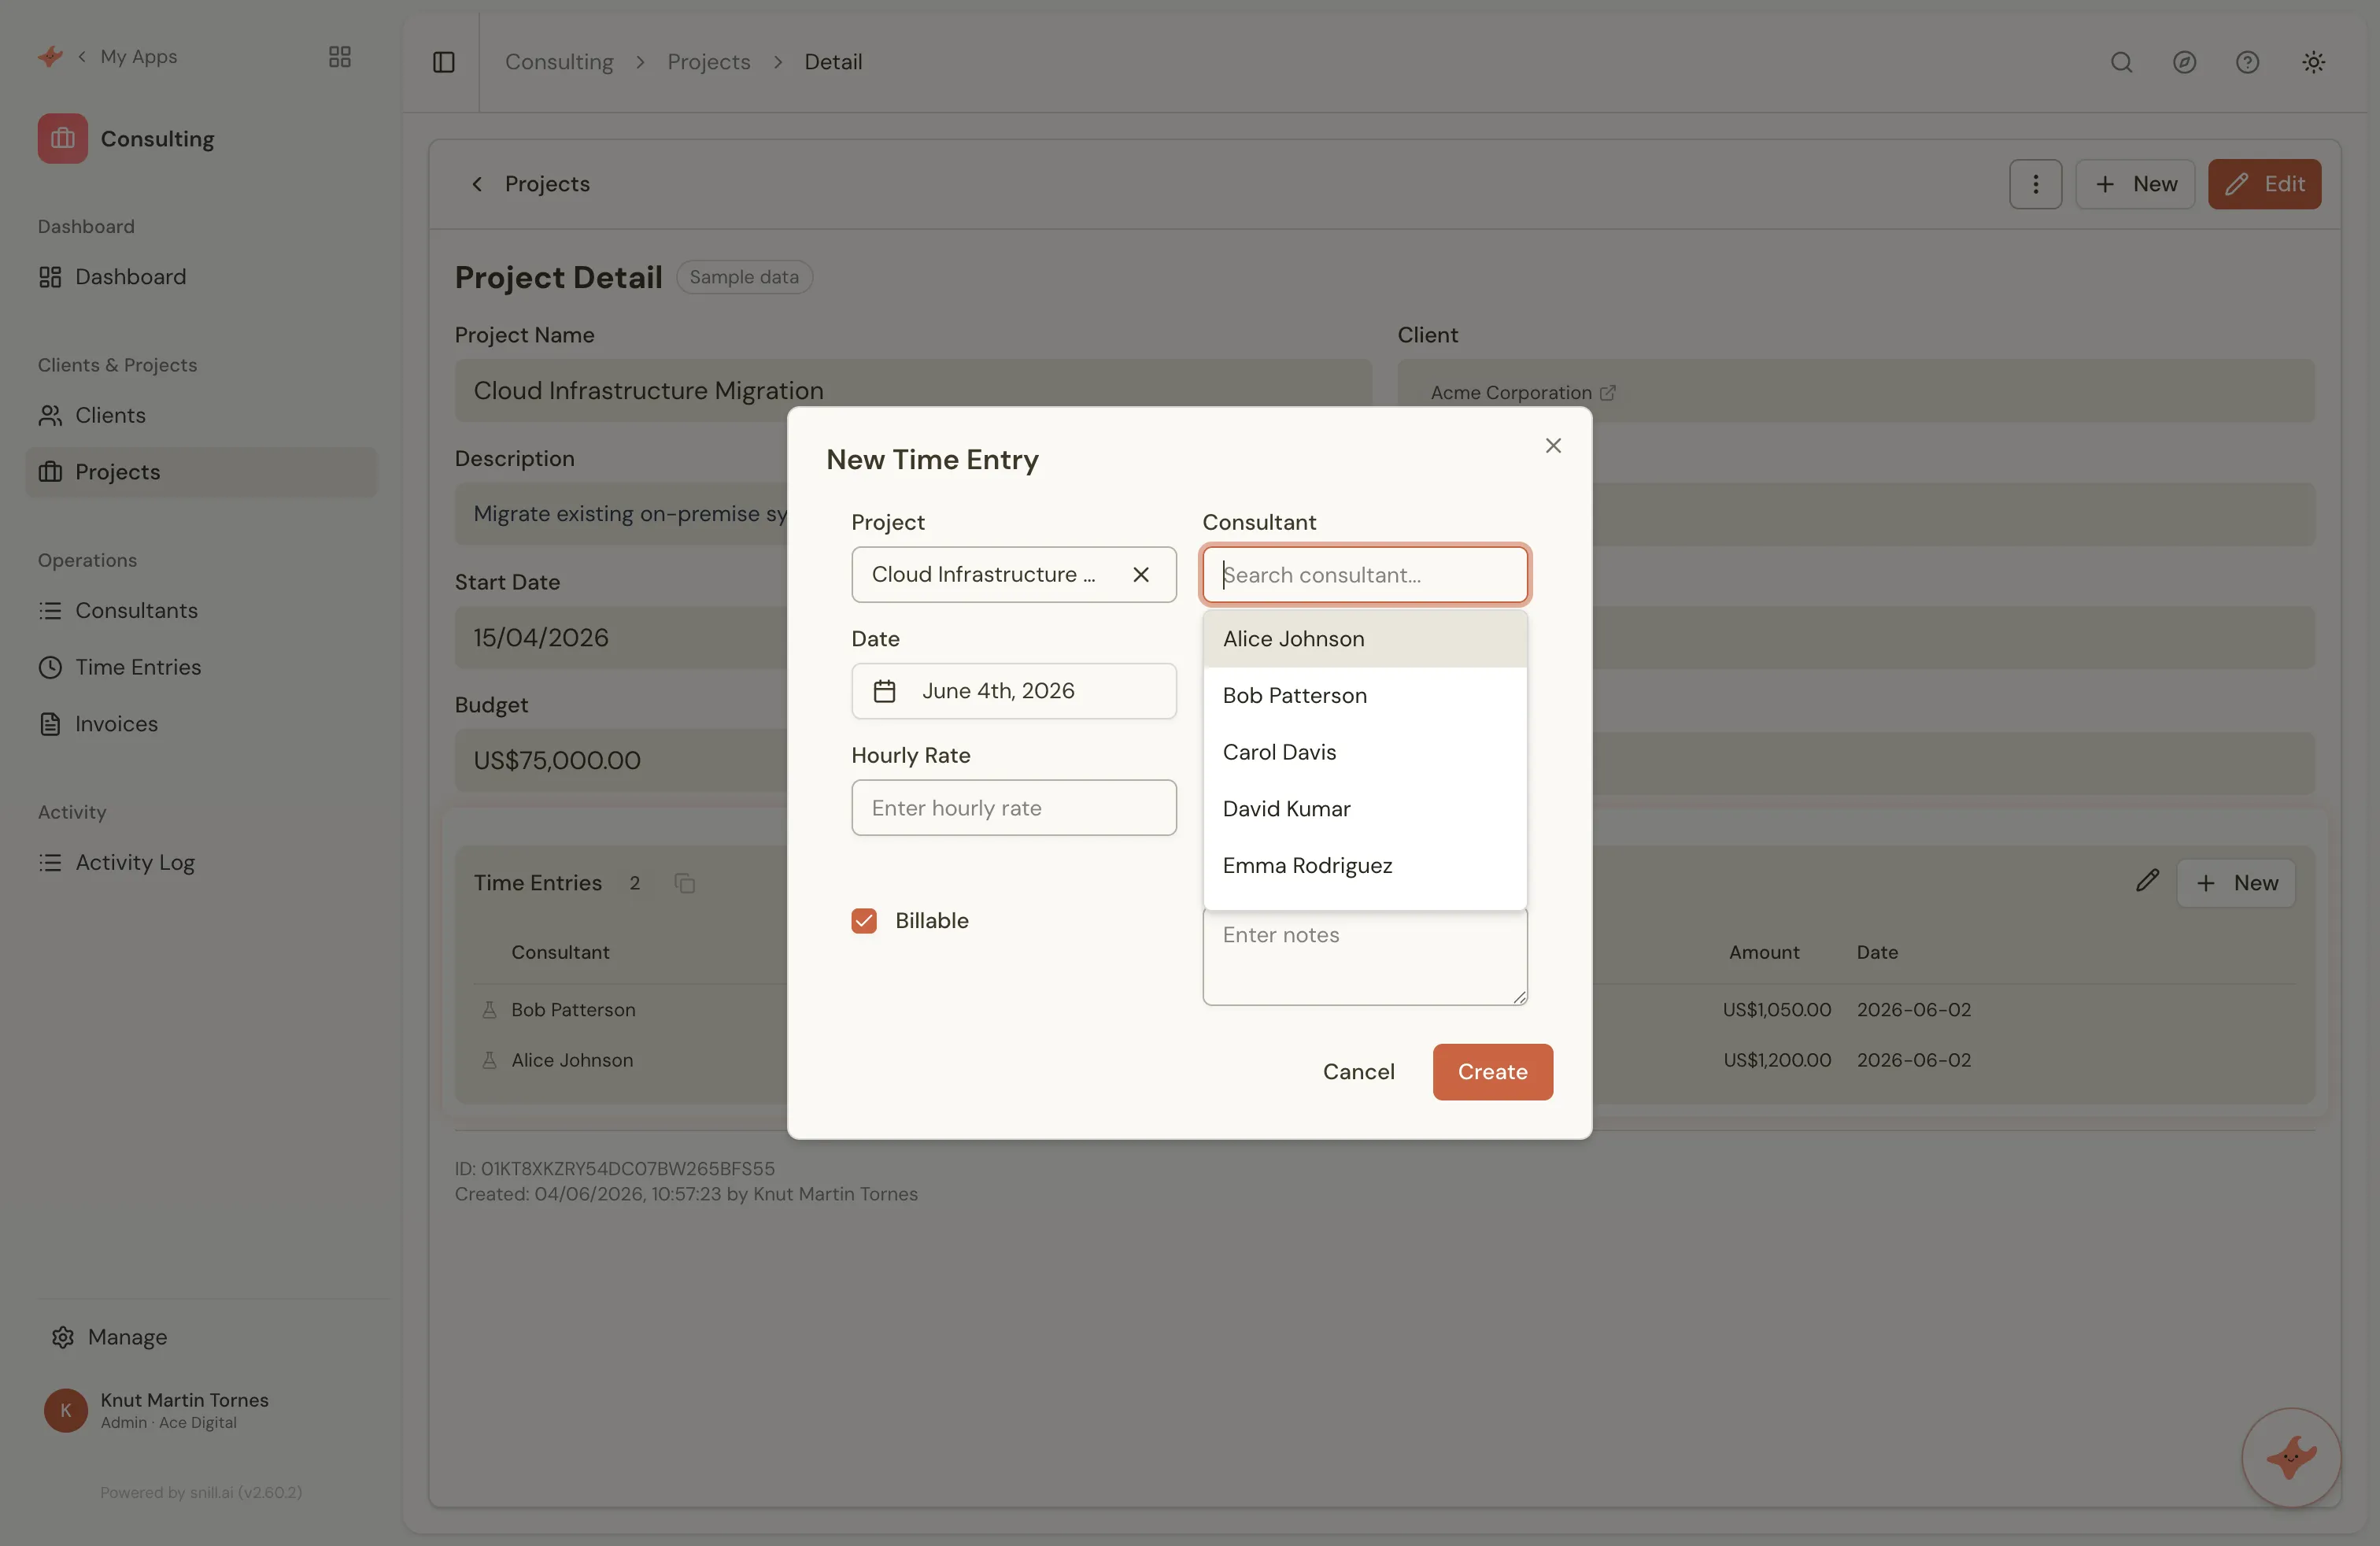
Multi-reference
Section titled “Multi-reference”When a record relates to multiple records in another collection. For example, a project might have several team members, each linking to the Employees collection.
Related collections
Section titled “Related collections”The reverse view — when viewing a customer, you can see all their invoices listed below the form. This is configured on the parent collection and shows child records that reference it. You can control which fields display, how they’re sorted, and whether users can create new child records directly.
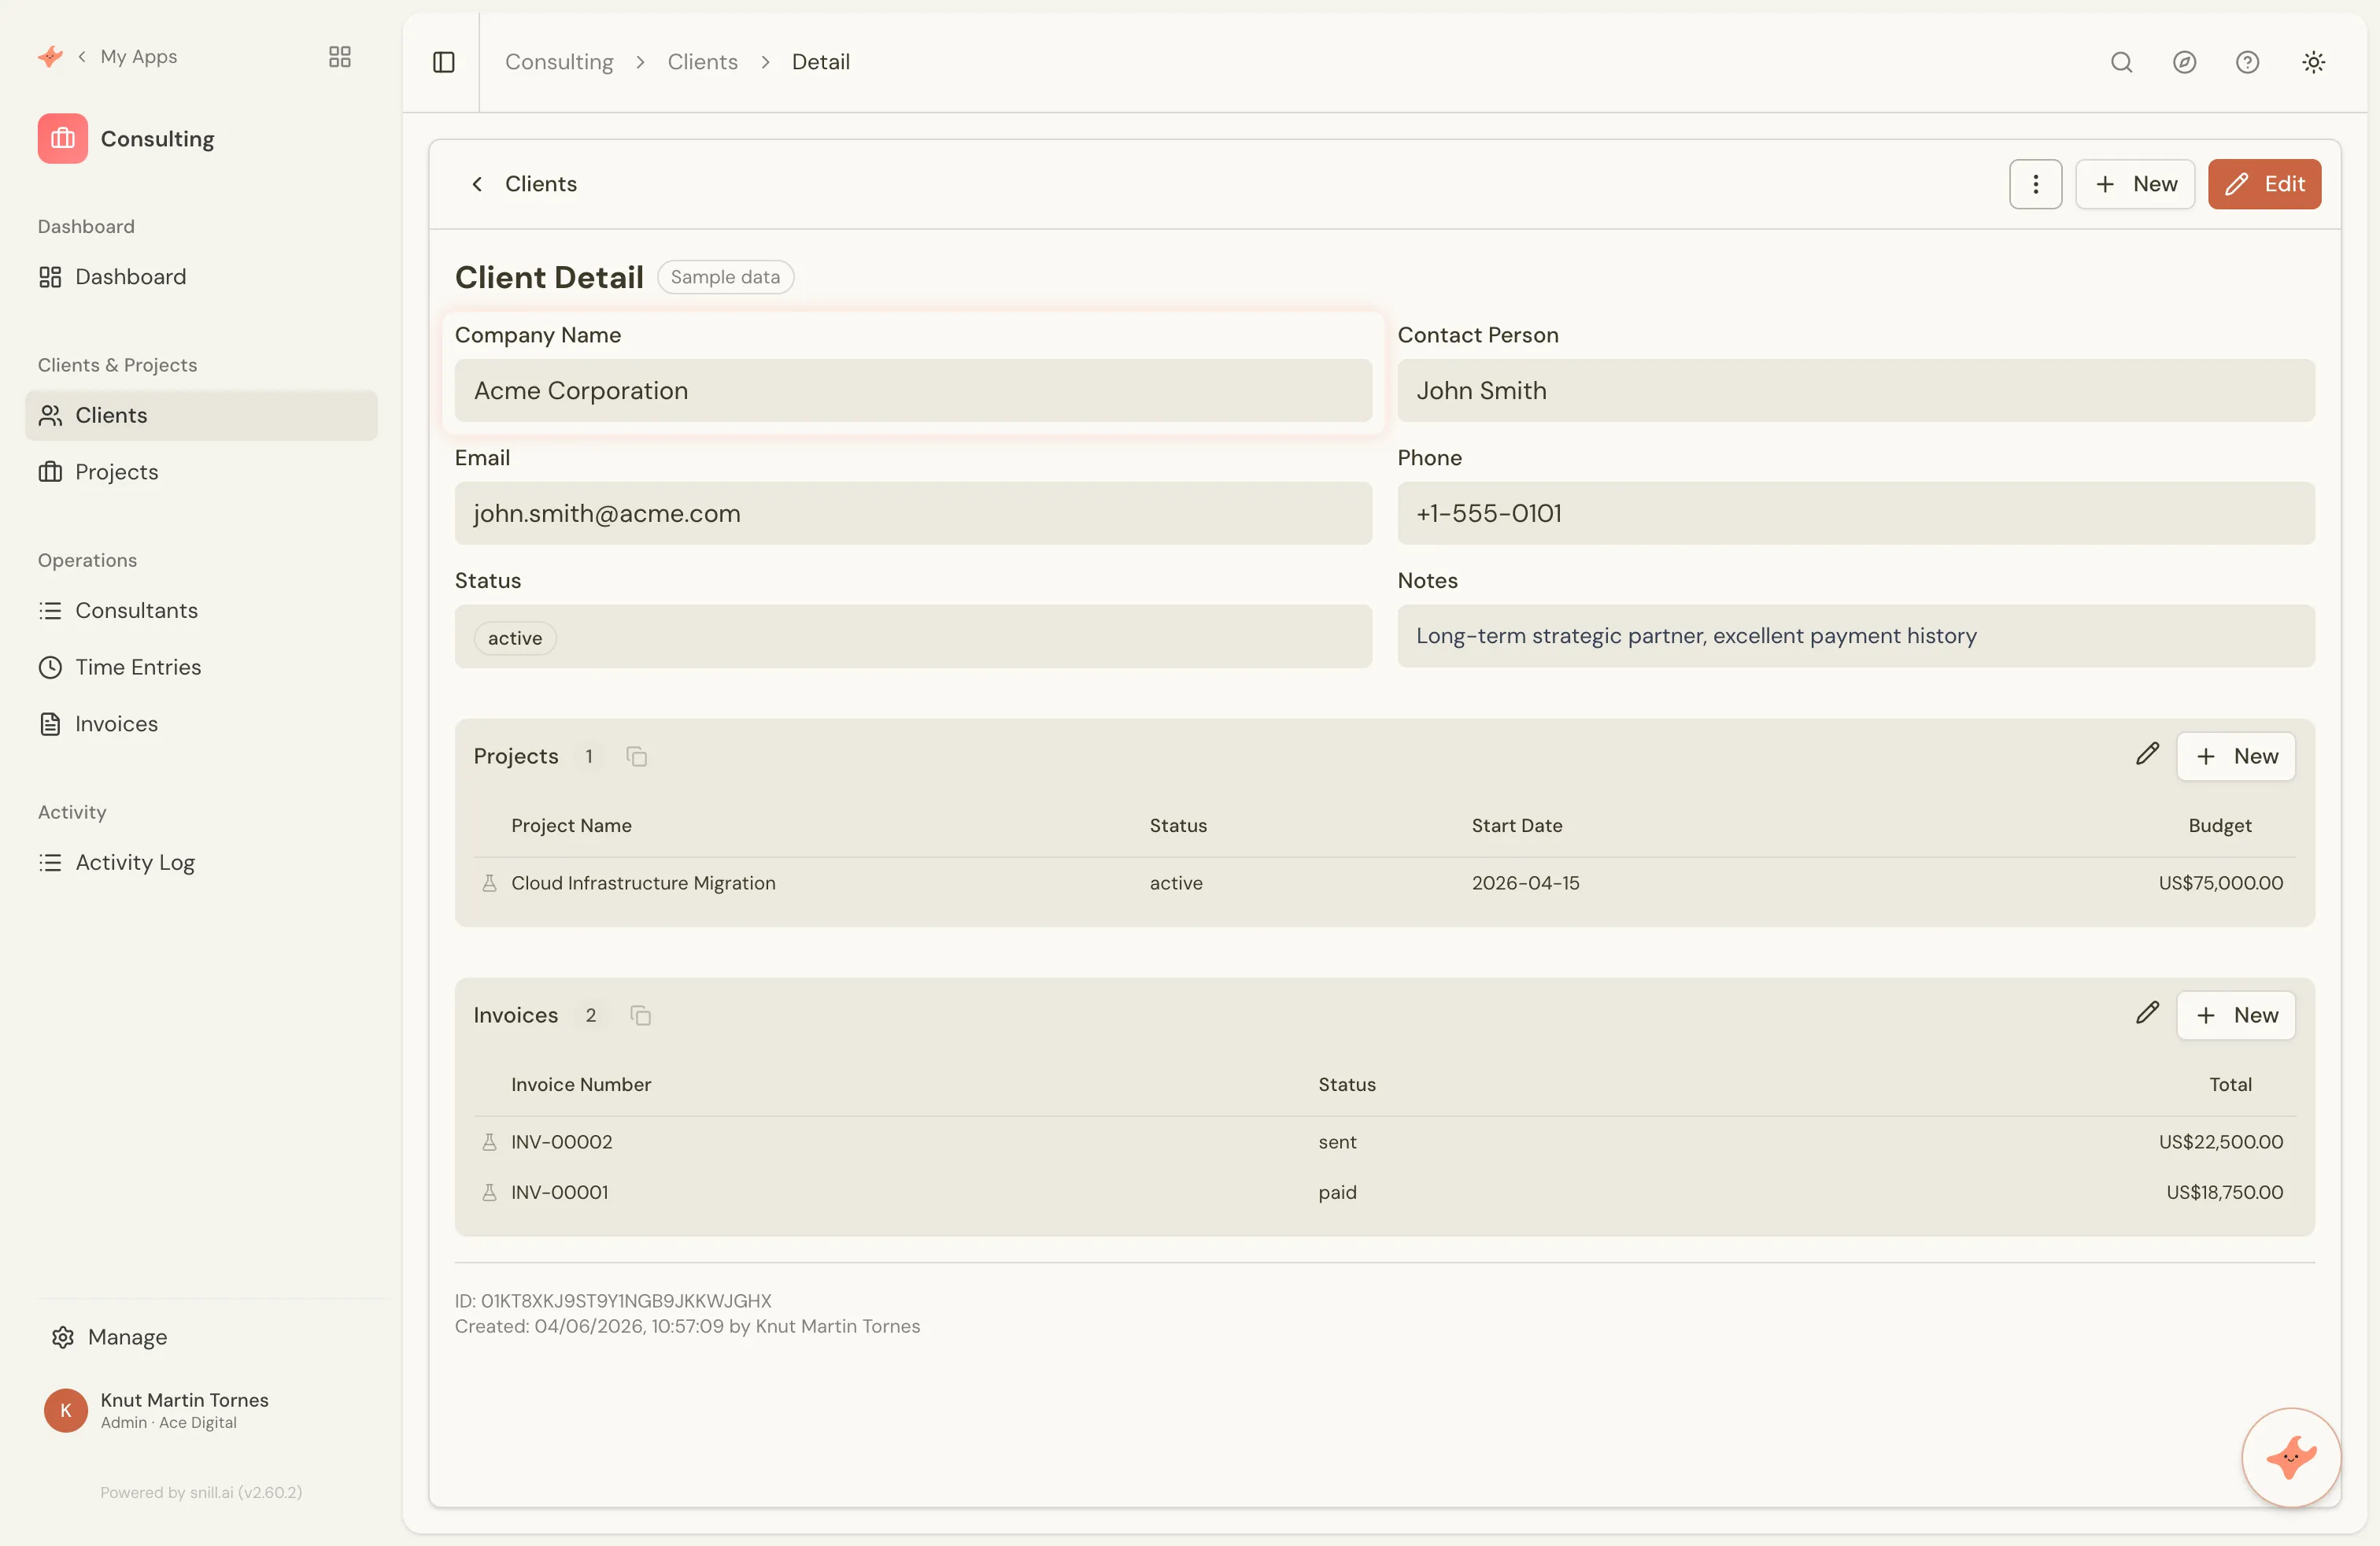
Self-referencing (tree view)
Section titled “Self-referencing (tree view)”A collection can reference itself to create hierarchies. For example, a “Categories” collection where each category has a parent field pointing to another category. Snill renders this as an expandable tree instead of a flat list.
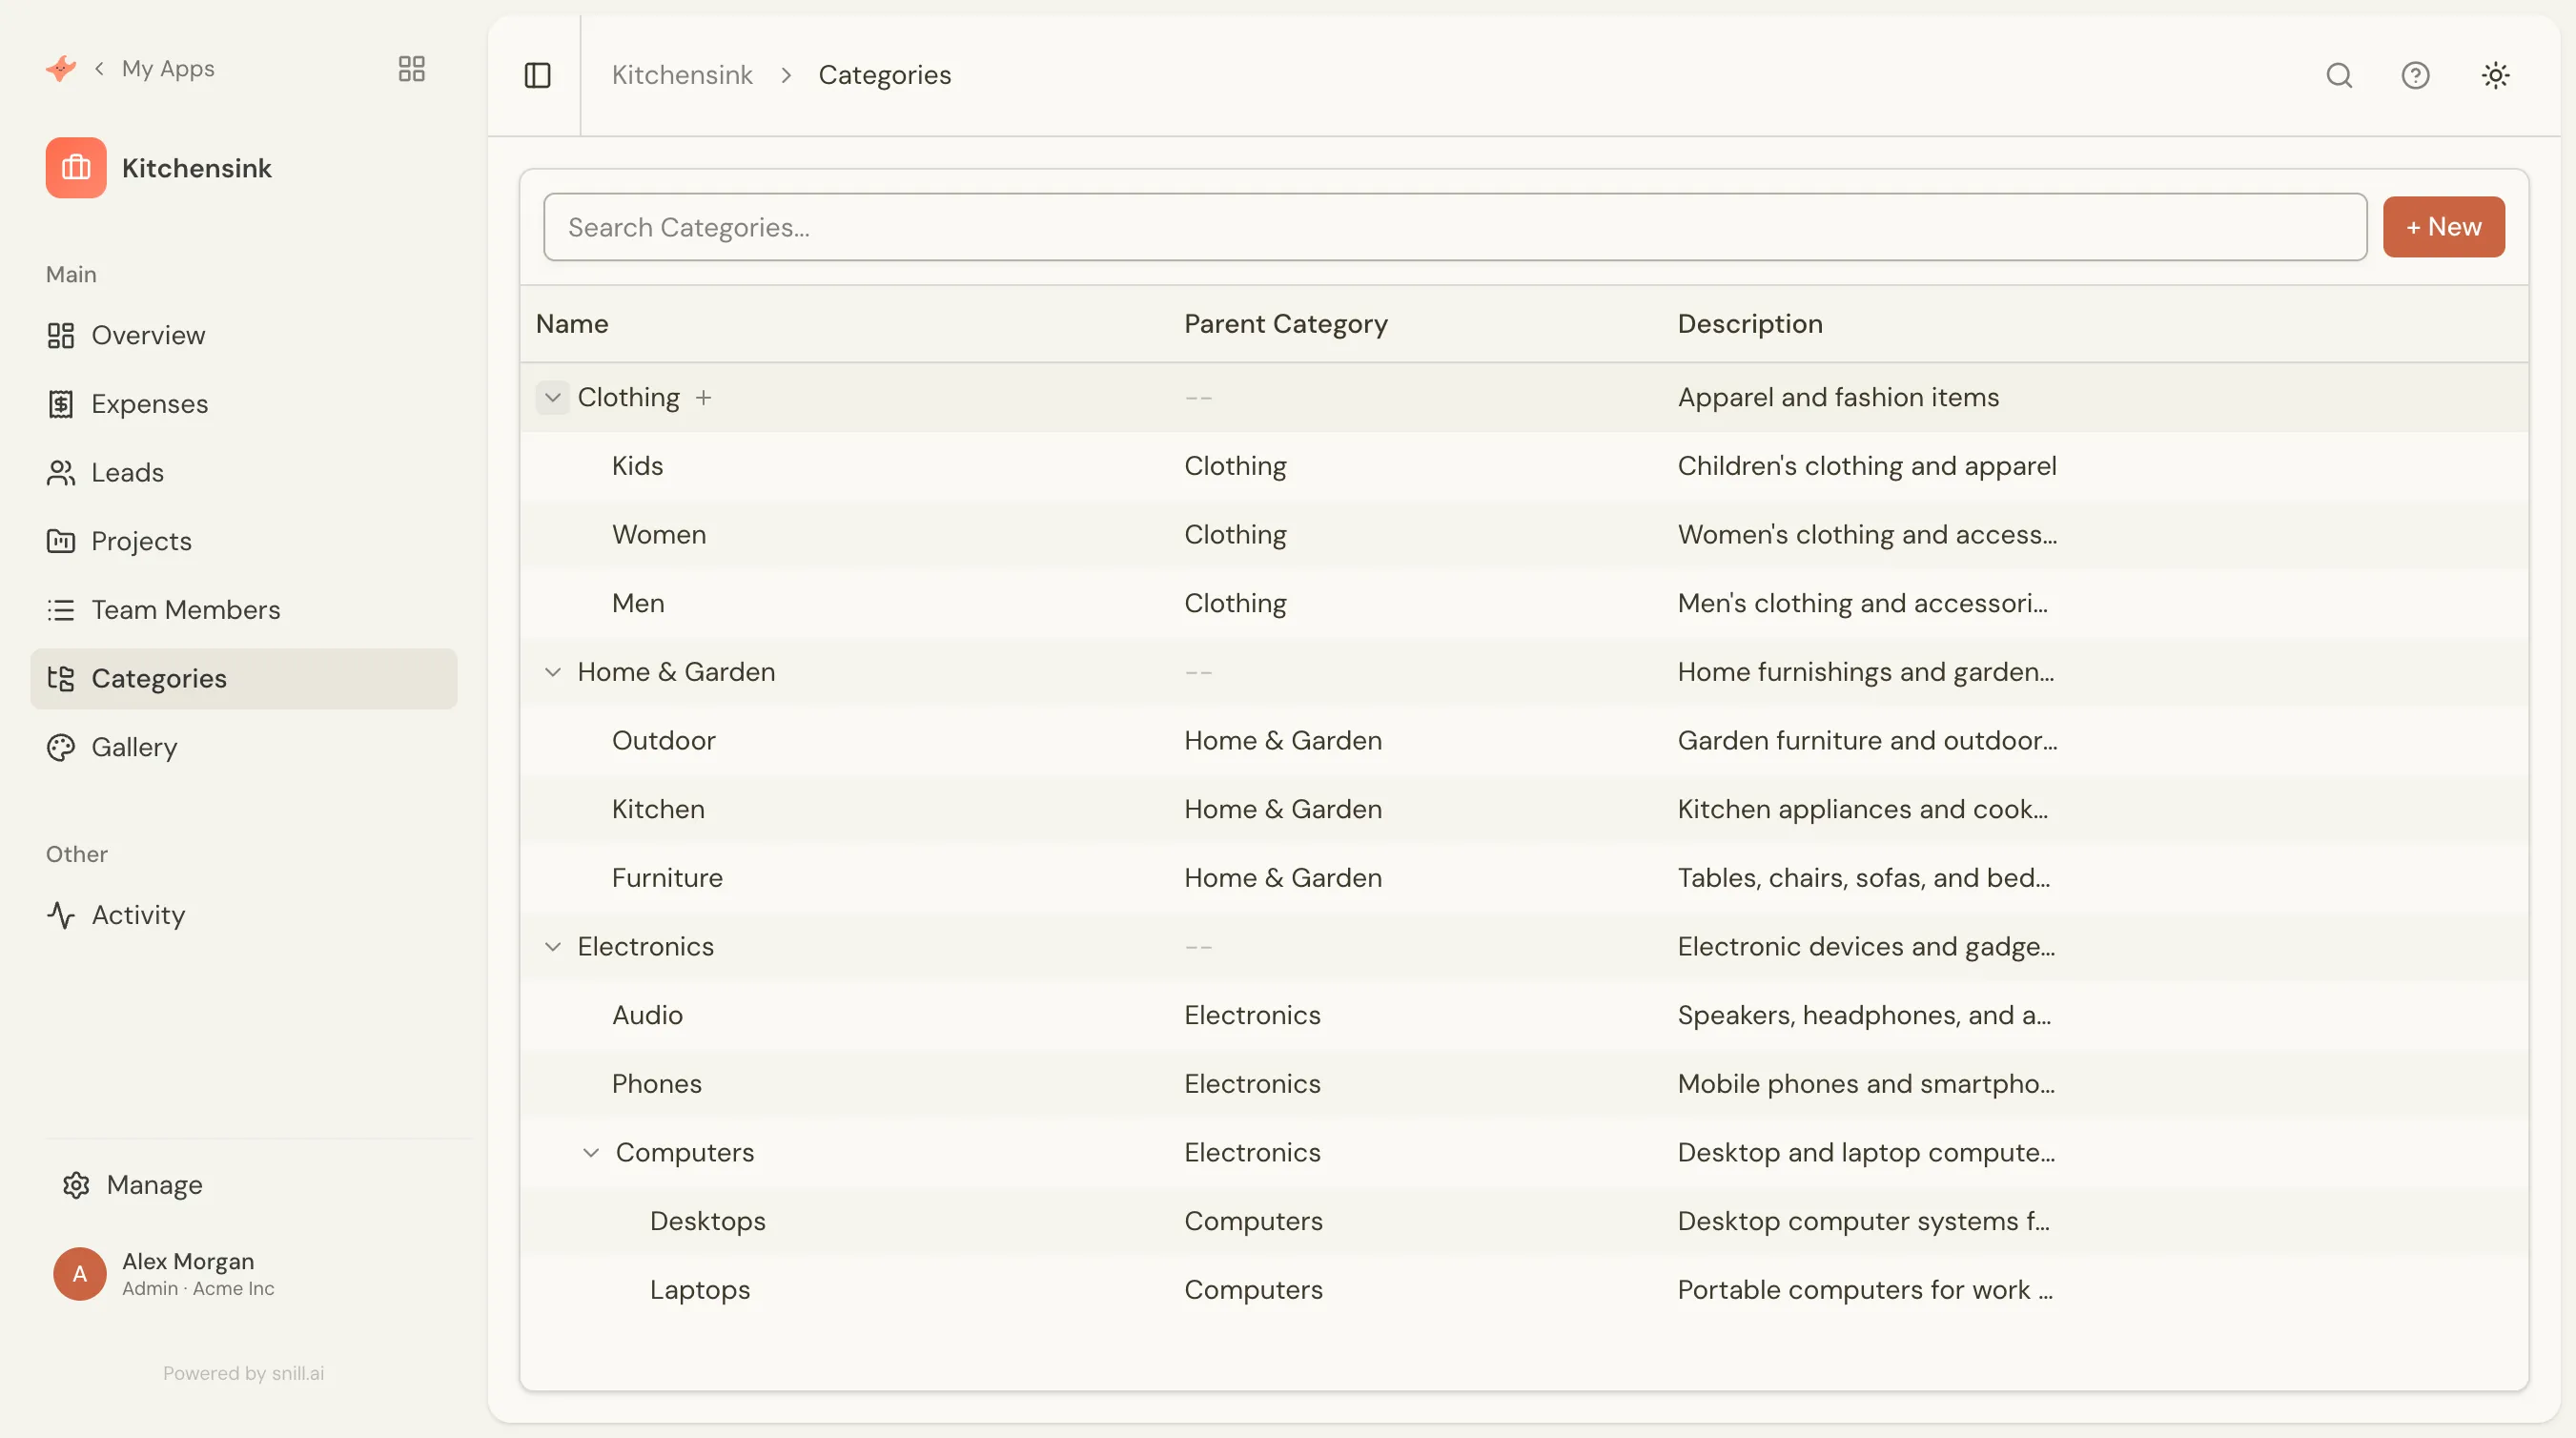
parent points to another category, so Electronics → Computers → Desktops nests to any depth, with expand/collapse controls.Master-detail (nested tables)
Section titled “Master-detail (nested tables)”A tree doesn’t have to nest a collection within itself — a row can also expand into a different collection. Turn on a master-detail view and each record drills down into its related records, shown as a nested table with its own columns right under the row. Expand a Customer to see its Orders; expand an order to see its Line Items — each level is its own collection, so it keeps its own headers and fields.
This composes with the self-tree: a collection can nest within itself and drill into a related collection, so a Categories tree can show sub-categories as indented rows and a Projects table under each one. Levels load as you expand them, deep chains are supported, and the search box filters the top-level rows.
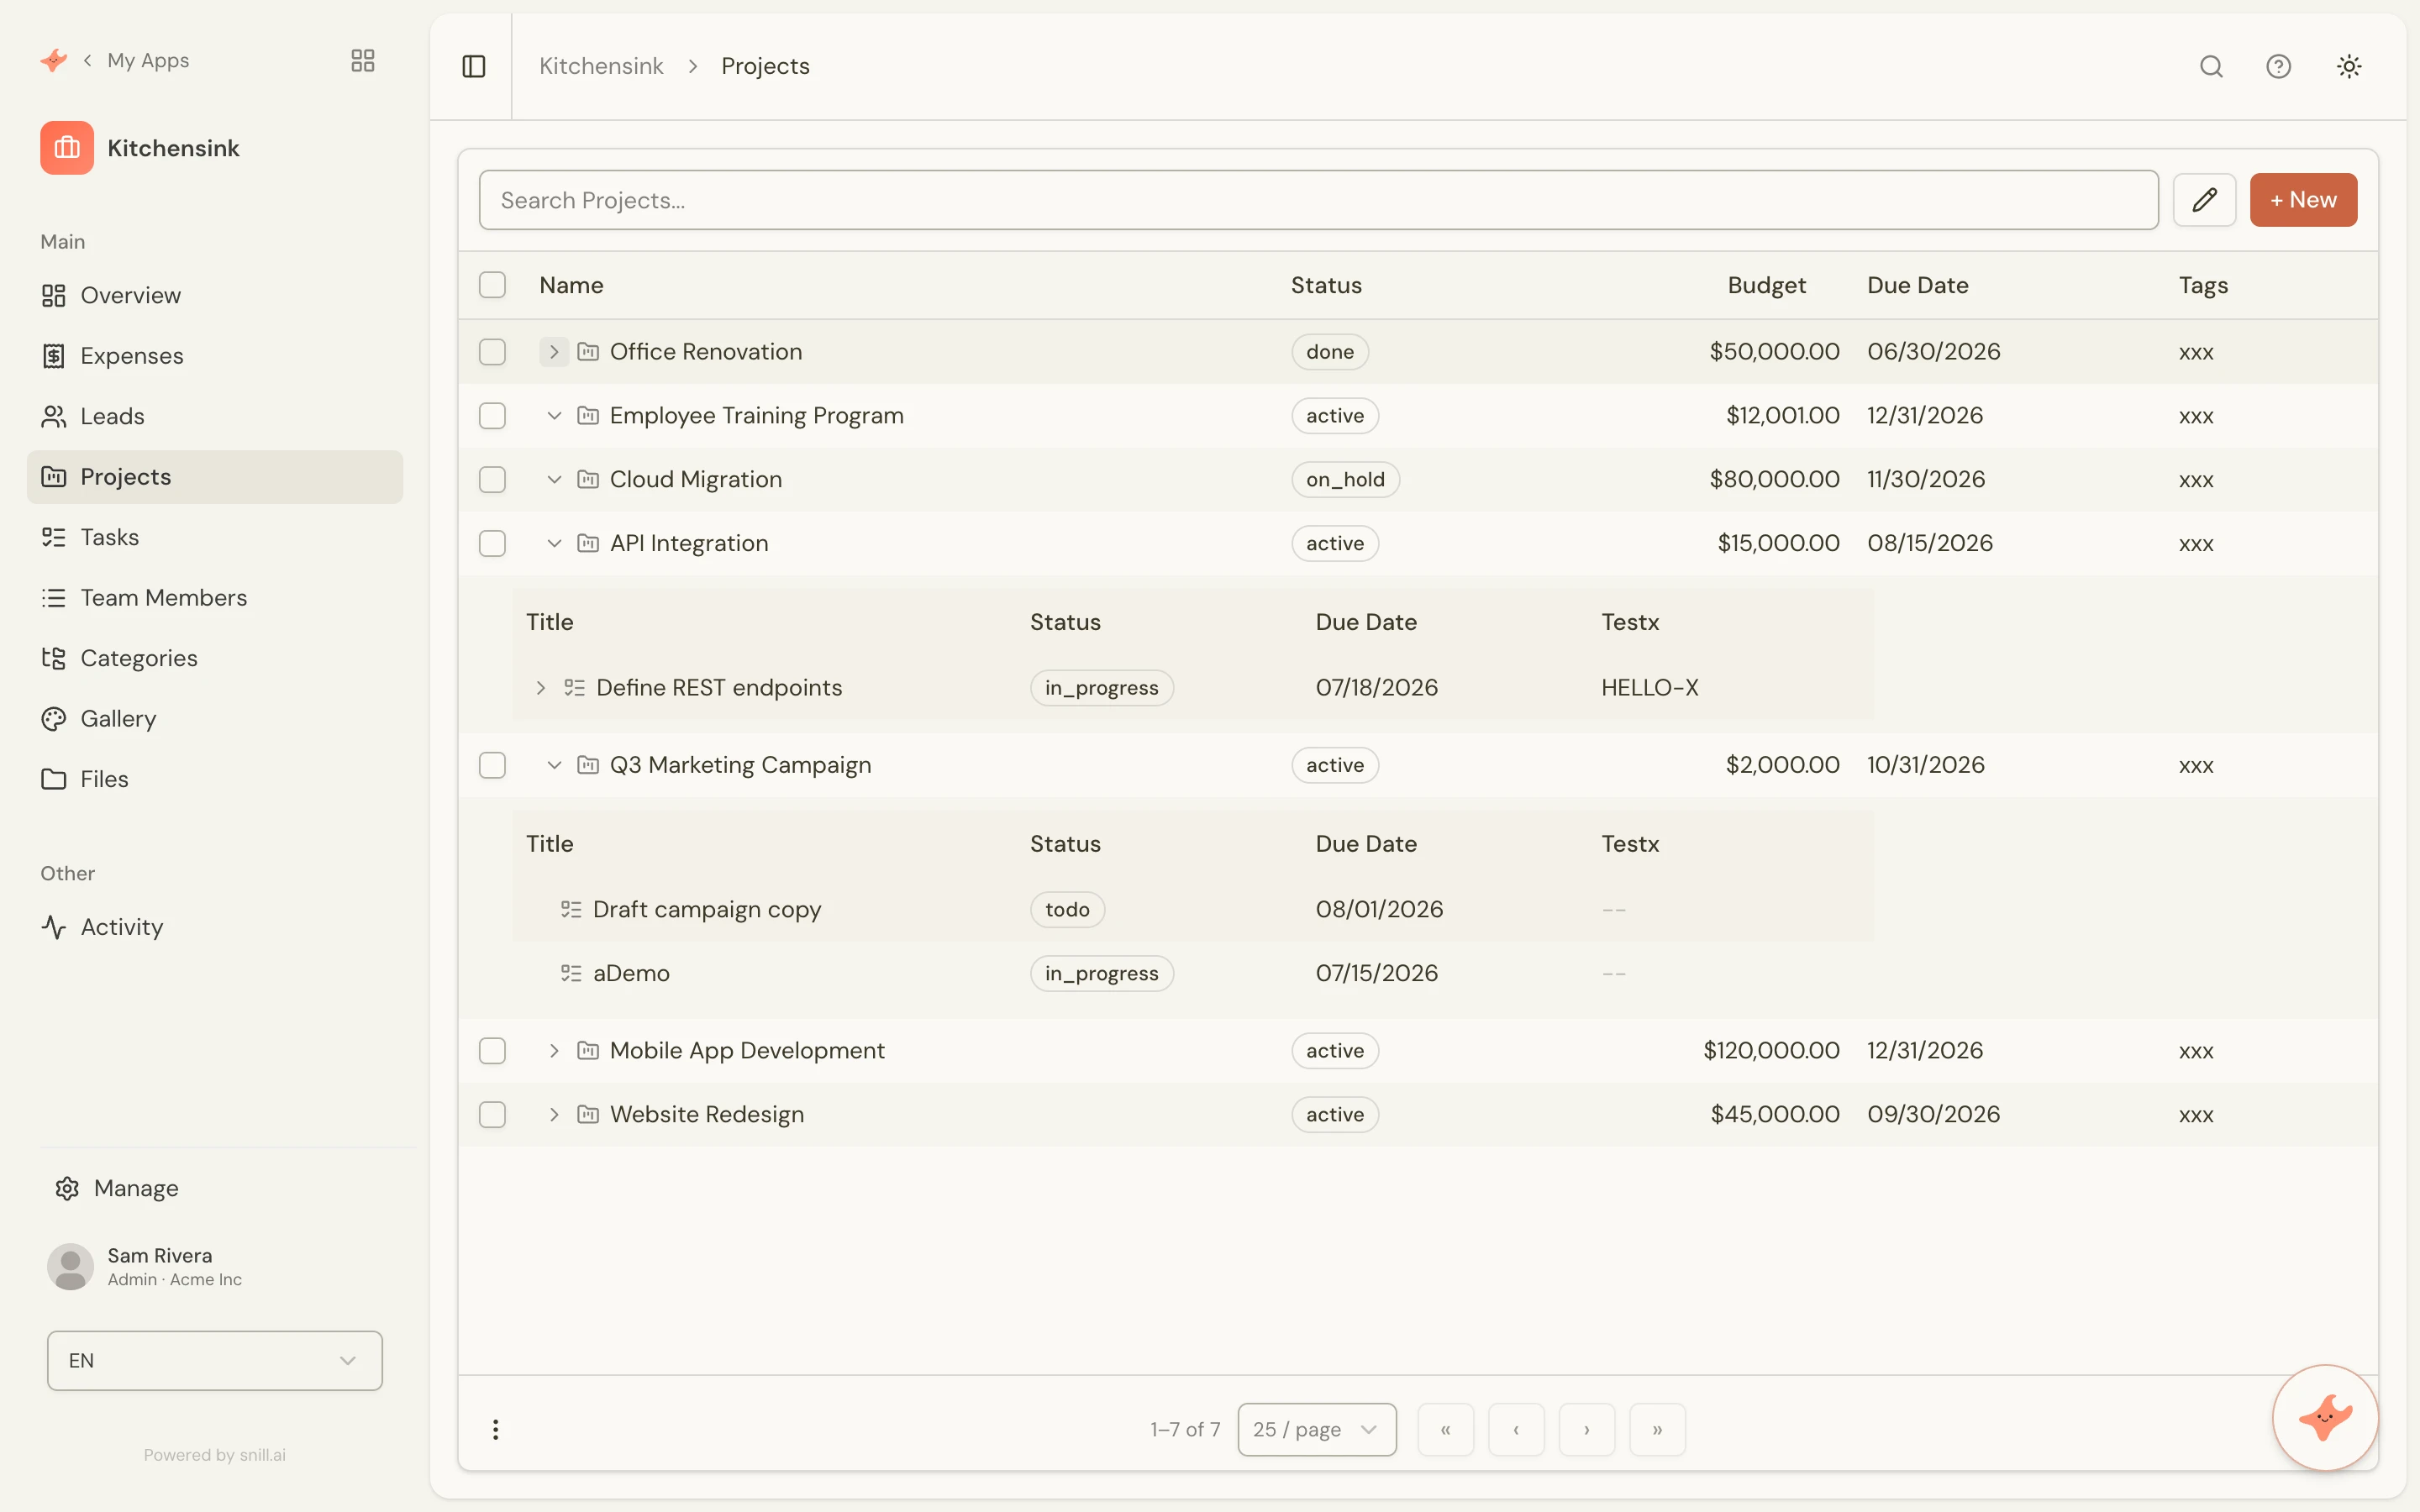
You set it up by describing it (“let me drill from customers into their orders and line items”) or in the Appmodel Editor — it’s built from the ordinary lookups you already have, and it’s display-only, so the underlying data and API are unchanged.
Linked fields
Section titled “Linked fields”When you create a lookup, you can also pull in field values from the referenced record. For example, when selecting a product on an order line, automatically copy the product’s price into a unit price field. This can either copy once (at creation) or stay in sync when the source changes.
Calculated fields
Section titled “Calculated fields”Automatically compute values from other fields using formulas.
A calculated field updates its value whenever the fields it depends on change. You define a formula, and Snill handles the rest.
In practice you rarely write a formula yourself — just tell the Data Assistant “the amount is hours times rate” and it adds the field. The visual editor and raw JSON are there if you’d rather.
Simple formulas
Section titled “Simple formulas”Reference other fields in the same record with arithmetic:
quantity * unitPrice
subtotal * $vatRate
The $ prefix references global app variables — constants like tax rates or hourly rates that you define once and use across formulas.
Aggregations
Section titled “Aggregations”Calculated fields can also summarize data from related collections. If you have an Invoice with many Line Items, you can calculate totals on the invoice:
| Function | What it does | Example |
|---|---|---|
SUM | Total of all values | SUM(lineItems.amount) |
AVG | Average | AVG(reviews.rating) |
COUNT | Number of records | COUNT(tasks) |
MIN | Smallest value | MIN(bids.amount) |
MAX | Largest value | MAX(offers.price) |
Aggregations update automatically when child records are created, edited, or deleted.
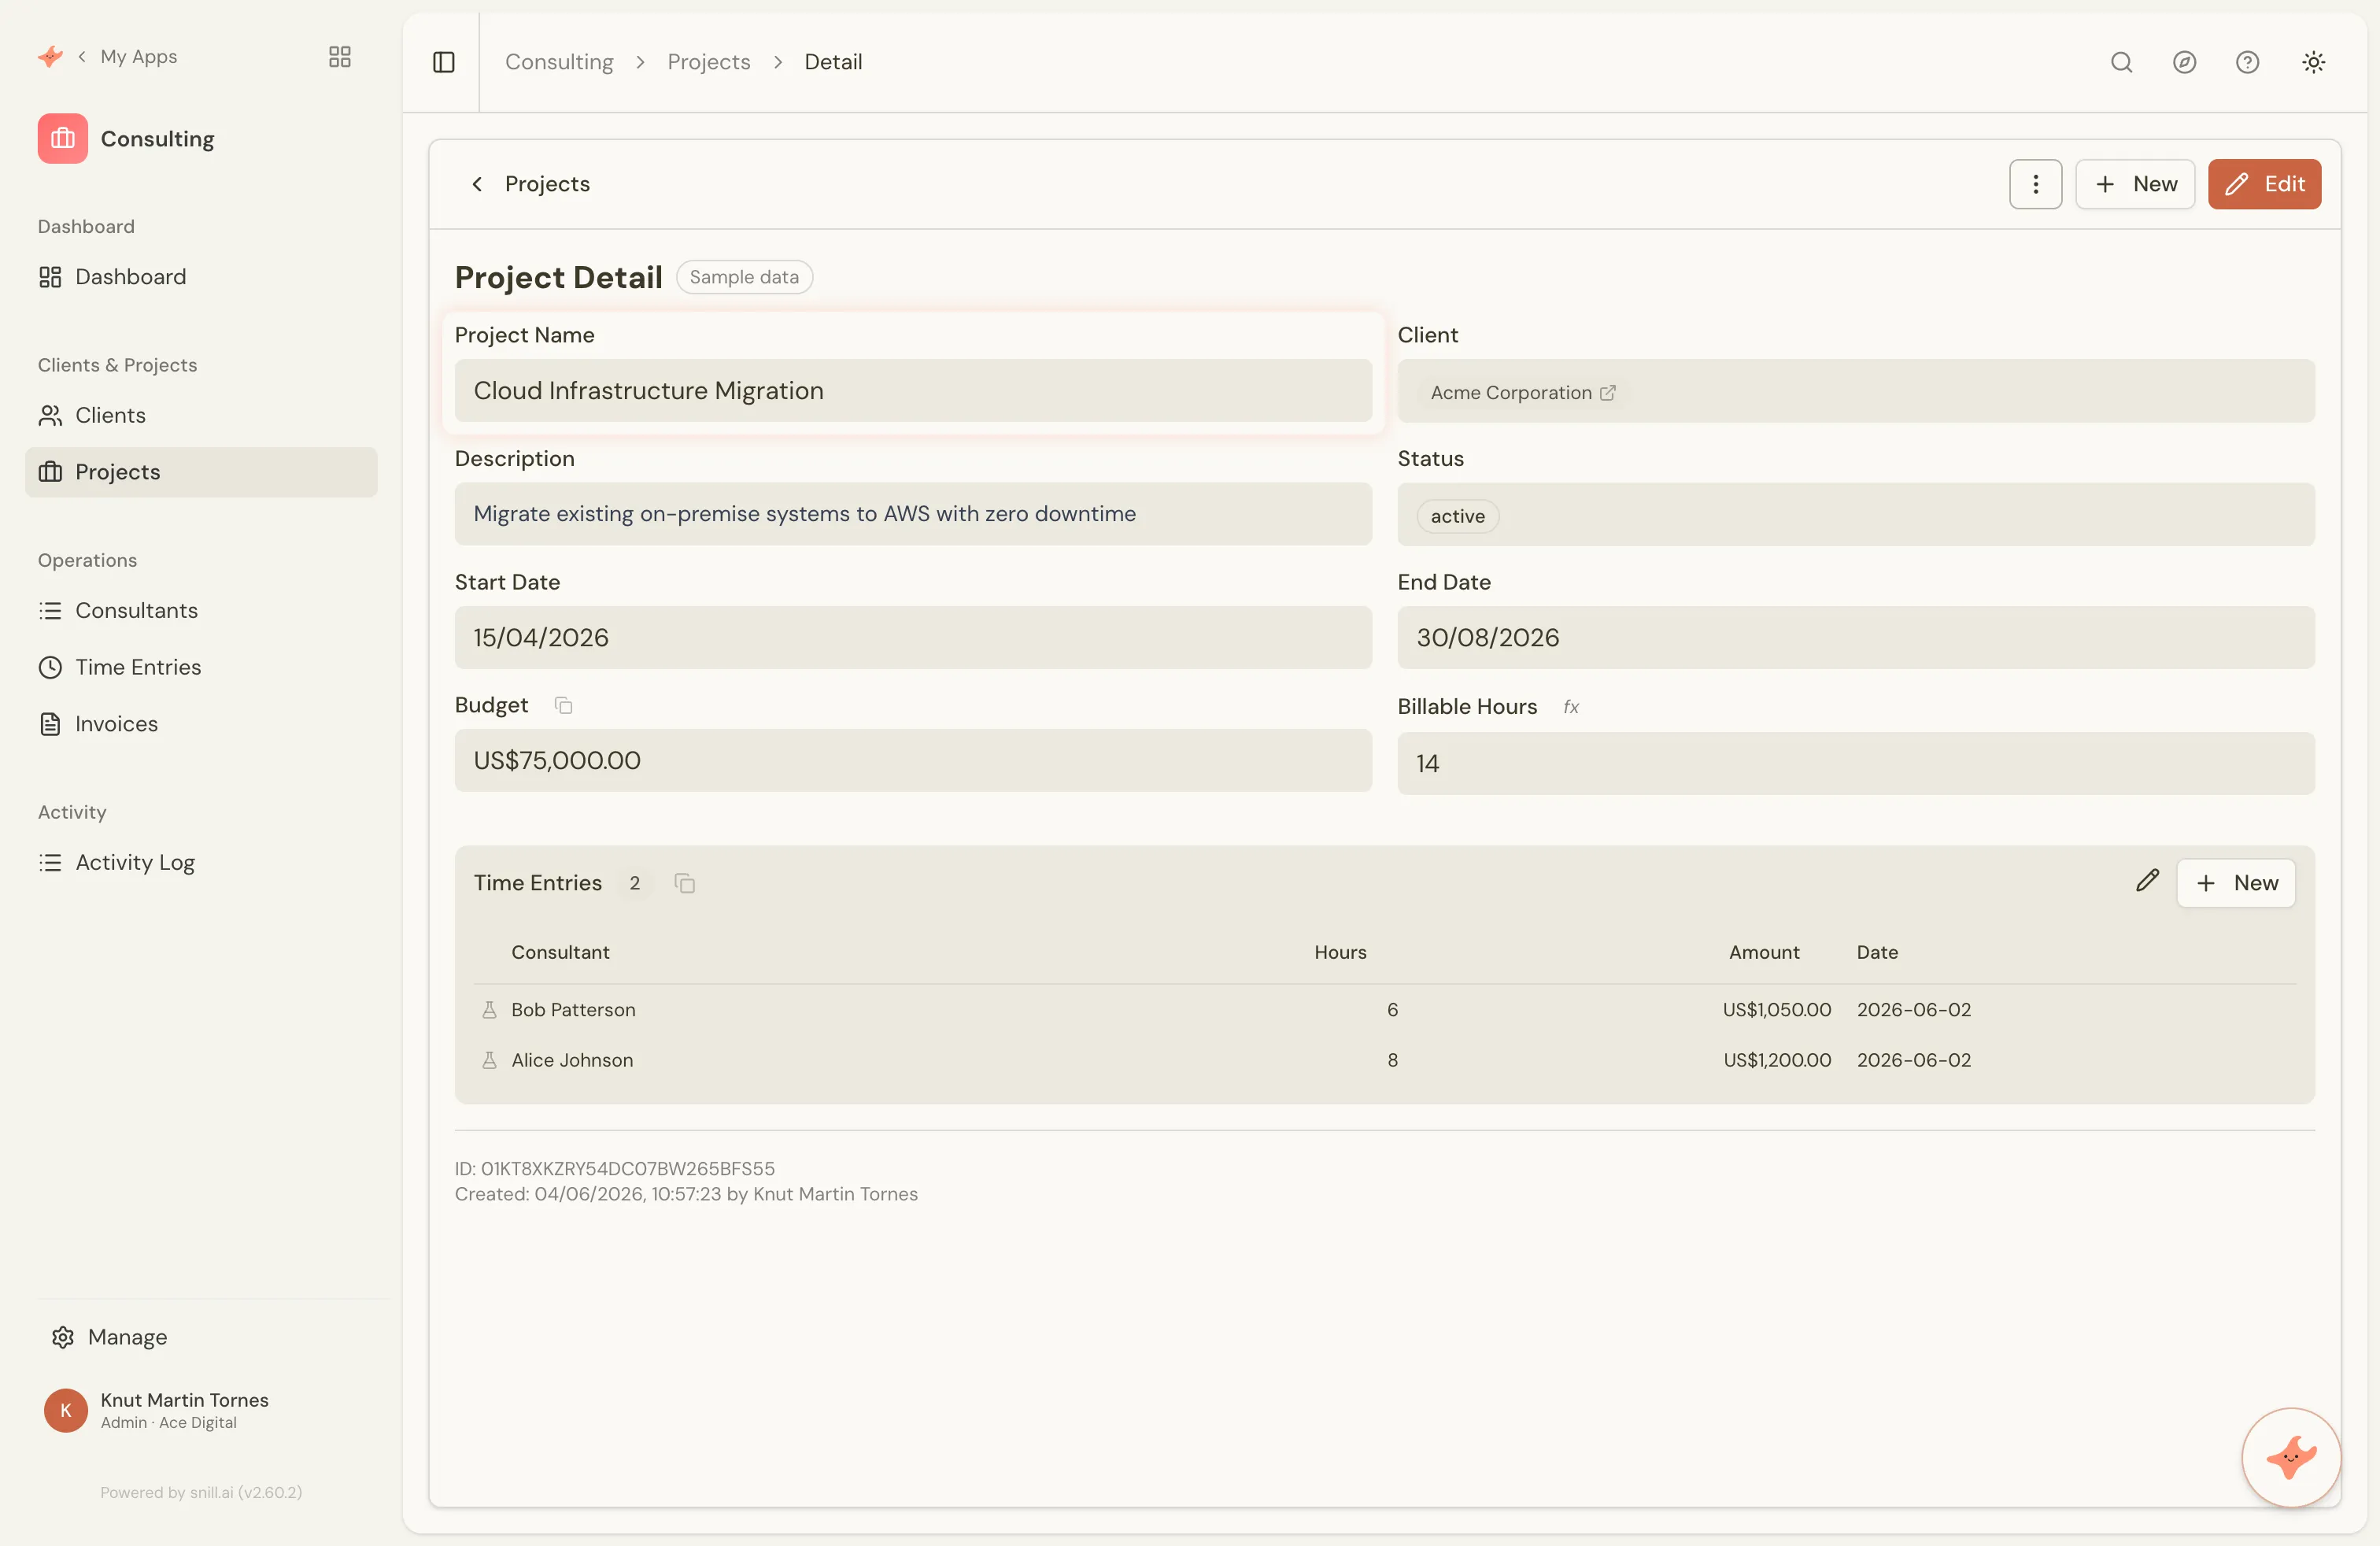
Billable Hours field is an aggregate (fx) summing the hours of its related time entries — recomputed automatically as entries change.Tip
You can combine aggregations with arithmetic. For example, compute a grand total: SUM(lineItems.amount) * $vatRate
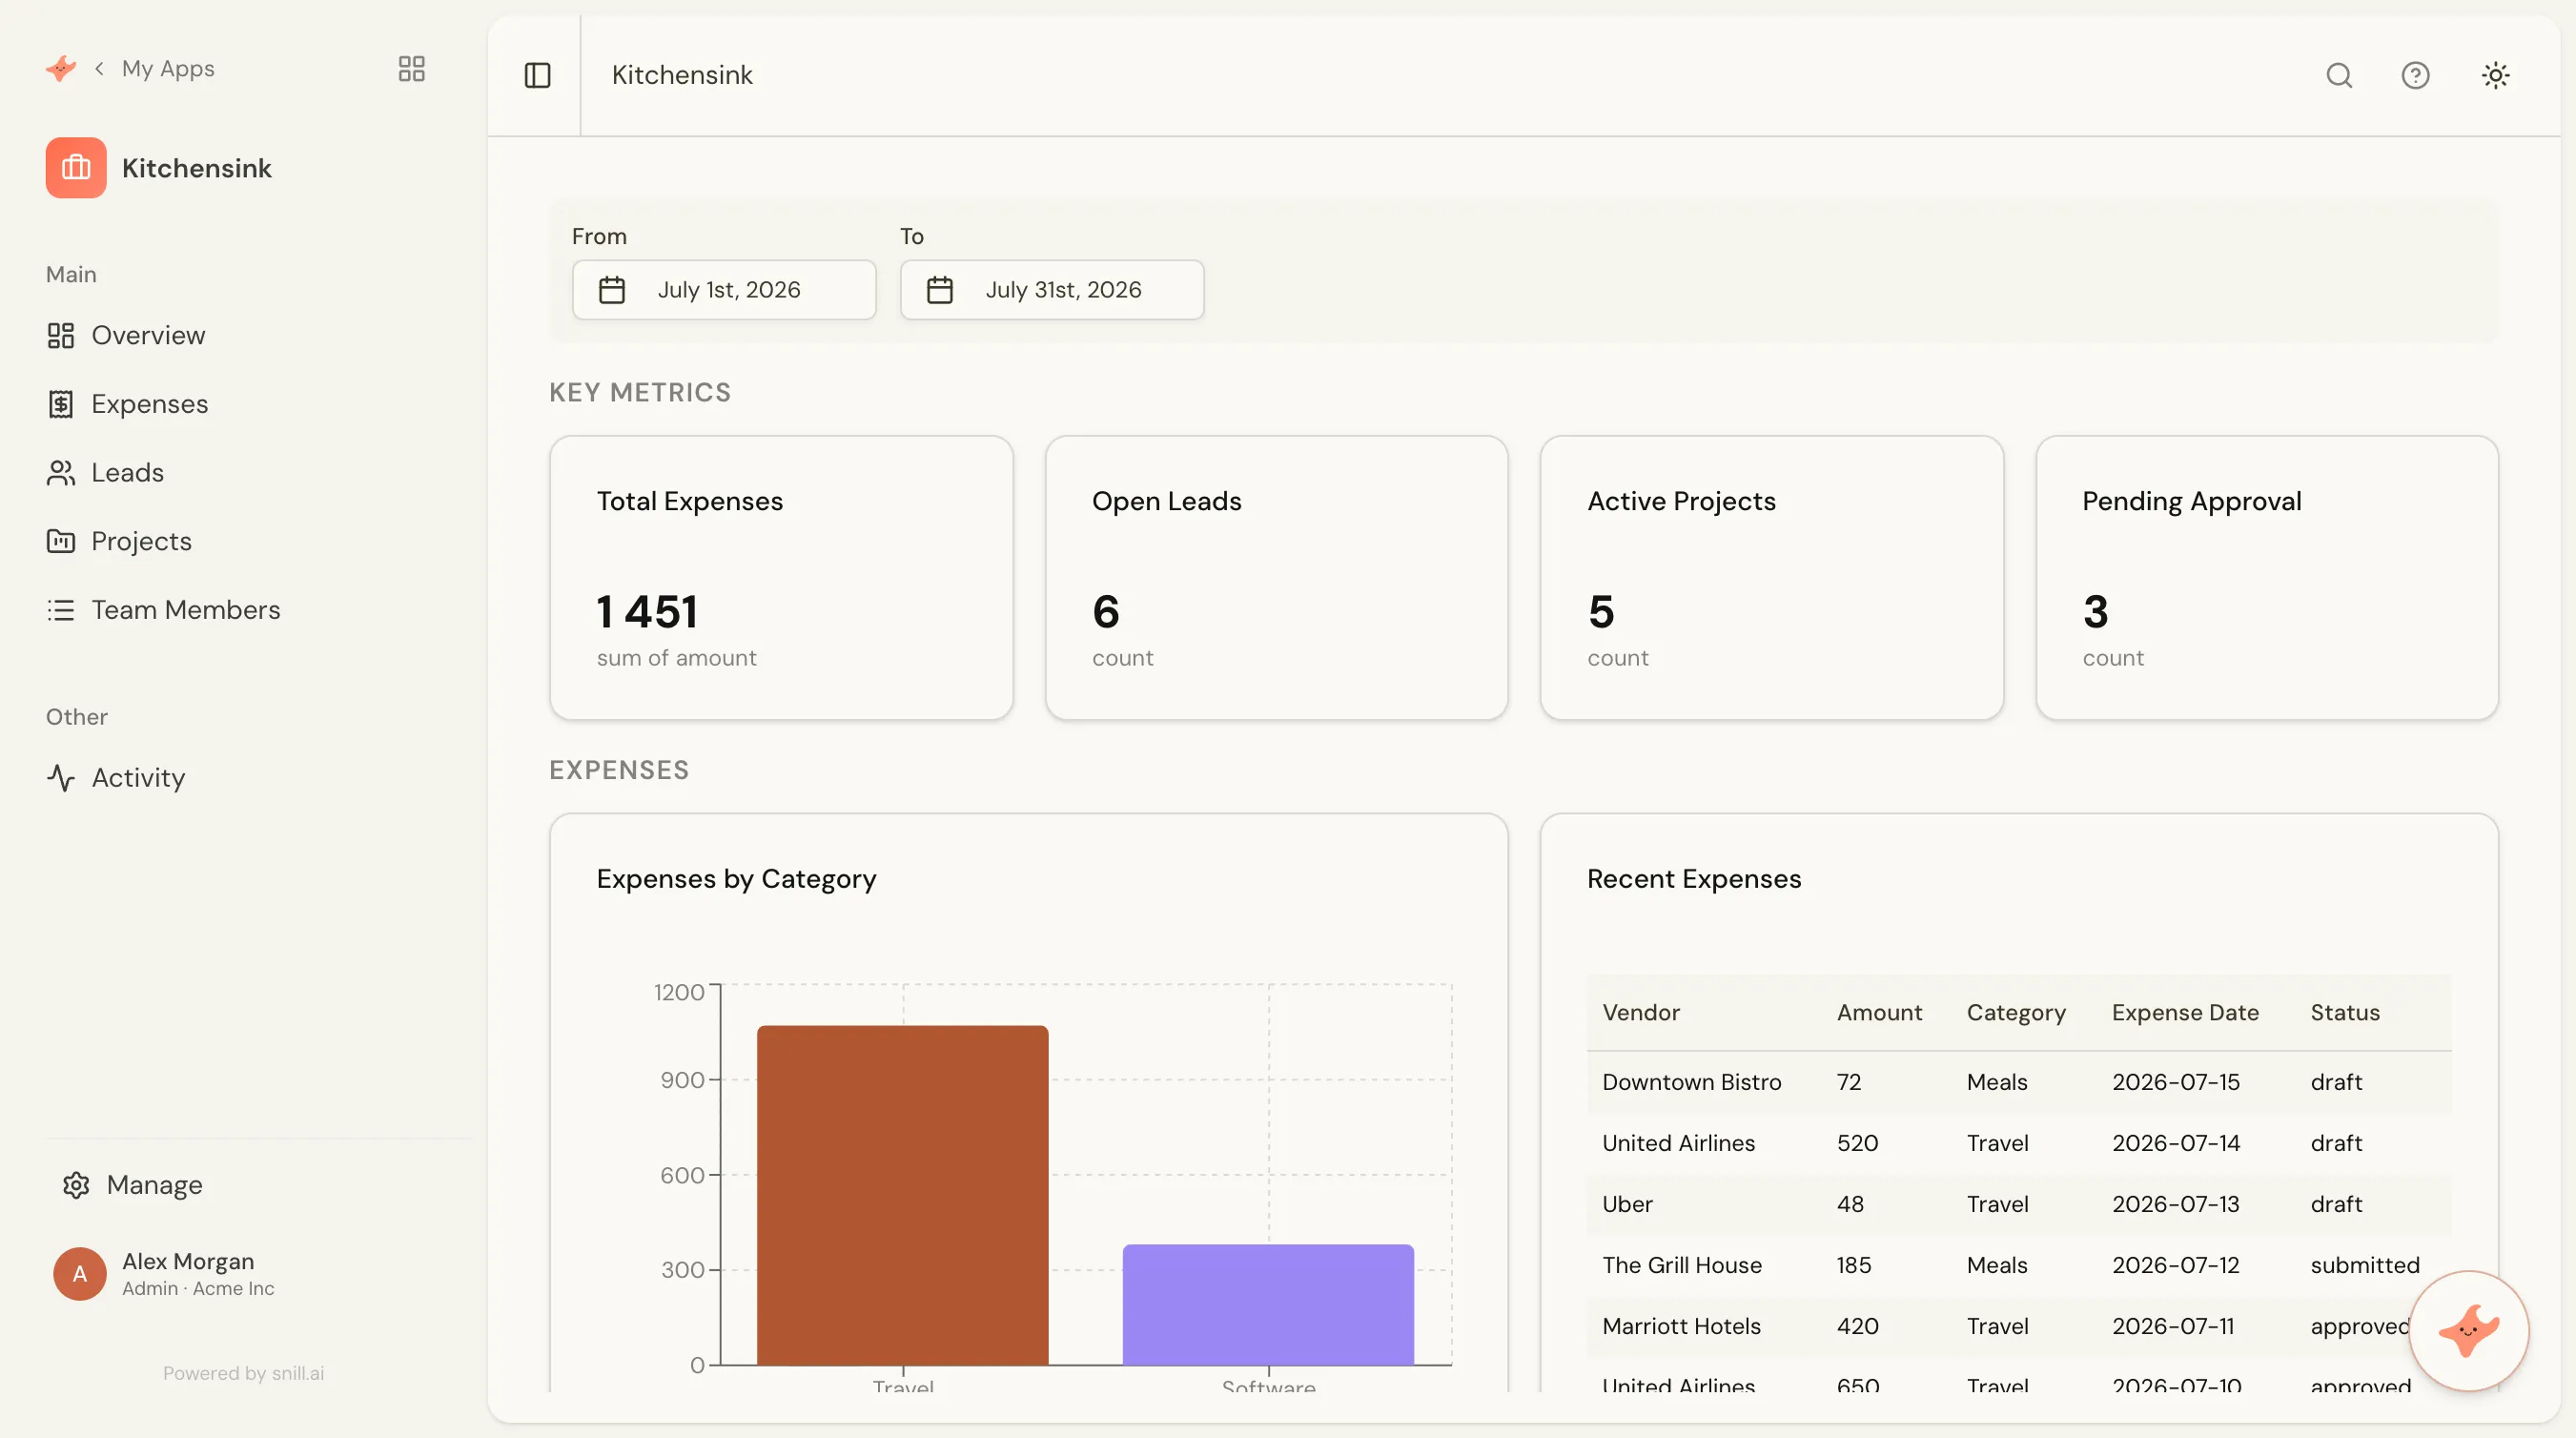
Build custom views with filters, charts, tables, and text — beyond the standard collection views.
Pages are custom views that combine multiple components into a single screen. While collections give you list and detail views, pages let you create dashboards, reports, and overviews that pull data from multiple collections.
Components
Section titled “Components”A page is a grid of components. Each component has a type and a width (1-4 columns on the grid):
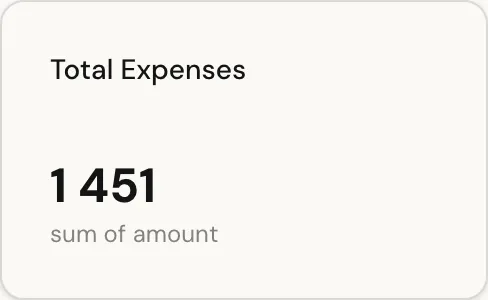
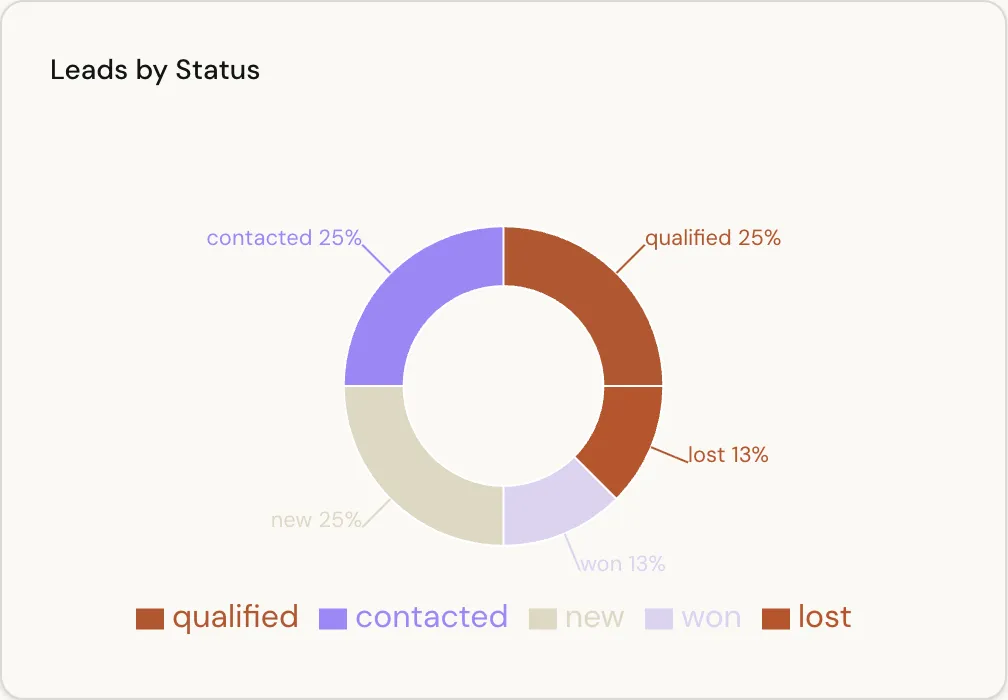
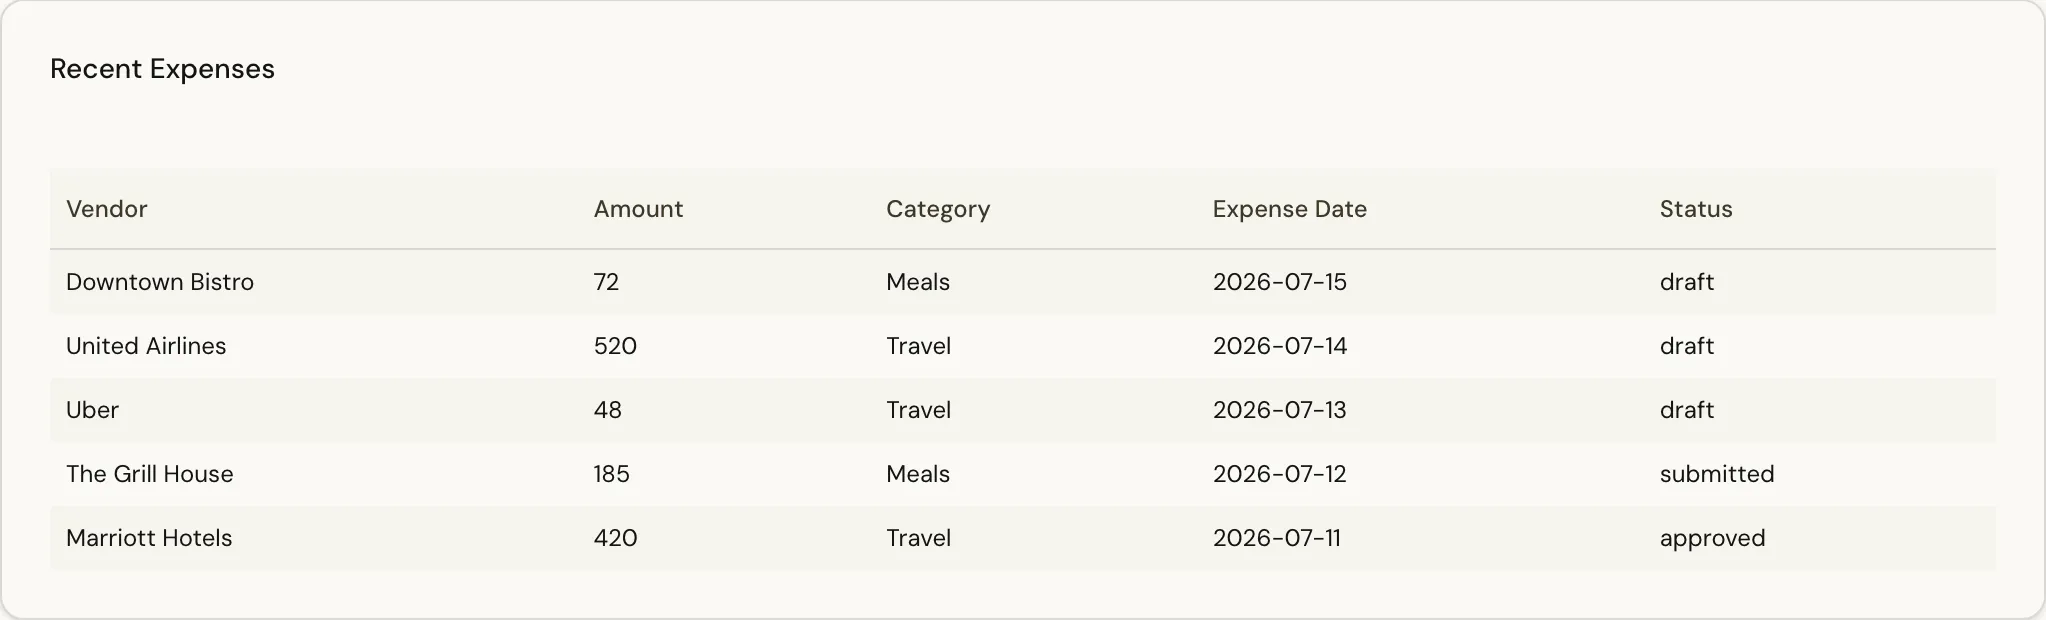


Parameters
Section titled “Parameters”Pages can have interactive filters at the top. When users change a filter, all components on the page update to reflect the selection. Parameter types include:
- Text input, dropdowns (single or multi-select), date pickers, date ranges, number ranges, checkboxes, and collection lookups
Parameters can have smart defaults like “today’s date” or “start of this month” — so the page shows relevant data immediately.
Date filters
Section titled “Date filters”Components can use dynamic date values in their queries — like “today”, “start of this month”, or “7 days ago”. These update automatically, so a page showing “this month’s sales” always shows the current month.
Tip
Pages appear in the sidebar navigation just like collections. You can even set a page as the app’s start page.
Form rules
Section titled “Form rules”Make forms dynamic — show, hide, or change fields based on conditions.
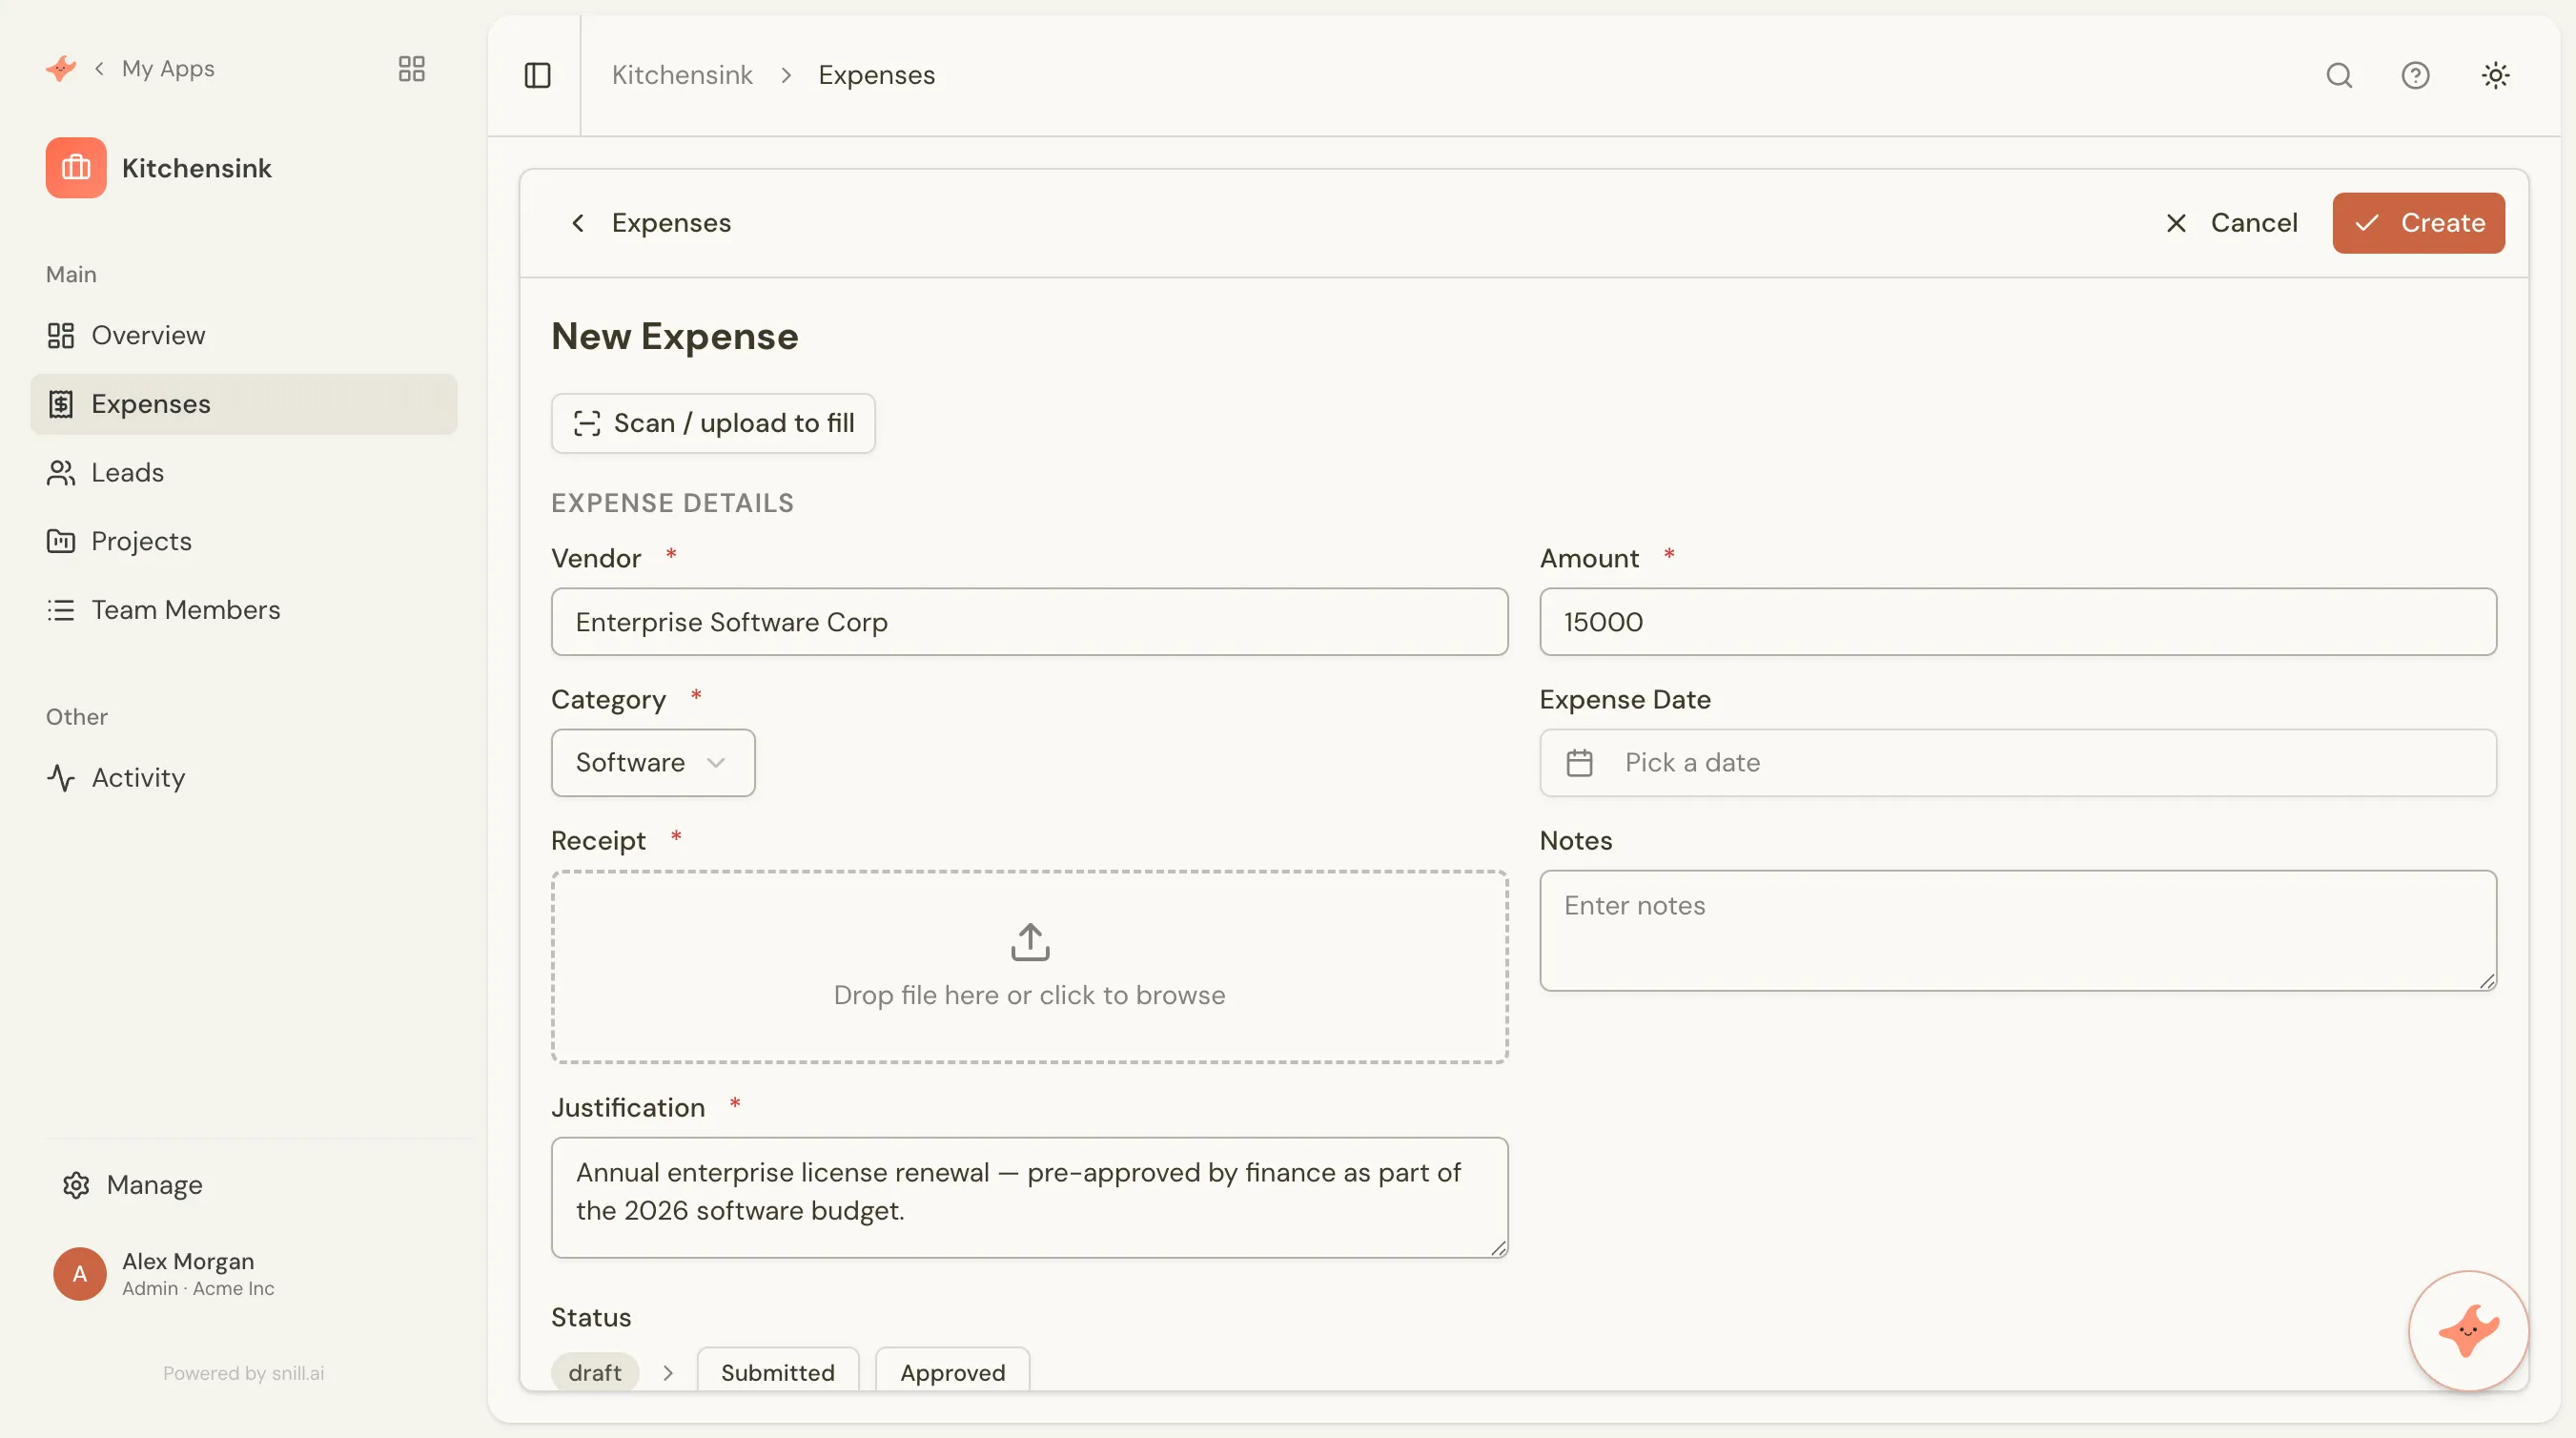
Form rules let you control field behavior based on the values of other fields. Each rule has a condition and one or more actions:
- Show / Hide — make fields visible or hidden based on a condition (e.g. show “overtime reason” only when hours exceed 8)
- Required — make a field mandatory only when certain conditions are met
- Read-only — lock fields from editing (e.g. make all fields read-only when status is “approved”)
- Set value — automatically fill in a field value when a condition is true (e.g. set
approved dateto today when status changes to “approved”) - Validate — enforce a check when a condition is met, including comparisons across fields (e.g. “end date must be after start date”), with your own error message
Rules evaluate instantly as the user types or selects values — no save required. Each rule can also have an else block for the opposite case.
You don’t have to build these by hand — describe what you want to the AI (“show a justification field when an expense is over 10,000”) and Snill writes the rule. Power users can fine-tune it in the visual editor or JSON.
Tip
Rules are evaluated in order. If multiple rules affect the same field, later rules take precedence.
Conditional formatting
Section titled “Conditional formatting”Make the data draw the eye — color a value, badge a status, or tint a whole row when a condition holds.
Where form rules change how a form behaves, conditional formatting changes how records look. You write a condition and a style, and Snill applies it wherever the record is shown — the list view, related tables on a parent record, and the record’s own detail page.
Each rule targets one or more fields (or the whole row) and renders one of three ways:
- Colored text — the value itself takes on a color (e.g. an overdue date in red).
- Badge — the value becomes a colored pill, ideal for a status or priority (this is what colors the badges on Kanban cards).
- Background tint — a subtle wash across the cell, row, or a form section, for at-a-glance state.
Colors are red, amber, green, blue, and gray, and you can add bold emphasis. The first matching rule wins, so order your rules from most to least specific. Numeric fields can also show a value bar — a small horizontal bar sized to where the number falls in a range (like a progress or utilization meter).
As always, just describe it — “show expired contracts with a red status badge and a faint red row” — and Snill sets up the rules, or fine-tune them in the Appmodel Editor.
Workflows
Section titled “Workflows”Turn a status field into a real approval process — with the right people moving work forward.
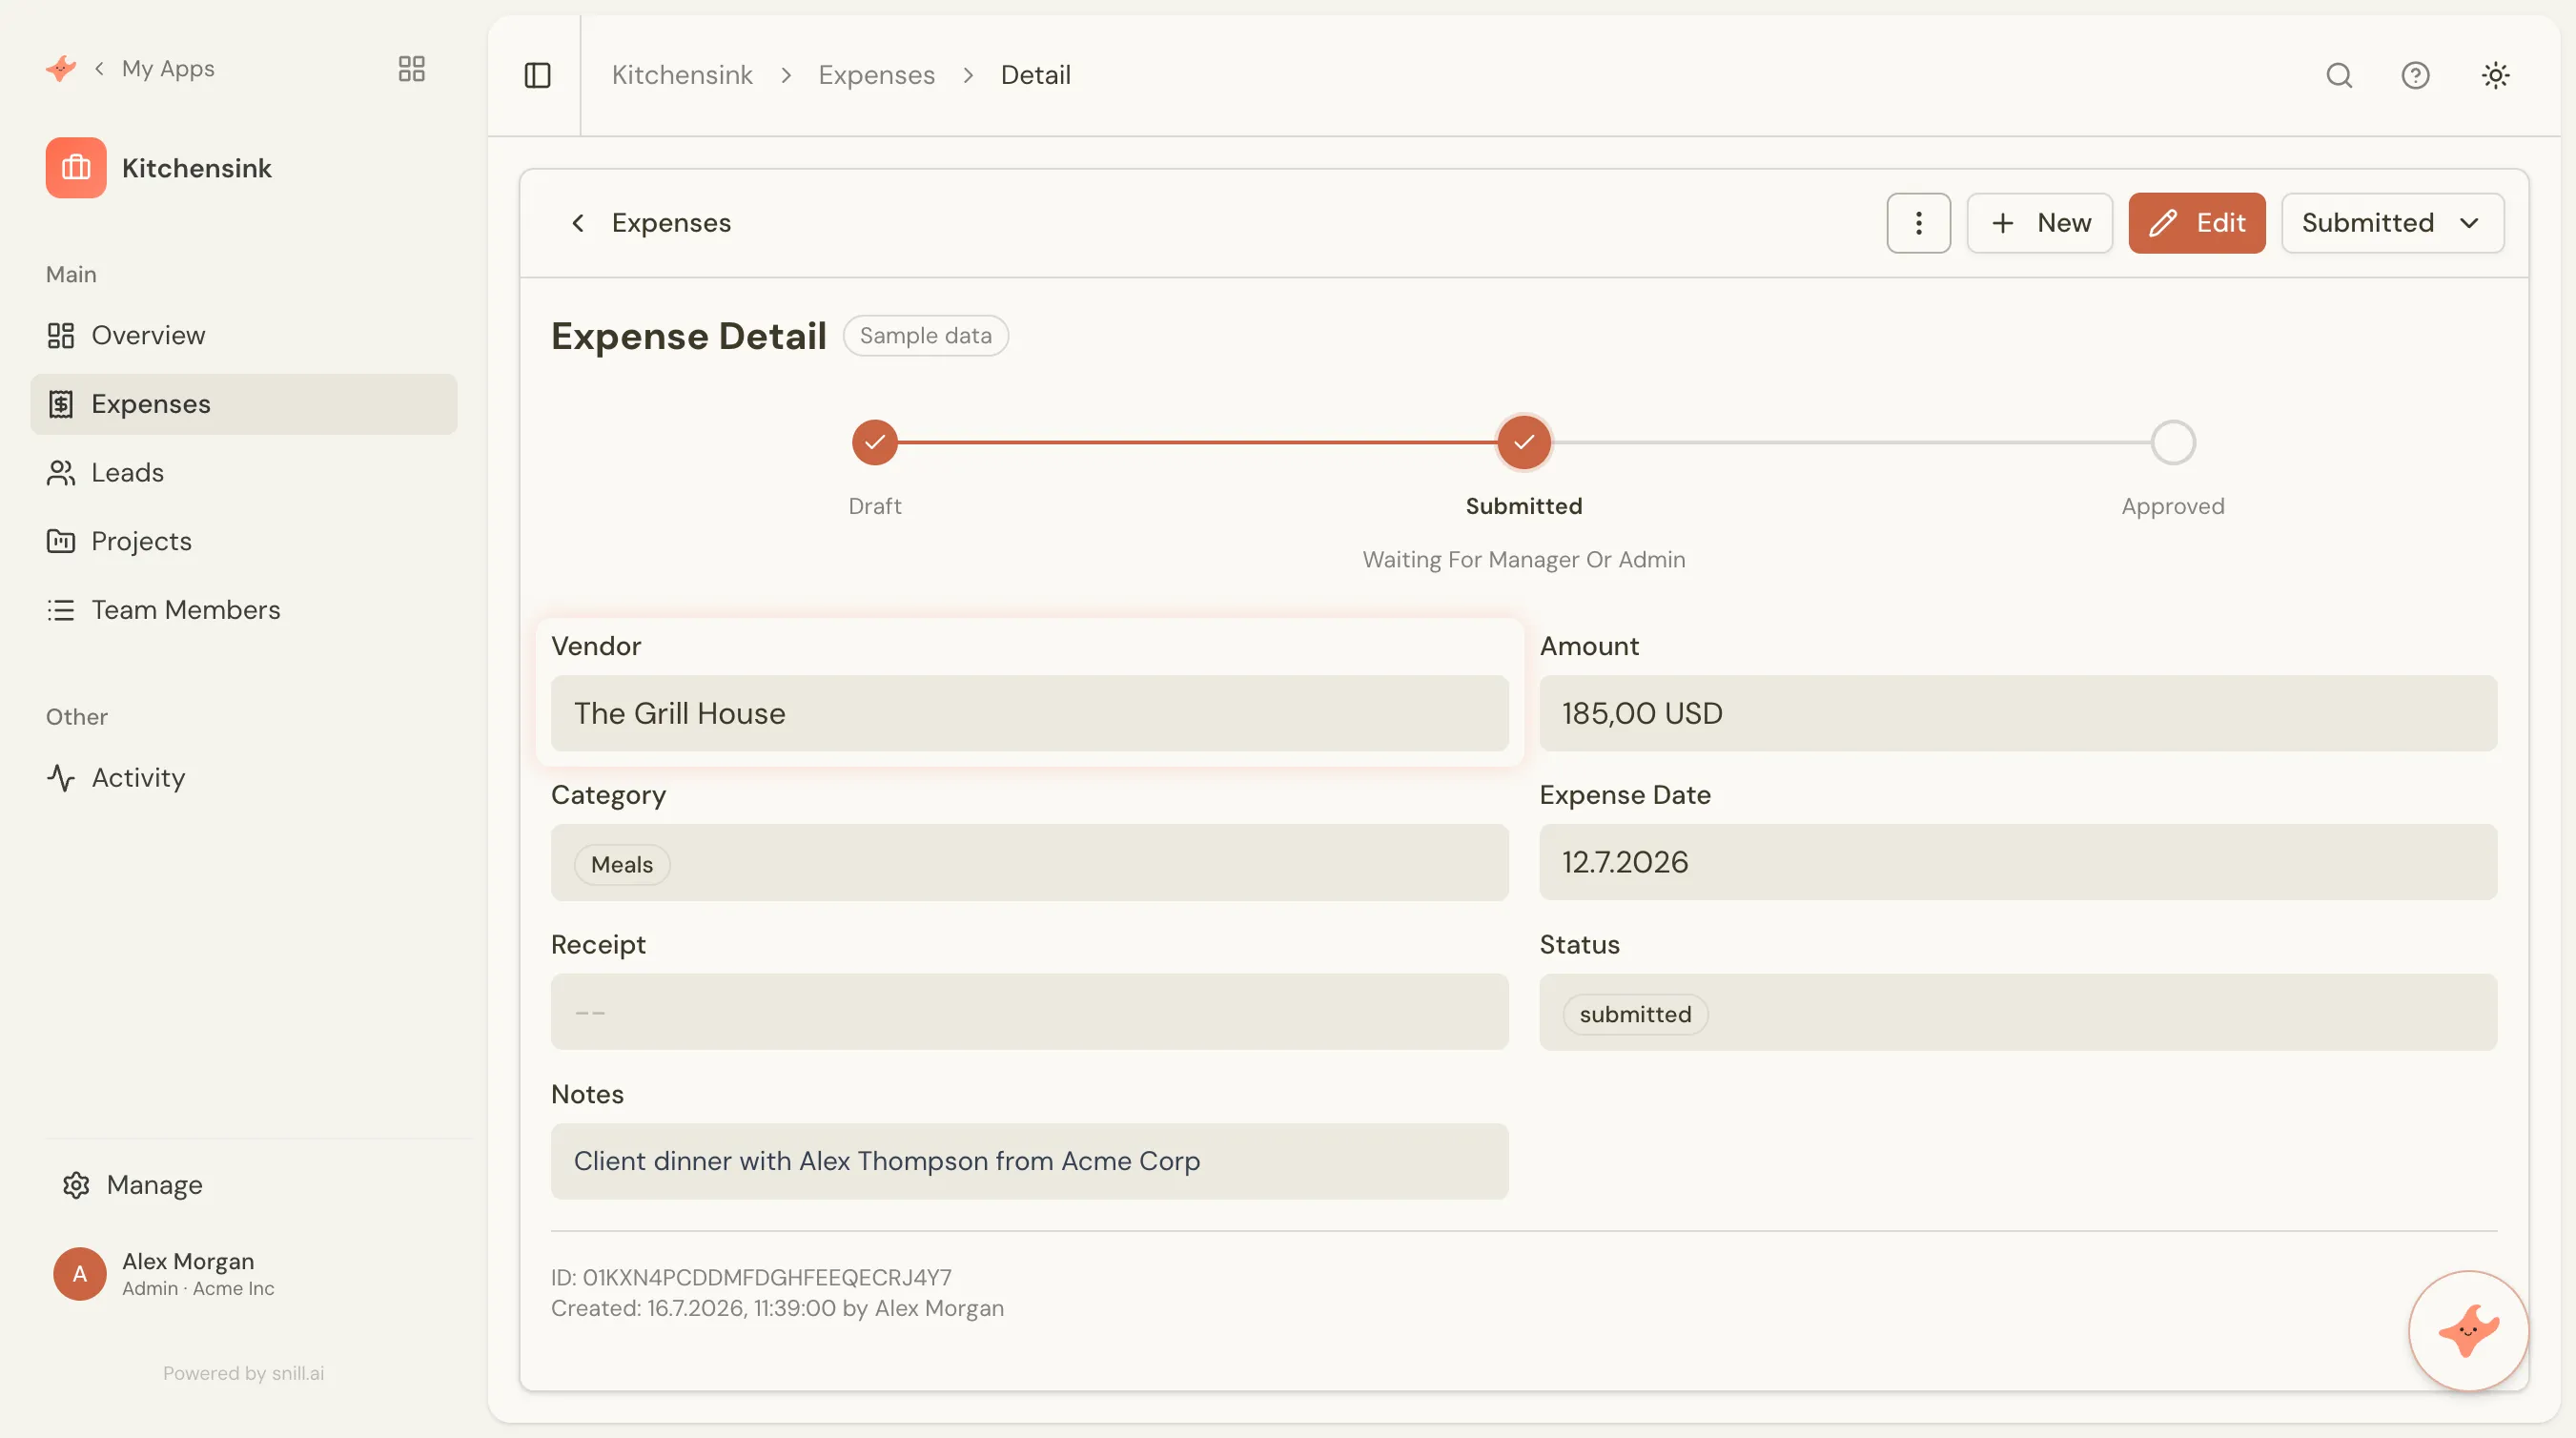
When a record moves through stages — a timesheet that goes draft → submitted → approved, or an invoice that goes draft → sent → paid — you can turn its status field into a workflow. You define which status can move to which, and who is allowed to make each move.
Tell Snill “timesheets go from draft to submitted to approved, and only managers can approve” and you get:
- Defined steps — only the transitions you set up are possible. A record can’t jump from draft straight to paid, and there are no accidental backward moves unless you allow them.
- Role-gated actions — each step says who can perform it. A manager sees an “Approve” button; someone without permission doesn’t see it at all.
- Locked records — if a person can’t move a record forward from its current stage, they see it as read-only. Whoever can act on it can also edit it.
- A visual stepper — the record’s detail page shows where it is in the process, with buttons to move it to the next stage.
The rules are enforced on the server, not just hidden in the interface — so an unauthorized change is rejected even if it comes through the API.
The simplest way to set one up is to describe it — “add an approval step to timesheets that only managers can complete” — and let Snill configure the transitions. The visual editor and JSON are there for fine-tuning.
Tip
Always include the way back. Snill only allows the transitions you list, so if a rejected timesheet should be able to return to draft, add that step explicitly.
Form layouts
Section titled “Form layouts”Organize fields into sections and columns for a clean editing experience.
By default, fields stack in a single column. With form layouts, you can:
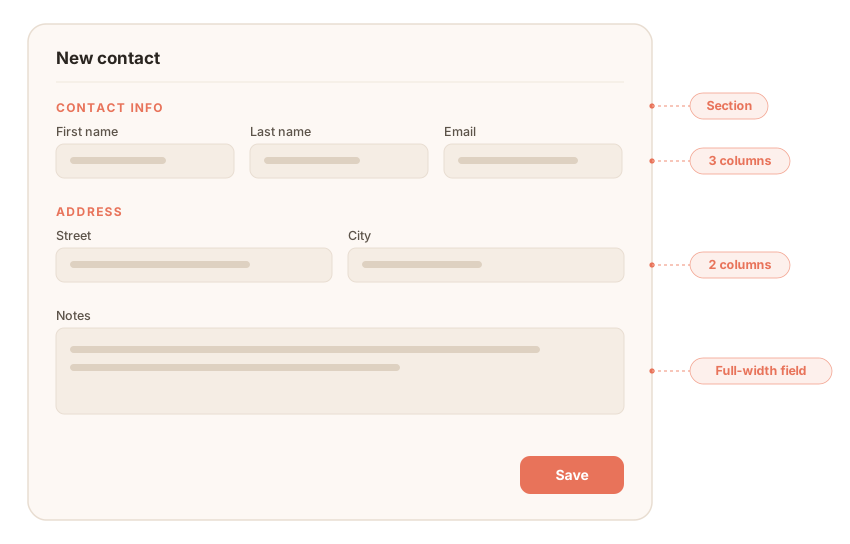
- Group fields into sections — each section gets a heading label and can contain any number of fields
- Set column counts — arrange fields in a 1 to 6 column grid, per section or for the whole form
- Span columns — individual fields can span multiple columns (e.g. a “Notes” textarea spanning the full width)
For example, a contact form might have a “Contact Info” section with name, email, and phone in 3 columns, and an “Address” section below with street, city, zip, and country in 2 columns.
Fields not assigned to any group render at the bottom in the default layout.
Tabbed layout
Section titled “Tabbed layout”Instead of stacking sections down the page, you can show each group as a tab. This keeps long records compact — the form opens on the first tab and users click across the tab bar to reach the rest, so a record with dozens of fields never becomes an endless scroll.
- Each group becomes a tab — the group’s label is the tab name.
- Ungrouped fields stay pinned above the tab bar — so key fields (like a name or status) are always visible, whichever tab is open.
- Print & PDF flatten automatically — when a record is printed or exported to PDF, the tabs expand into stacked sections so nothing is hidden.
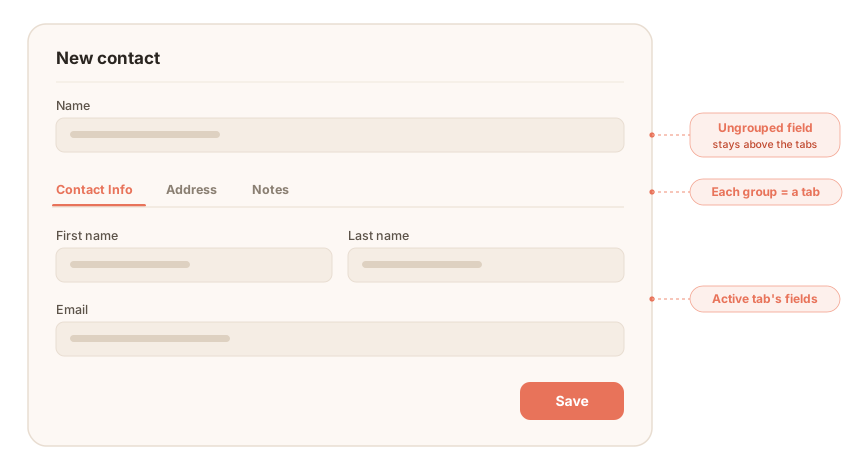
Turn it on by asking the AI (“show the contact form as tabs”) or by setting the form’s layout to tabs in the Appmodel Editor. Column counts and full-width spans work the same inside a tab as in a stacked section.
Component groups
Section titled “Component groups”Form groups can also contain page-style components (charts, stats, tables) alongside regular fields. This lets you embed live data visualizations directly within a record’s form — for example, showing a chart of related invoices right next to the customer’s contact details.
Templates
Section titled “Templates”Build display strings from record values using simple interpolation.
A template field assembles text from other fields automatically. Use the $(fieldName) syntax to insert values:
Dear $(contactName), your order $(orderNumber) is ready.This is useful for creating readable display names, reference strings, or formatted summaries. Templates support dot notation for lookup fields — for example, $(customer.name) pulls the name from a linked customer record.
You can also reference app variables with $variableName, so a template like $(name) — $companyName would include your company name.
Dashboards
Section titled “Dashboards”A summary view of your most important data — stats, charts, and tables at a glance.
Every app has a dashboard that provides an overview of your data. It’s built from widgets arranged on a 4-column grid:
Widget types
Section titled “Widget types”| Widget | What it shows |
|---|---|
| Count | Total number of records in a collection |
| Stat | An aggregate value — sum, average, min, or max of a field |
| Chart | Data grouped and visualized — supports bar, line, area, pie, donut, radar, and more |
| Table | A mini table showing recent or filtered records |
| Activity | A feed of recent changes across the app |
Charts can group data by any field — including dates with configurable granularity (day, week, month, year). A grouped chart or table can also be ranked and capped to the top N, turning it into a leaderboard — top 5 customers by revenue, the 10 busiest projects — instead of every group at once. Each widget can span 1 to 4 columns for flexible layouts.
The AI generates a sensible dashboard automatically, but you can customize it through the visual editor or by asking the AI to change it.
Access control
Section titled “Access control”Control who can see, edit, and delete data — at the collection, record, and field level.
You can set all of this just by describing it — “only managers can see salaries”, “salespeople only see their own deals” — and Snill applies the right rules. As always, the visual editor and JSON are there for the technically inclined.
Collection-level access
Section titled “Collection-level access”Each collection can restrict access by role. There are three modes:
- Everyone — all users have full access (the default)
- Custom roles — specify which roles can read, edit, and delete. For example, only “admin” and “manager” can delete records, while “viewer” can only read.
- Admin only — only admins can access the collection. It won’t appear in the sidebar for other users.
Record ownership
Section titled “Record ownership”For collections where users should only see or edit their own records, you can set an ownership mode:
| Mode | See | Edit / Delete |
|---|---|---|
| All | All records | All records |
| Own-modify | All records | Only their own |
| Own | Only their own | Only their own |
Ownership is tracked automatically — the system records who created each record. Admins always have full access regardless of these settings.
Field-level access
Section titled “Field-level access”Individual fields can be restricted too. For example, a “salary” field might be visible only to the “admin” and “hr” roles, and editable only by “admin”.
Activity Log
Section titled “Activity Log”A complete audit trail for everything that happens in your app.
The activity log records every data mutation (create, update, delete) along with custom events fired by triggers and action buttons. Each entry captures the user, action, collection, affected record, a short summary, and a timestamp.
Open it from the Activity Log item in the left sidebar. The view is searchable and paginated, with filters by action type and collection.
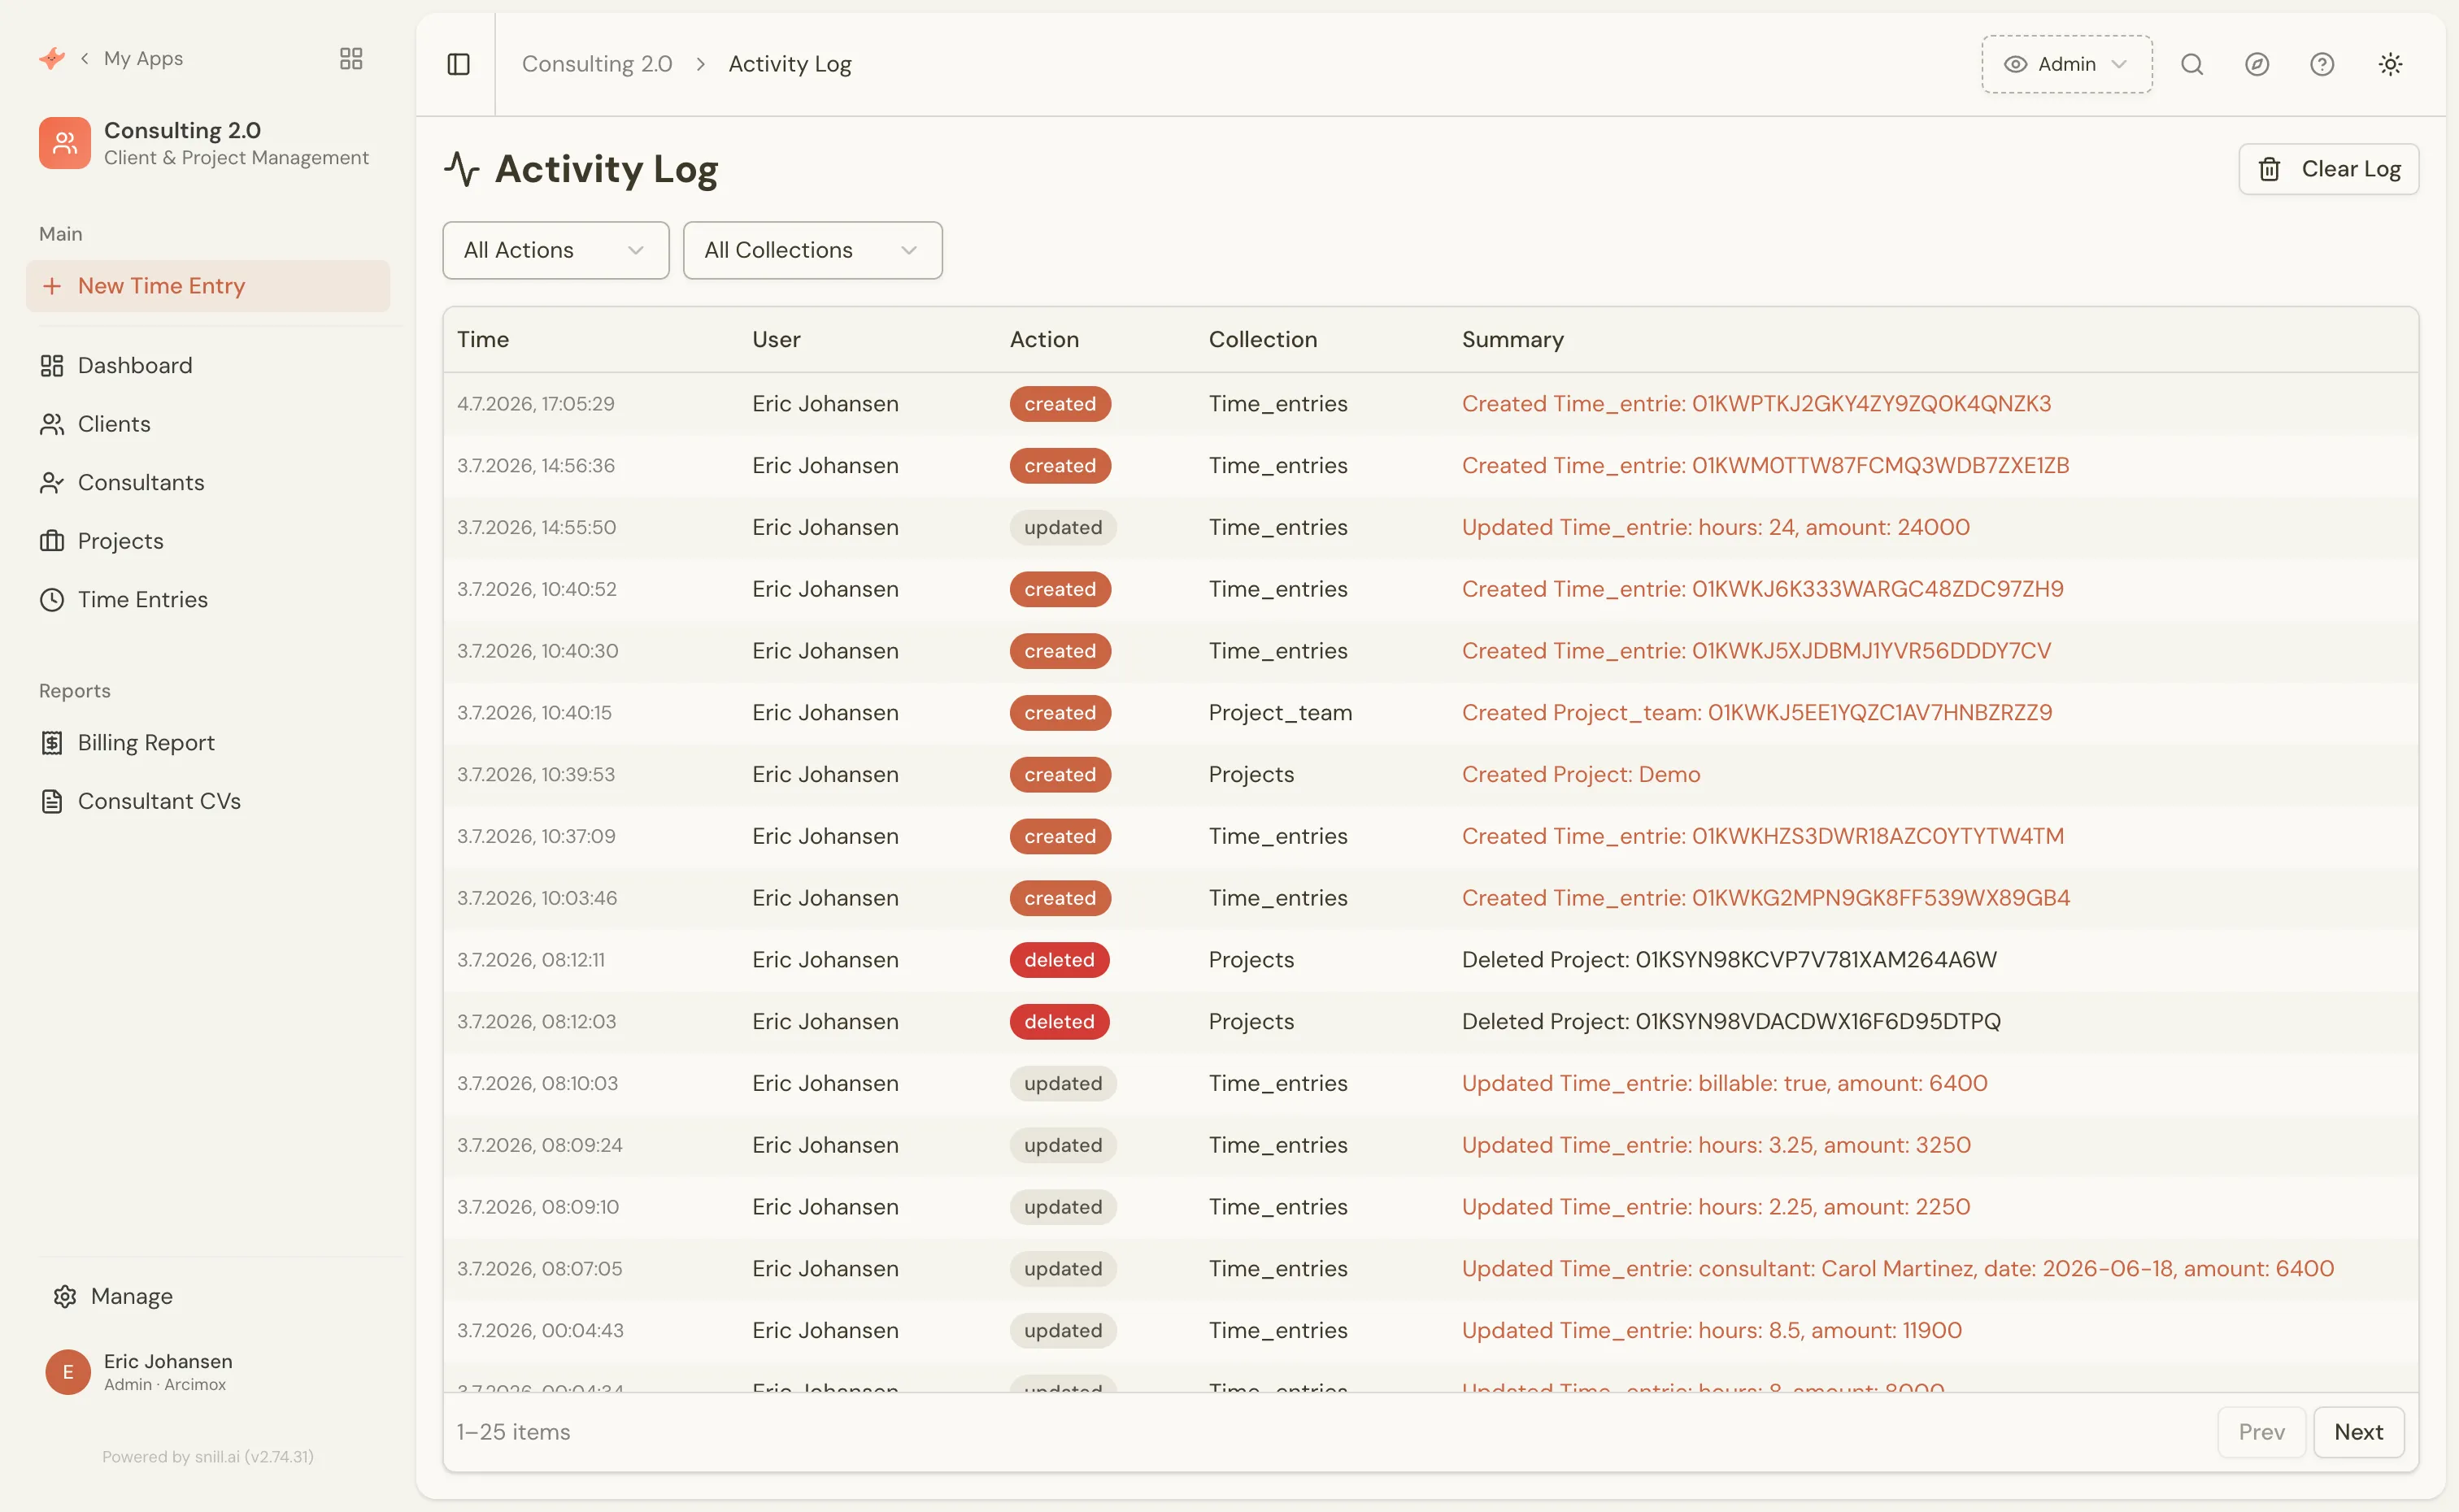
The activity log is also part of the public REST API. Your app’s OpenAPI spec includes a GET /v1/system/activitylog endpoint — useful for exporting audit history or building integrations that watch for specific events. See the API & Integrations section.
Data Assistant
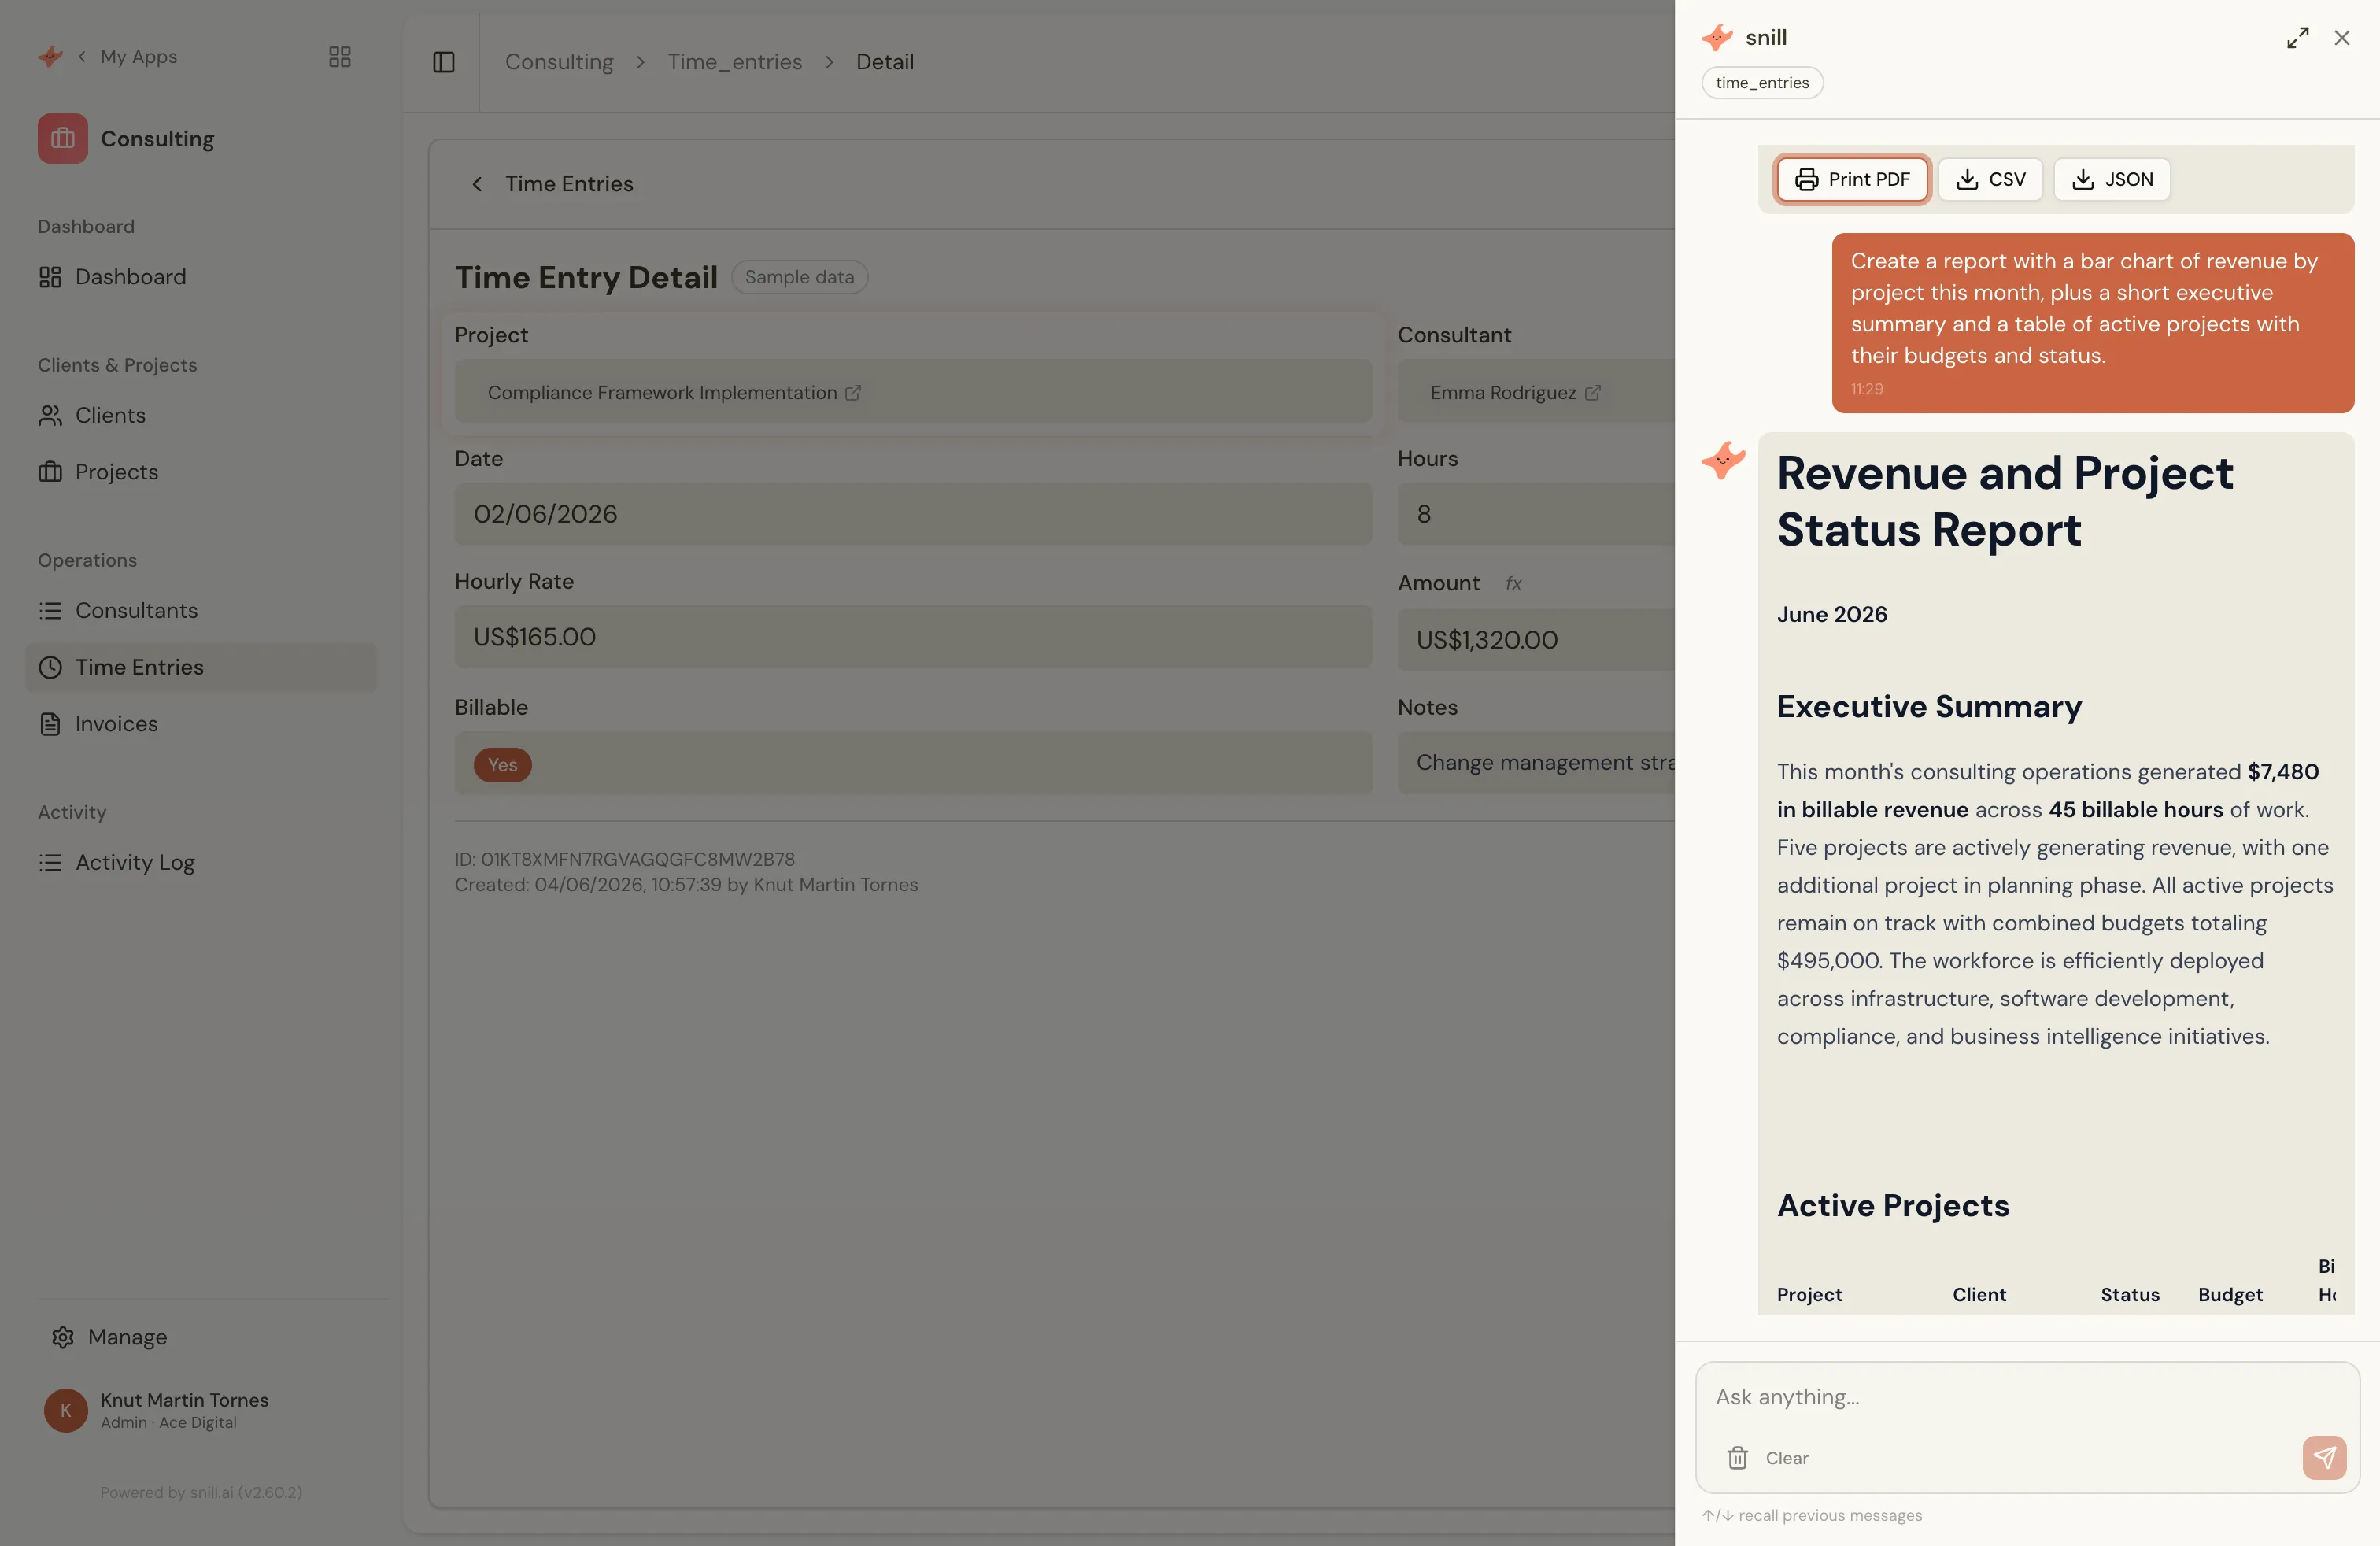
Section titled “Data Assistant”An AI chat that can query your data, generate reports, and modify your app.
The Data Assistant is a built-in AI that understands your app’s data model. You can ask it questions in plain language:
- “Show me all invoices from this month that are unpaid”
- “What’s the total revenue by customer for Q1?”
- “Create a chart of monthly sales trends”
Beyond querying, the assistant can also modify your app’s structure — adding fields, creating new collections, adjusting layouts, and updating dashboard widgets. It’s the same AI that built your app initially, so it understands the full context.
The assistant proposes, you approve
Section titled “The assistant proposes, you approve”The assistant never applies a structural change on its own. When you ask for one it proposes the change and shows you what it would do, and nothing takes effect until you approve it. This is deliberate: once real people depend on an app, the expensive failure isn’t slow work, it’s a change nobody reviewed.
Approved changes are recorded in version history, which notes what changed and whether the change came from the AI or was made manually, with one-click rollback to any earlier version of the data model. Data changes are recorded separately in the activity log.
Note
Structural changes (adding fields, modifying the data model) are only available to admin users. Non-admin users can query and explore data but cannot change the app’s configuration.
Note
Snill’s AI runs in the EU. The Data Assistant, report generation, and scan to fill process your data on AWS Bedrock in EU regions only, for GDPR data residency. If EU inference is temporarily unavailable the AI pauses rather than sending data outside the EU — it never falls back to a non-EU region.
Keyboard & Snill Finder
Section titled “Keyboard & Snill Finder”Move around your whole app without reaching for the mouse — jump anywhere with the Snill Finder, and drive lists and records straight from the keyboard.
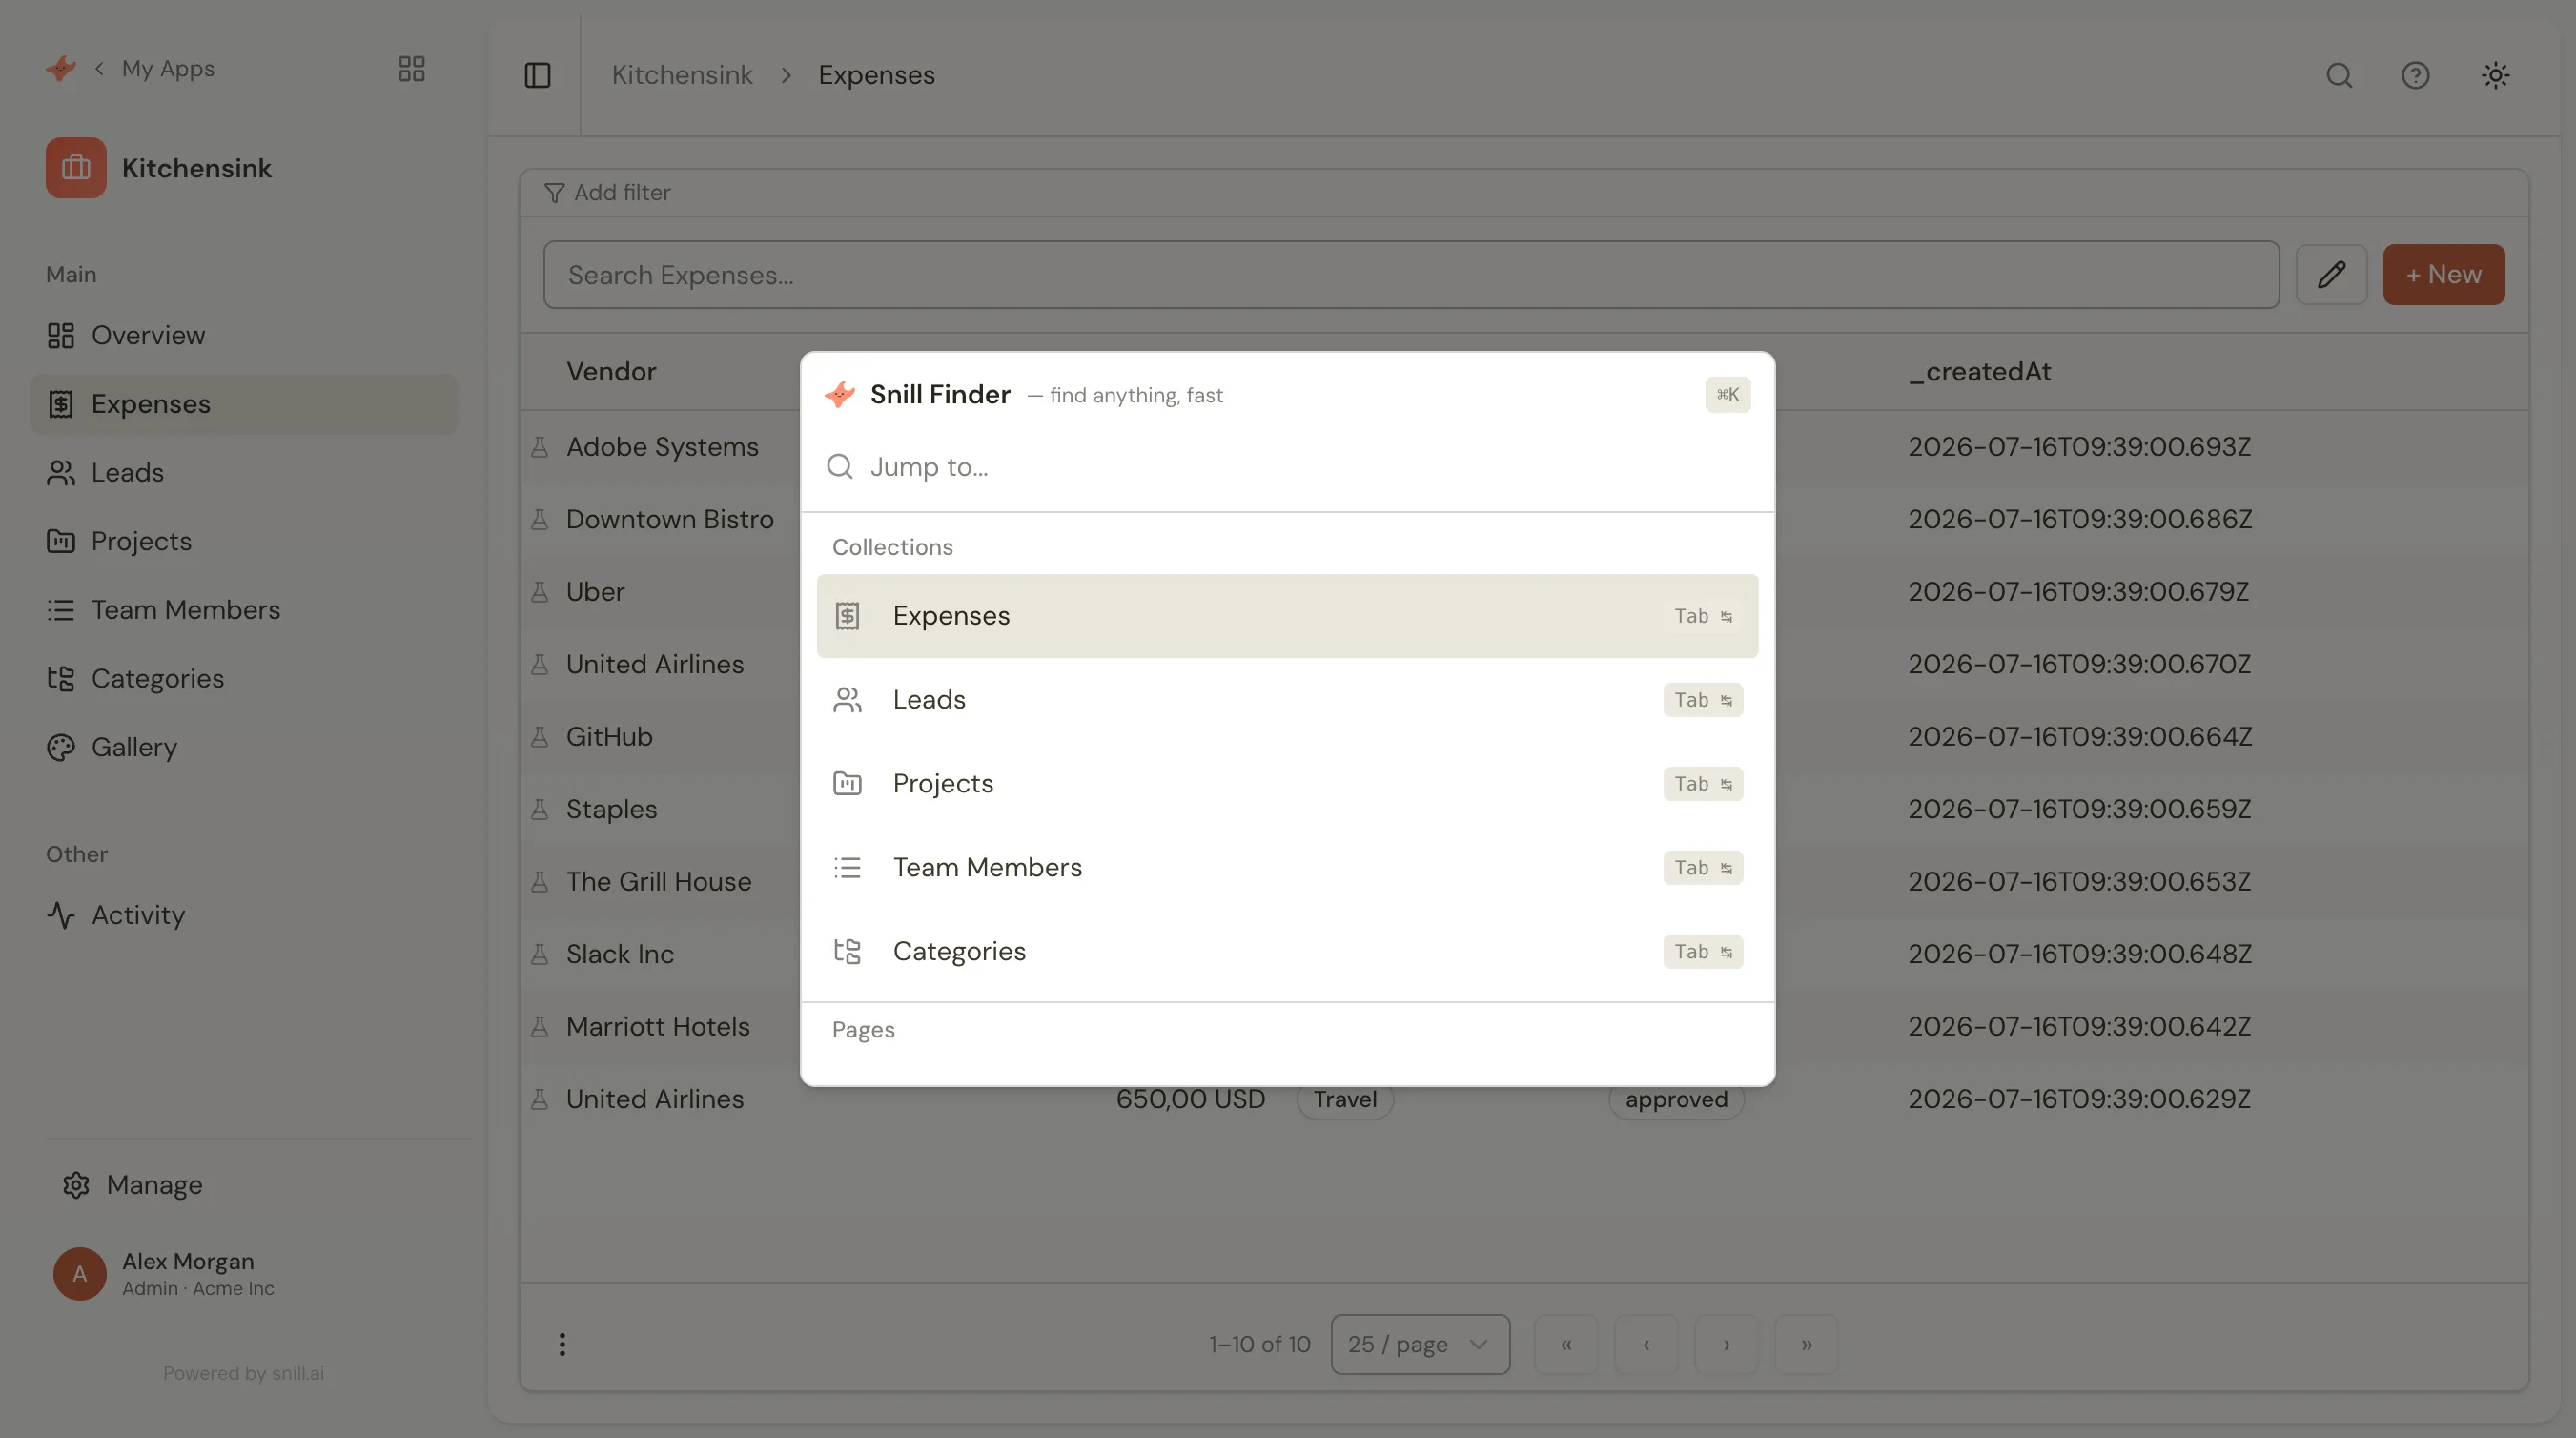
Snill Finder (⌘K)
Section titled “Snill Finder (⌘K)”Press ⌘K (Ctrl + K on Windows/Linux) anywhere in your app to open the Snill Finder — a command palette that takes you to any collection, custom page, or record in a couple of keystrokes. Start typing to filter, press Tab to jump straight to a collection, or use ↑ / ↓ and Enter to pick a result.
Keyboard shortcuts
Section titled “Keyboard shortcuts”Press ? on any screen to pop up the built-in cheatsheet. The essentials:
| Scope | Action | Key |
|---|---|---|
| Global | Open Snill Finder | ⌘K |
| Print page as report | ⌘P | |
| Show shortcut help | ? | |
| List view | New record | n |
| Focus search | / | |
| Move between rows | ↑ ↓ | |
| Previous / next page | ← → | |
| Open selected record | Enter | |
| Clear selection | Esc | |
| Detail view | Edit record | e |
| Save record | ⌘S | |
| Cancel edit / back to list | Esc |
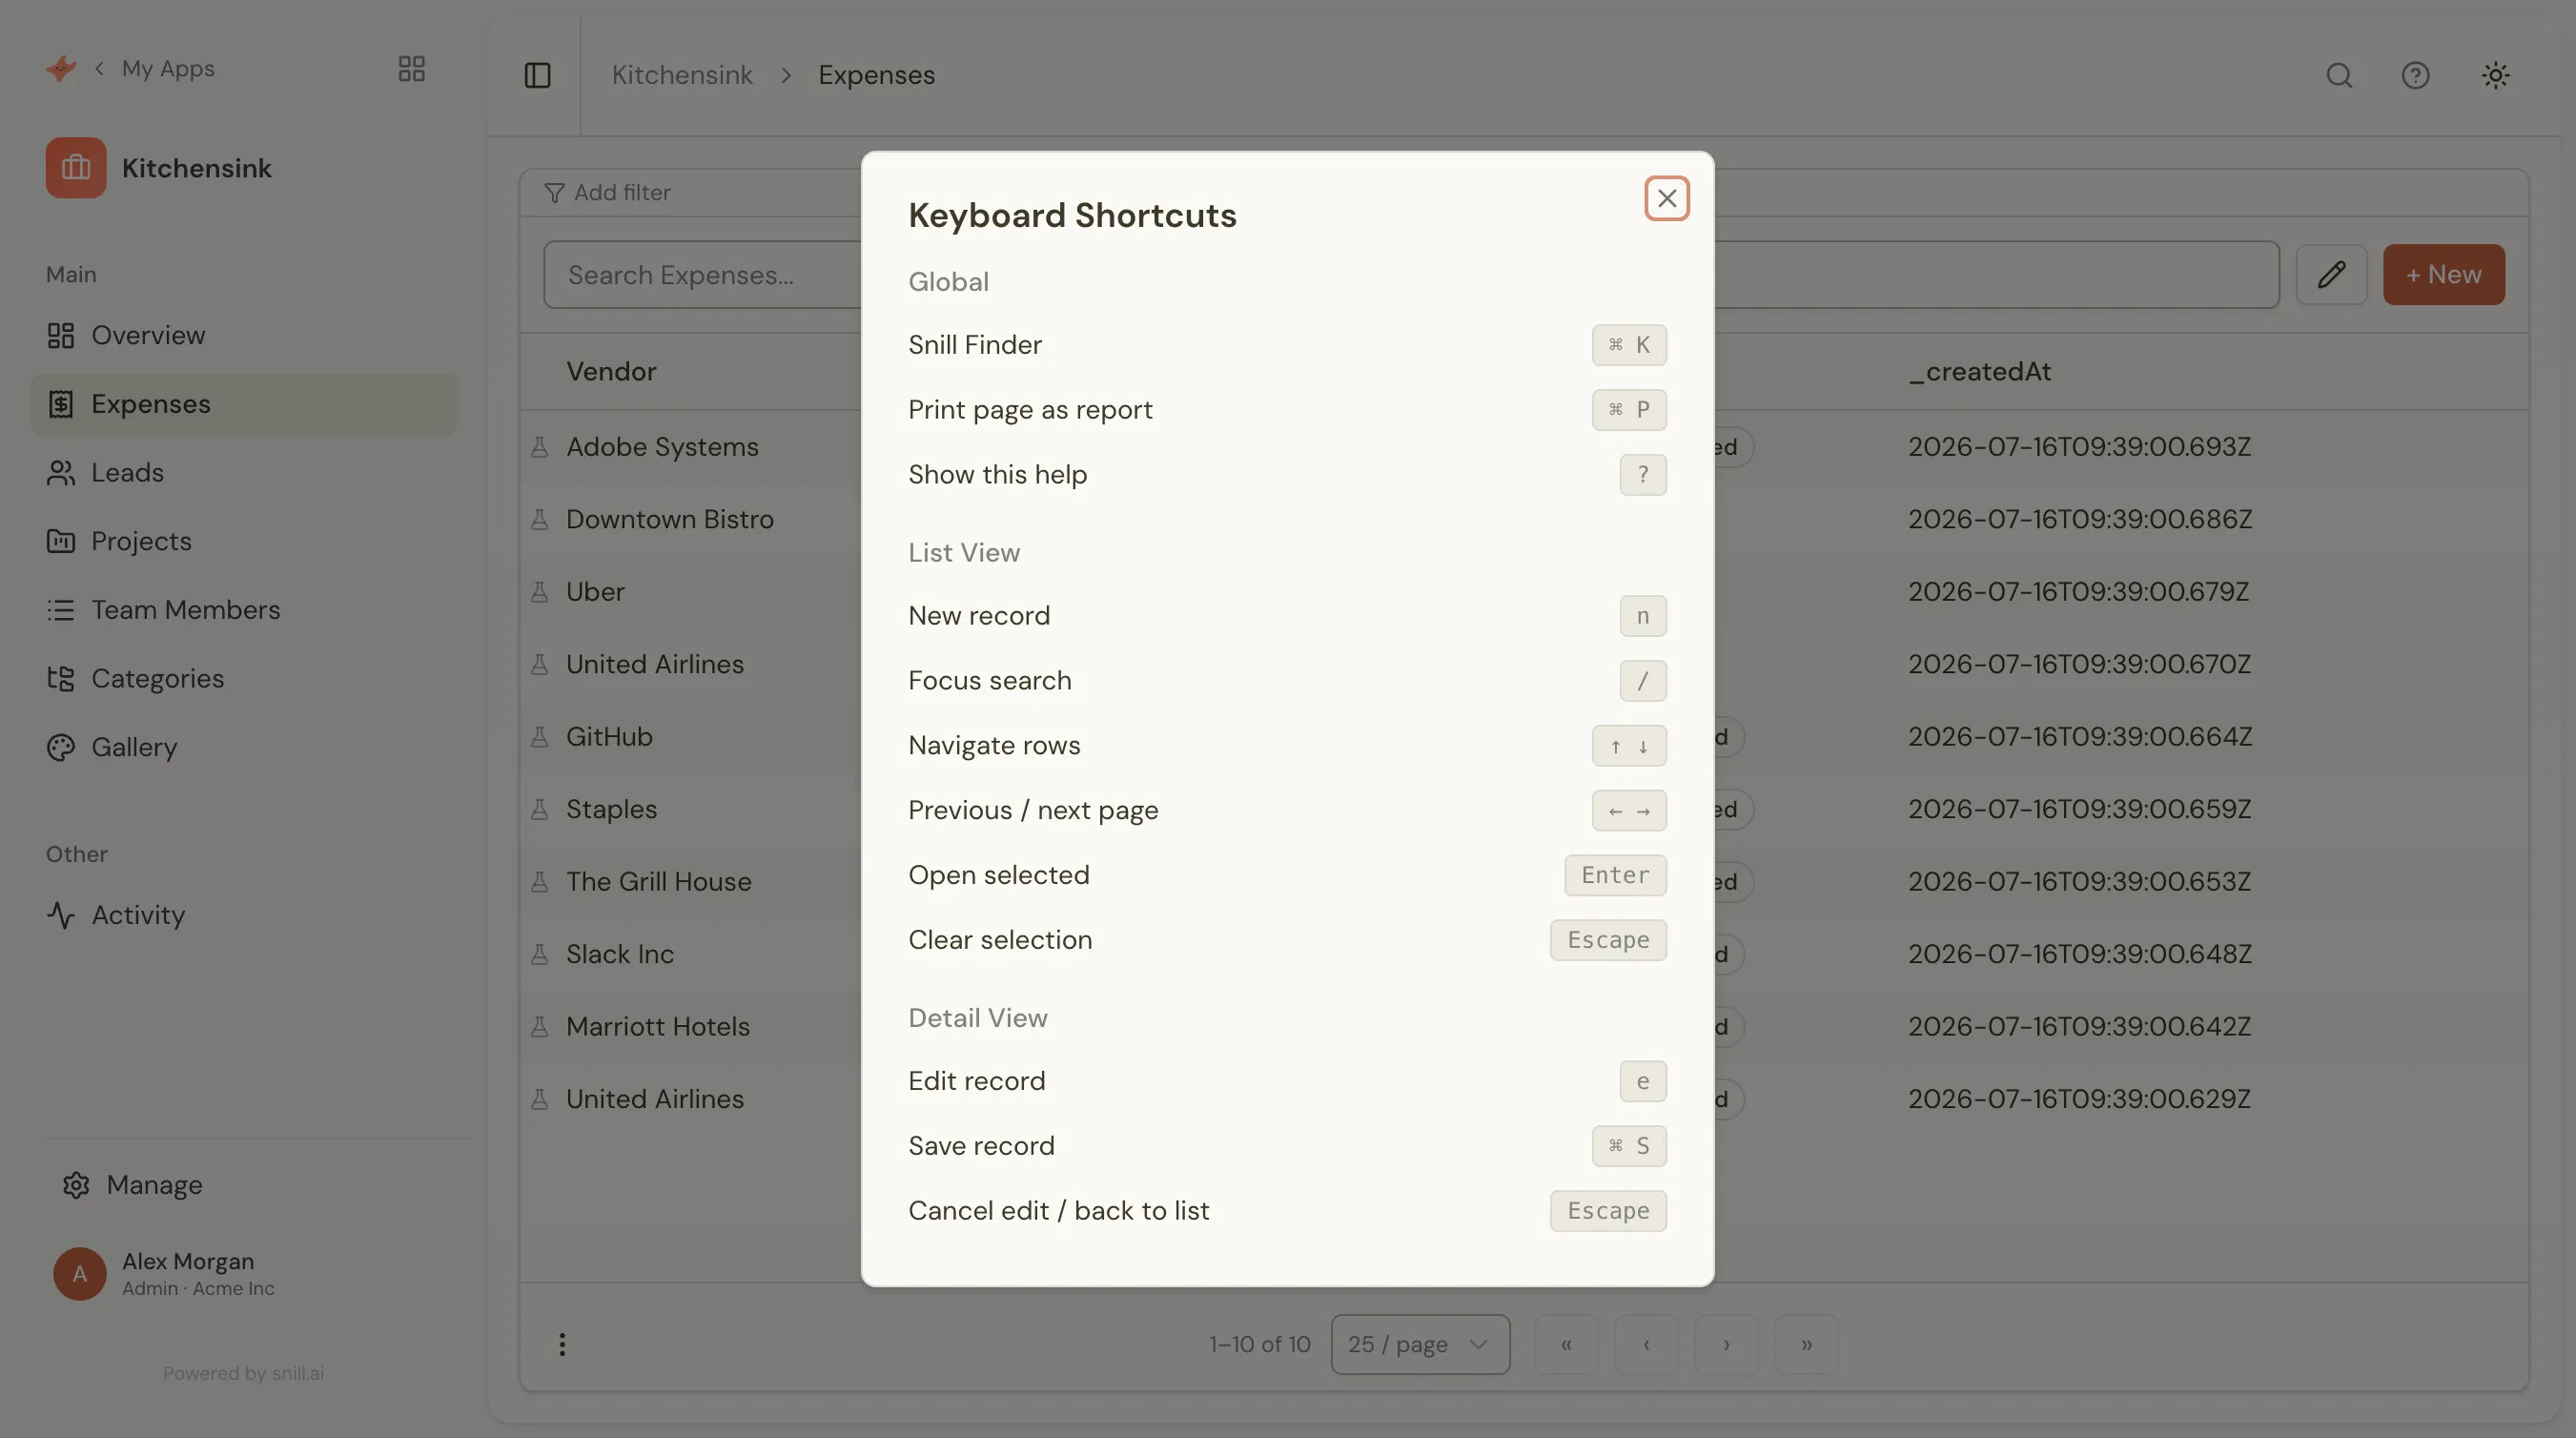
? on any screen to bring it up.Navigating lists, records, and sub-lists
Section titled “Navigating lists, records, and sub-lists”The whole app is reachable from the keyboard, including related records:
- In a list, use ↑ / ↓ to move between rows and Enter to open the highlighted record. / jumps to search, n starts a new record, and ← / → page through results.
- In a record, ↑ / ↓ move a highlight through the fields and any related sub-lists. Press Enter on a lookup field to follow it straight to the linked record.
- In a related sub-list, press Enter on the sub-list to step into it, then ↑ / ↓ to move through its rows and Enter to open one — so you can walk from a parent record into its children (e.g. a client into its projects) without touching the mouse.
- Esc steps back out — clearing a selection, leaving a sub-list, or returning from a record to its list.
Tip
On Windows and Linux, use Ctrl wherever a shortcut shows ⌘ — for example, Ctrl + K opens the Snill Finder.
Appmodel Editor
Section titled “Appmodel Editor”A visual and code-level editor for your app’s entire configuration.
The Appmodel Editor gives admins full control over the app’s data model — the JSON configuration that defines every collection, field, relationship, layout, and dashboard.
Most people never open it — the Data Assistant makes the same changes when you ask, in plain language. The editor is here for when you want hands-on, fine-grained control.
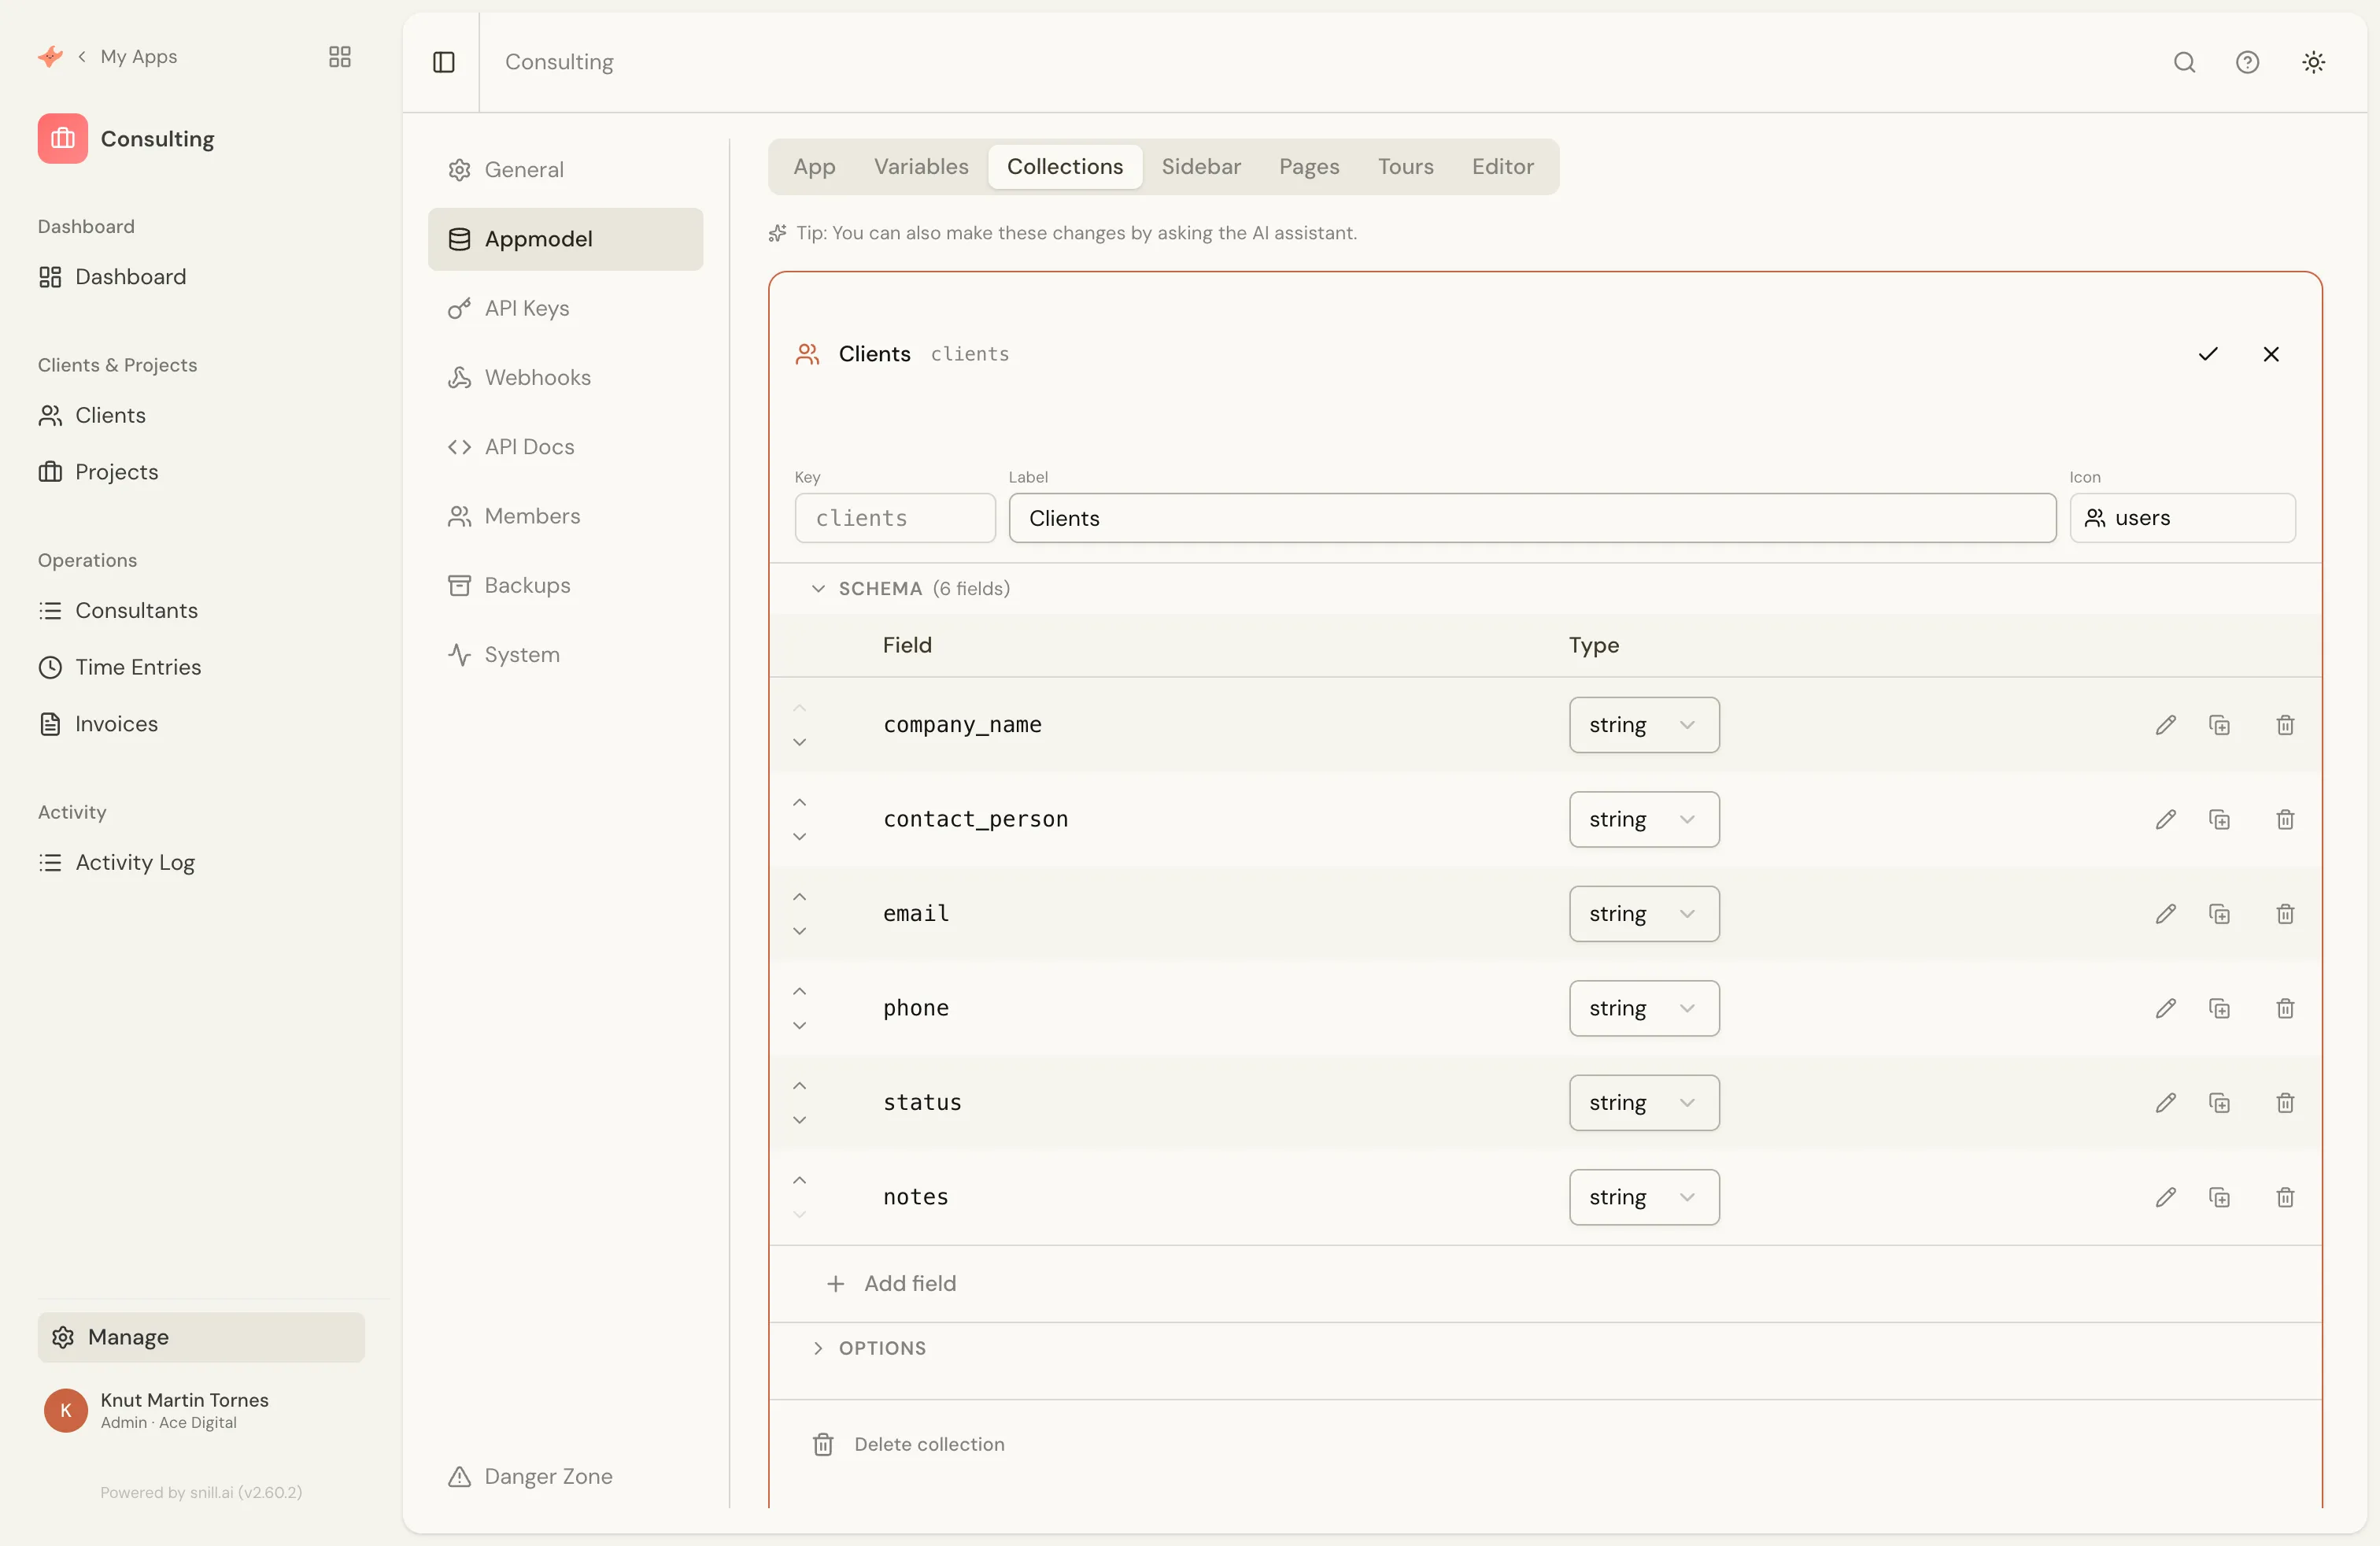
Visual editor
Section titled “Visual editor”The visual editor lets you configure everything without touching JSON:
- Collection cards — view and edit each collection’s fields, settings, and relationships
- Field editor — click any field to change its type, format, validations, lookup config, and access control
- Options editor — configure list fields, search fields, sort order, form layout, related collections, and more
- Sidebar, Dashboard, and Variables tabs — manage navigation, widgets, and global constants
JSON schema editor
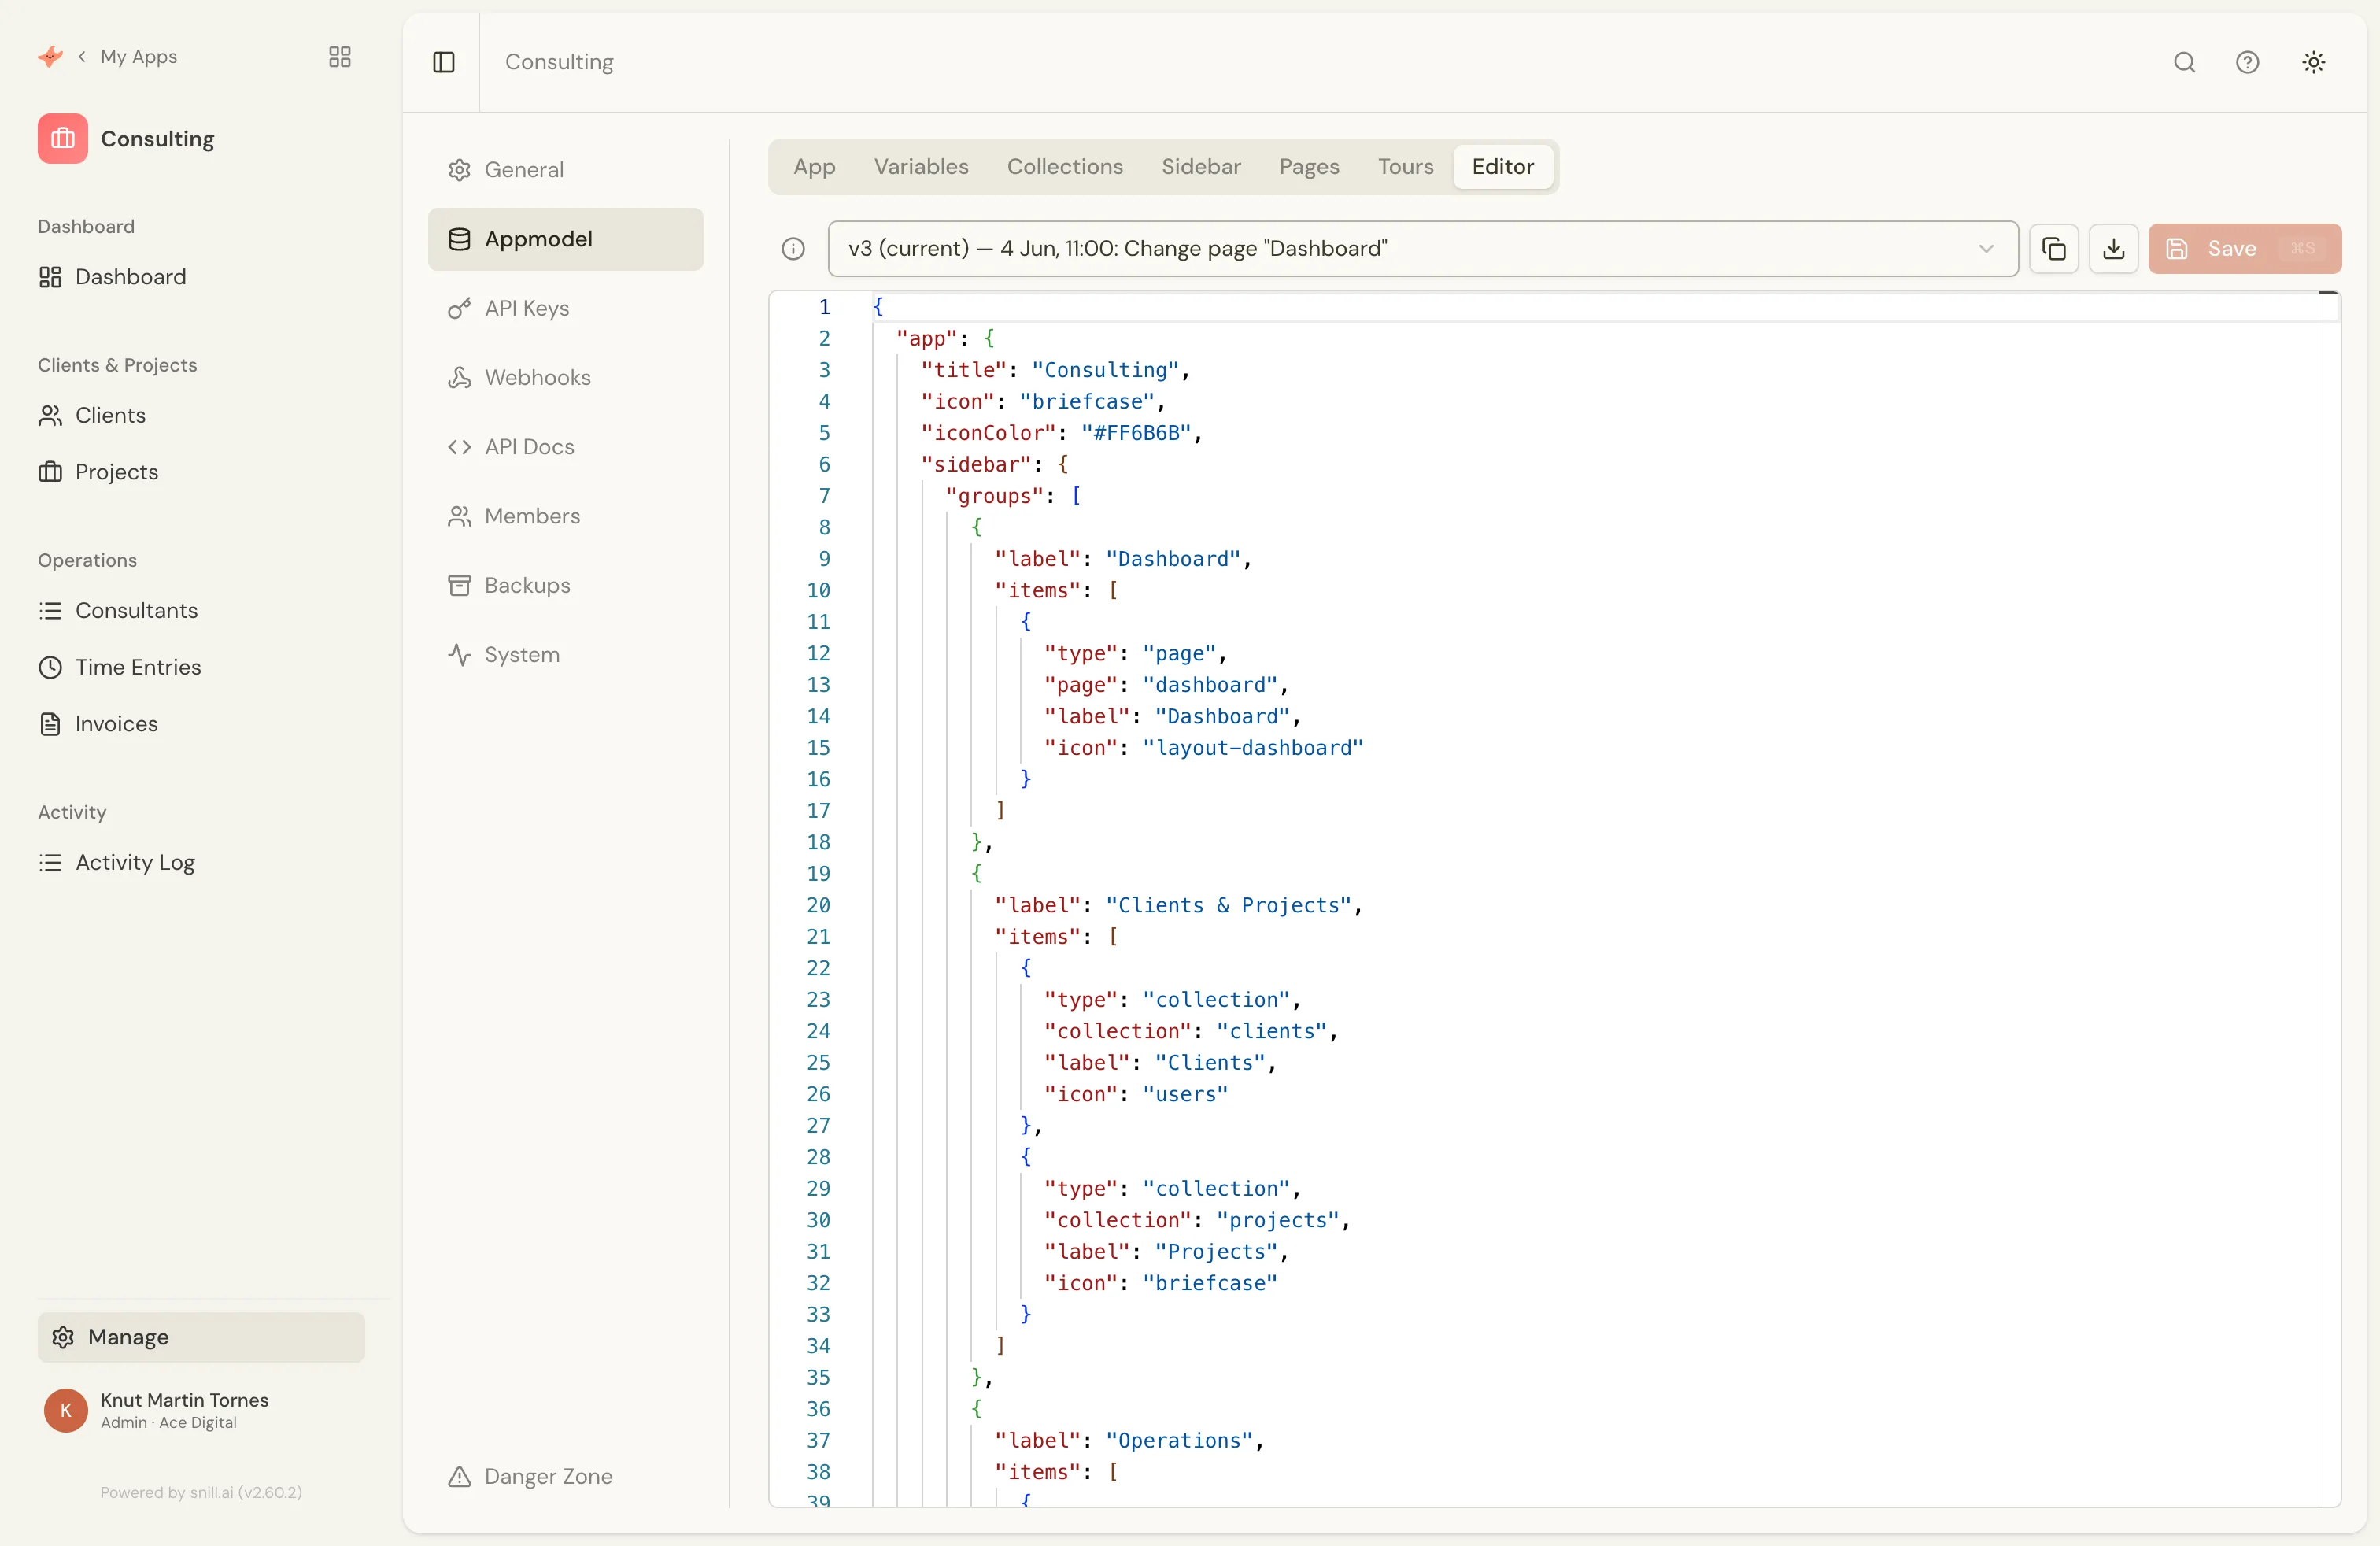
Section titled “JSON schema editor”For advanced users, the JSON tab provides a full code editor with:
- Schema validation — real-time error highlighting with detailed tooltips as you type
- Autocomplete — suggestions for field types, formats, and DSL extensions
- Version history — browse and restore any previous version of the data model, with details on what changed and whether the change was made by AI or manually
- Copy and download — export the full JSON for backup or reference
Model grid & Develop mode
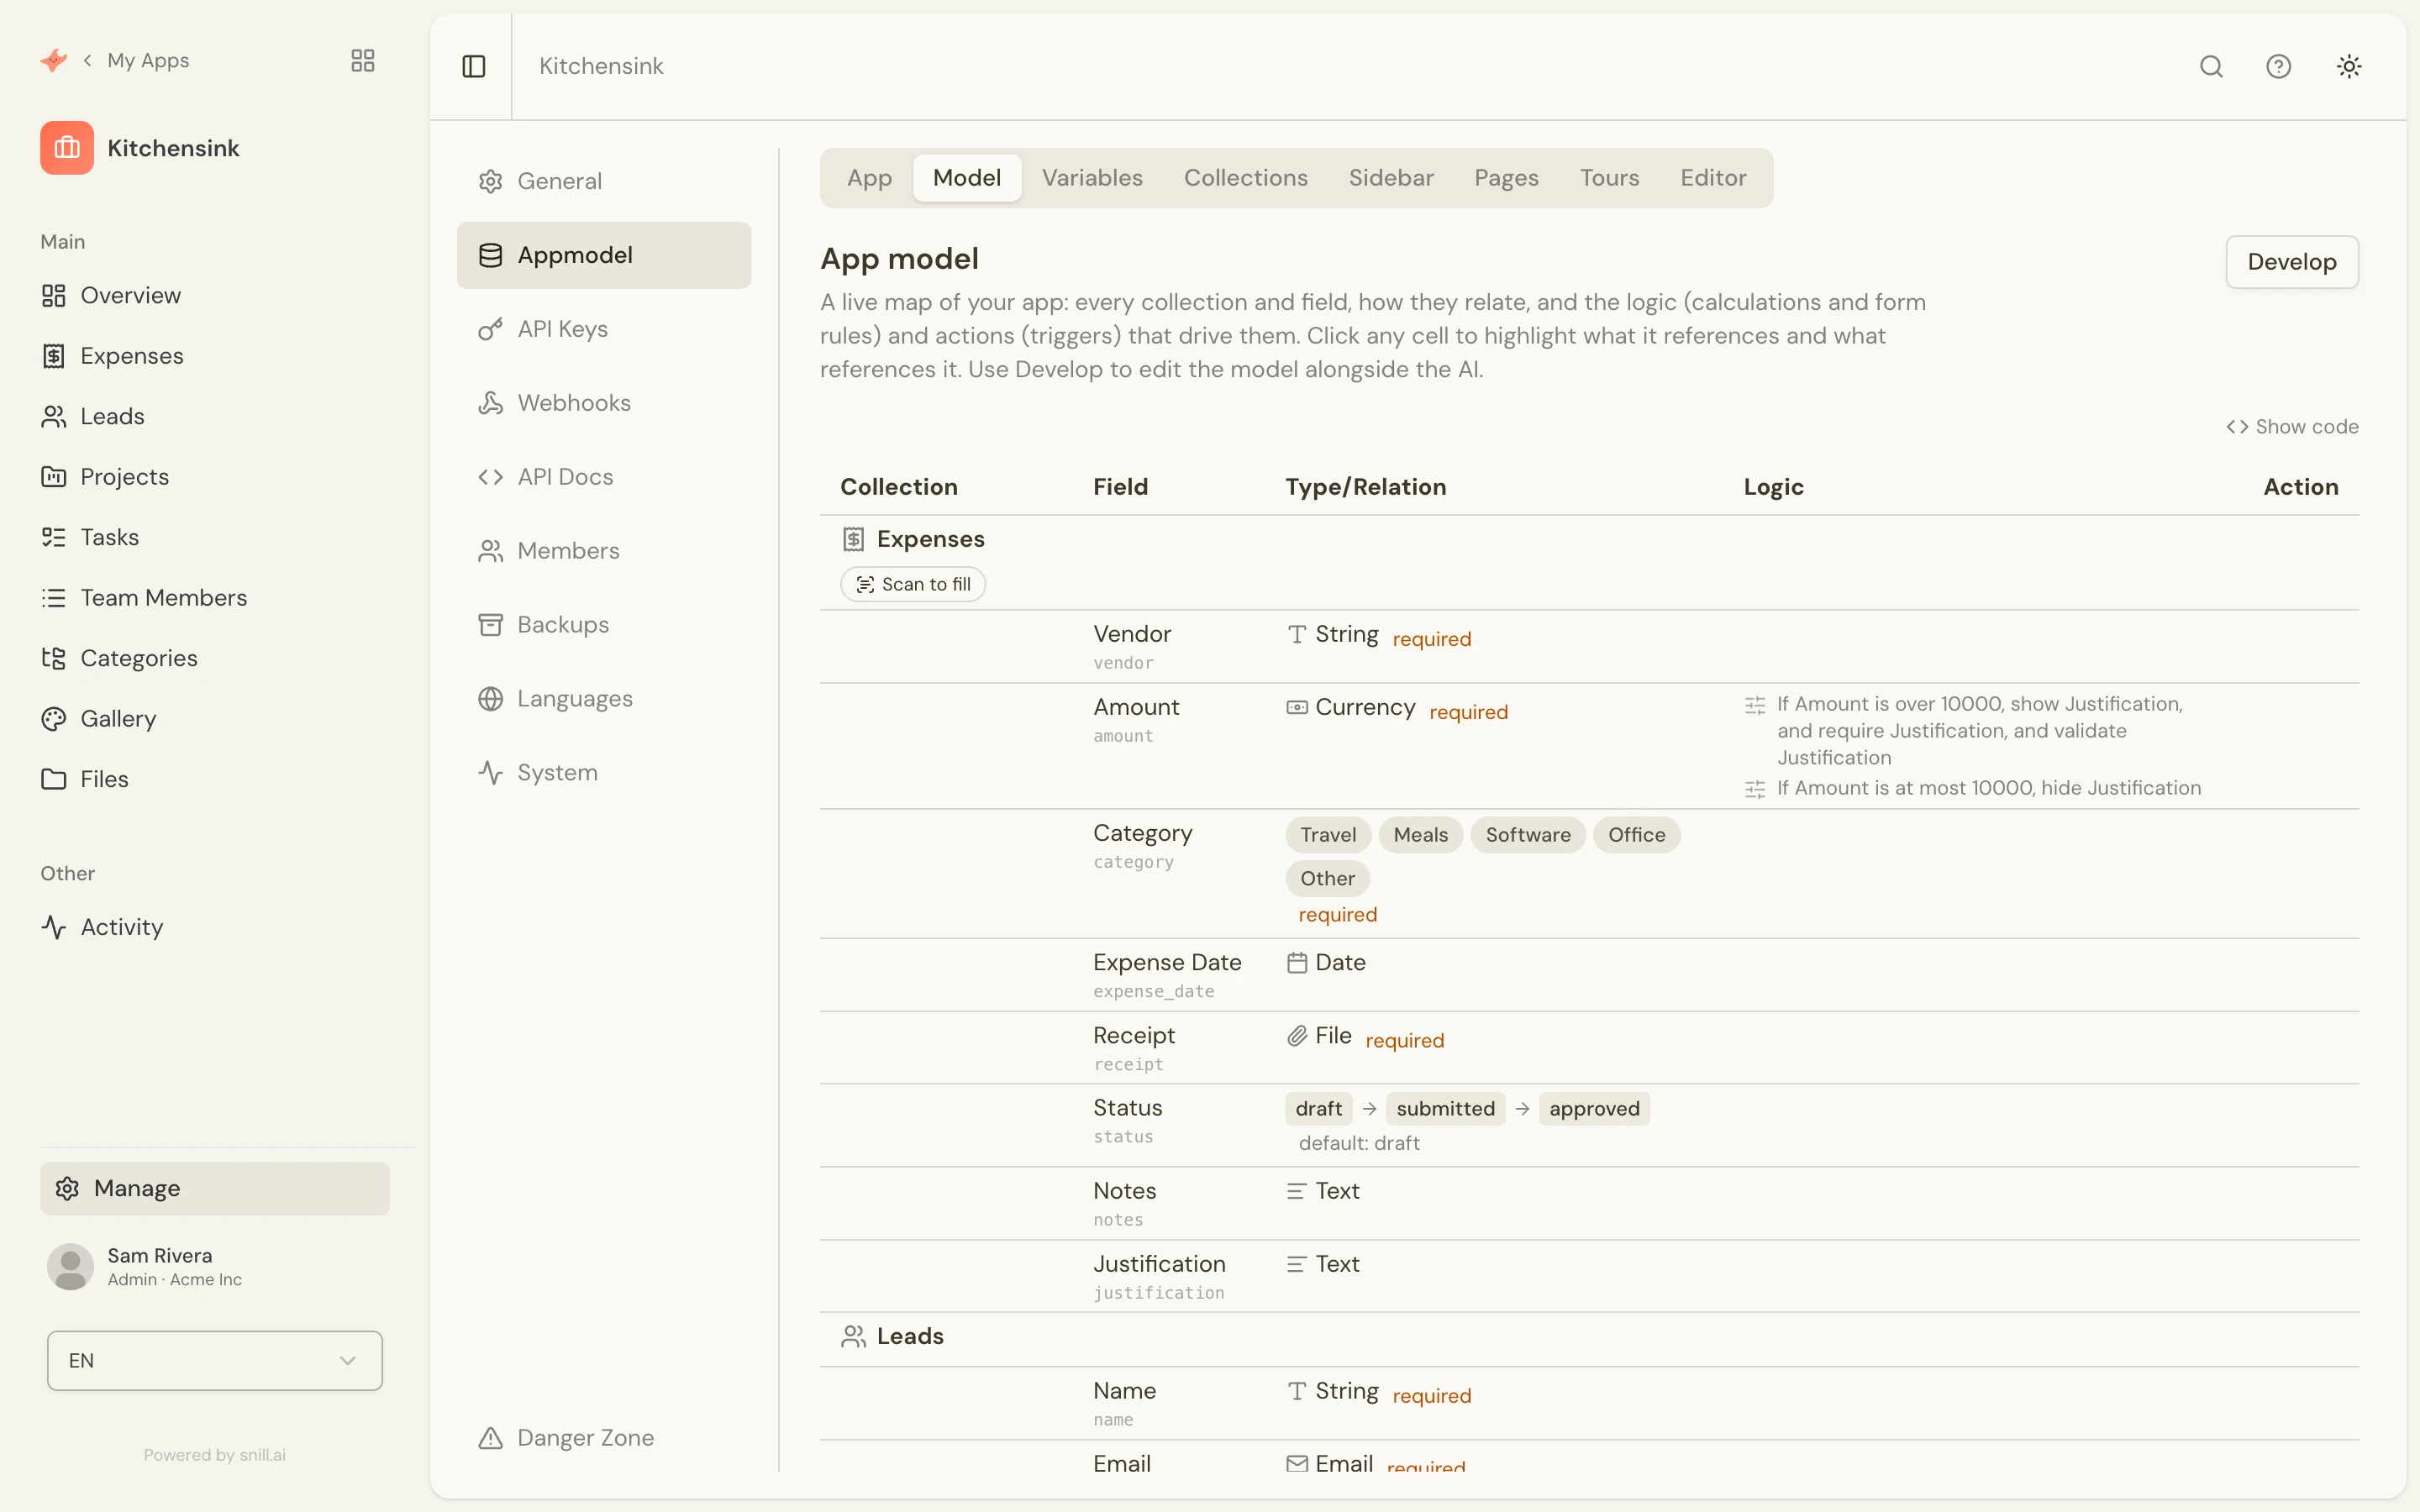
Section titled “Model grid & Develop mode”The Model tab is a read-only, spreadsheet-style map of your whole app — every collection and field on one screen, with columns for the field’s type or relation, its calculation logic, and any trigger attached to it. Click a cell to light up everything connected to it in both directions: click a relation and its target collection highlights; click a collection and every lookup, formula, and trigger that touches it lights up — so you can see the impact of a change at a glance.
Click Develop to open a full-screen build workspace: the live model grid fills the screen with the AI chat docked alongside it. As you ask the AI to change the app, the pending change previews right in the grid as a colour-coded diff — green for added, amber for changed, red for removed — before you click Apply to commit it. The grid only shows the model; it never changes anything on its own.
Note
The Appmodel Editor is only available to admin users. Changes are validated before saving and create a new version — you can always roll back.
Import / Export
Section titled “Import / Export”Bring your data in from CSV or JSON, and export it whenever you need.
Importing data
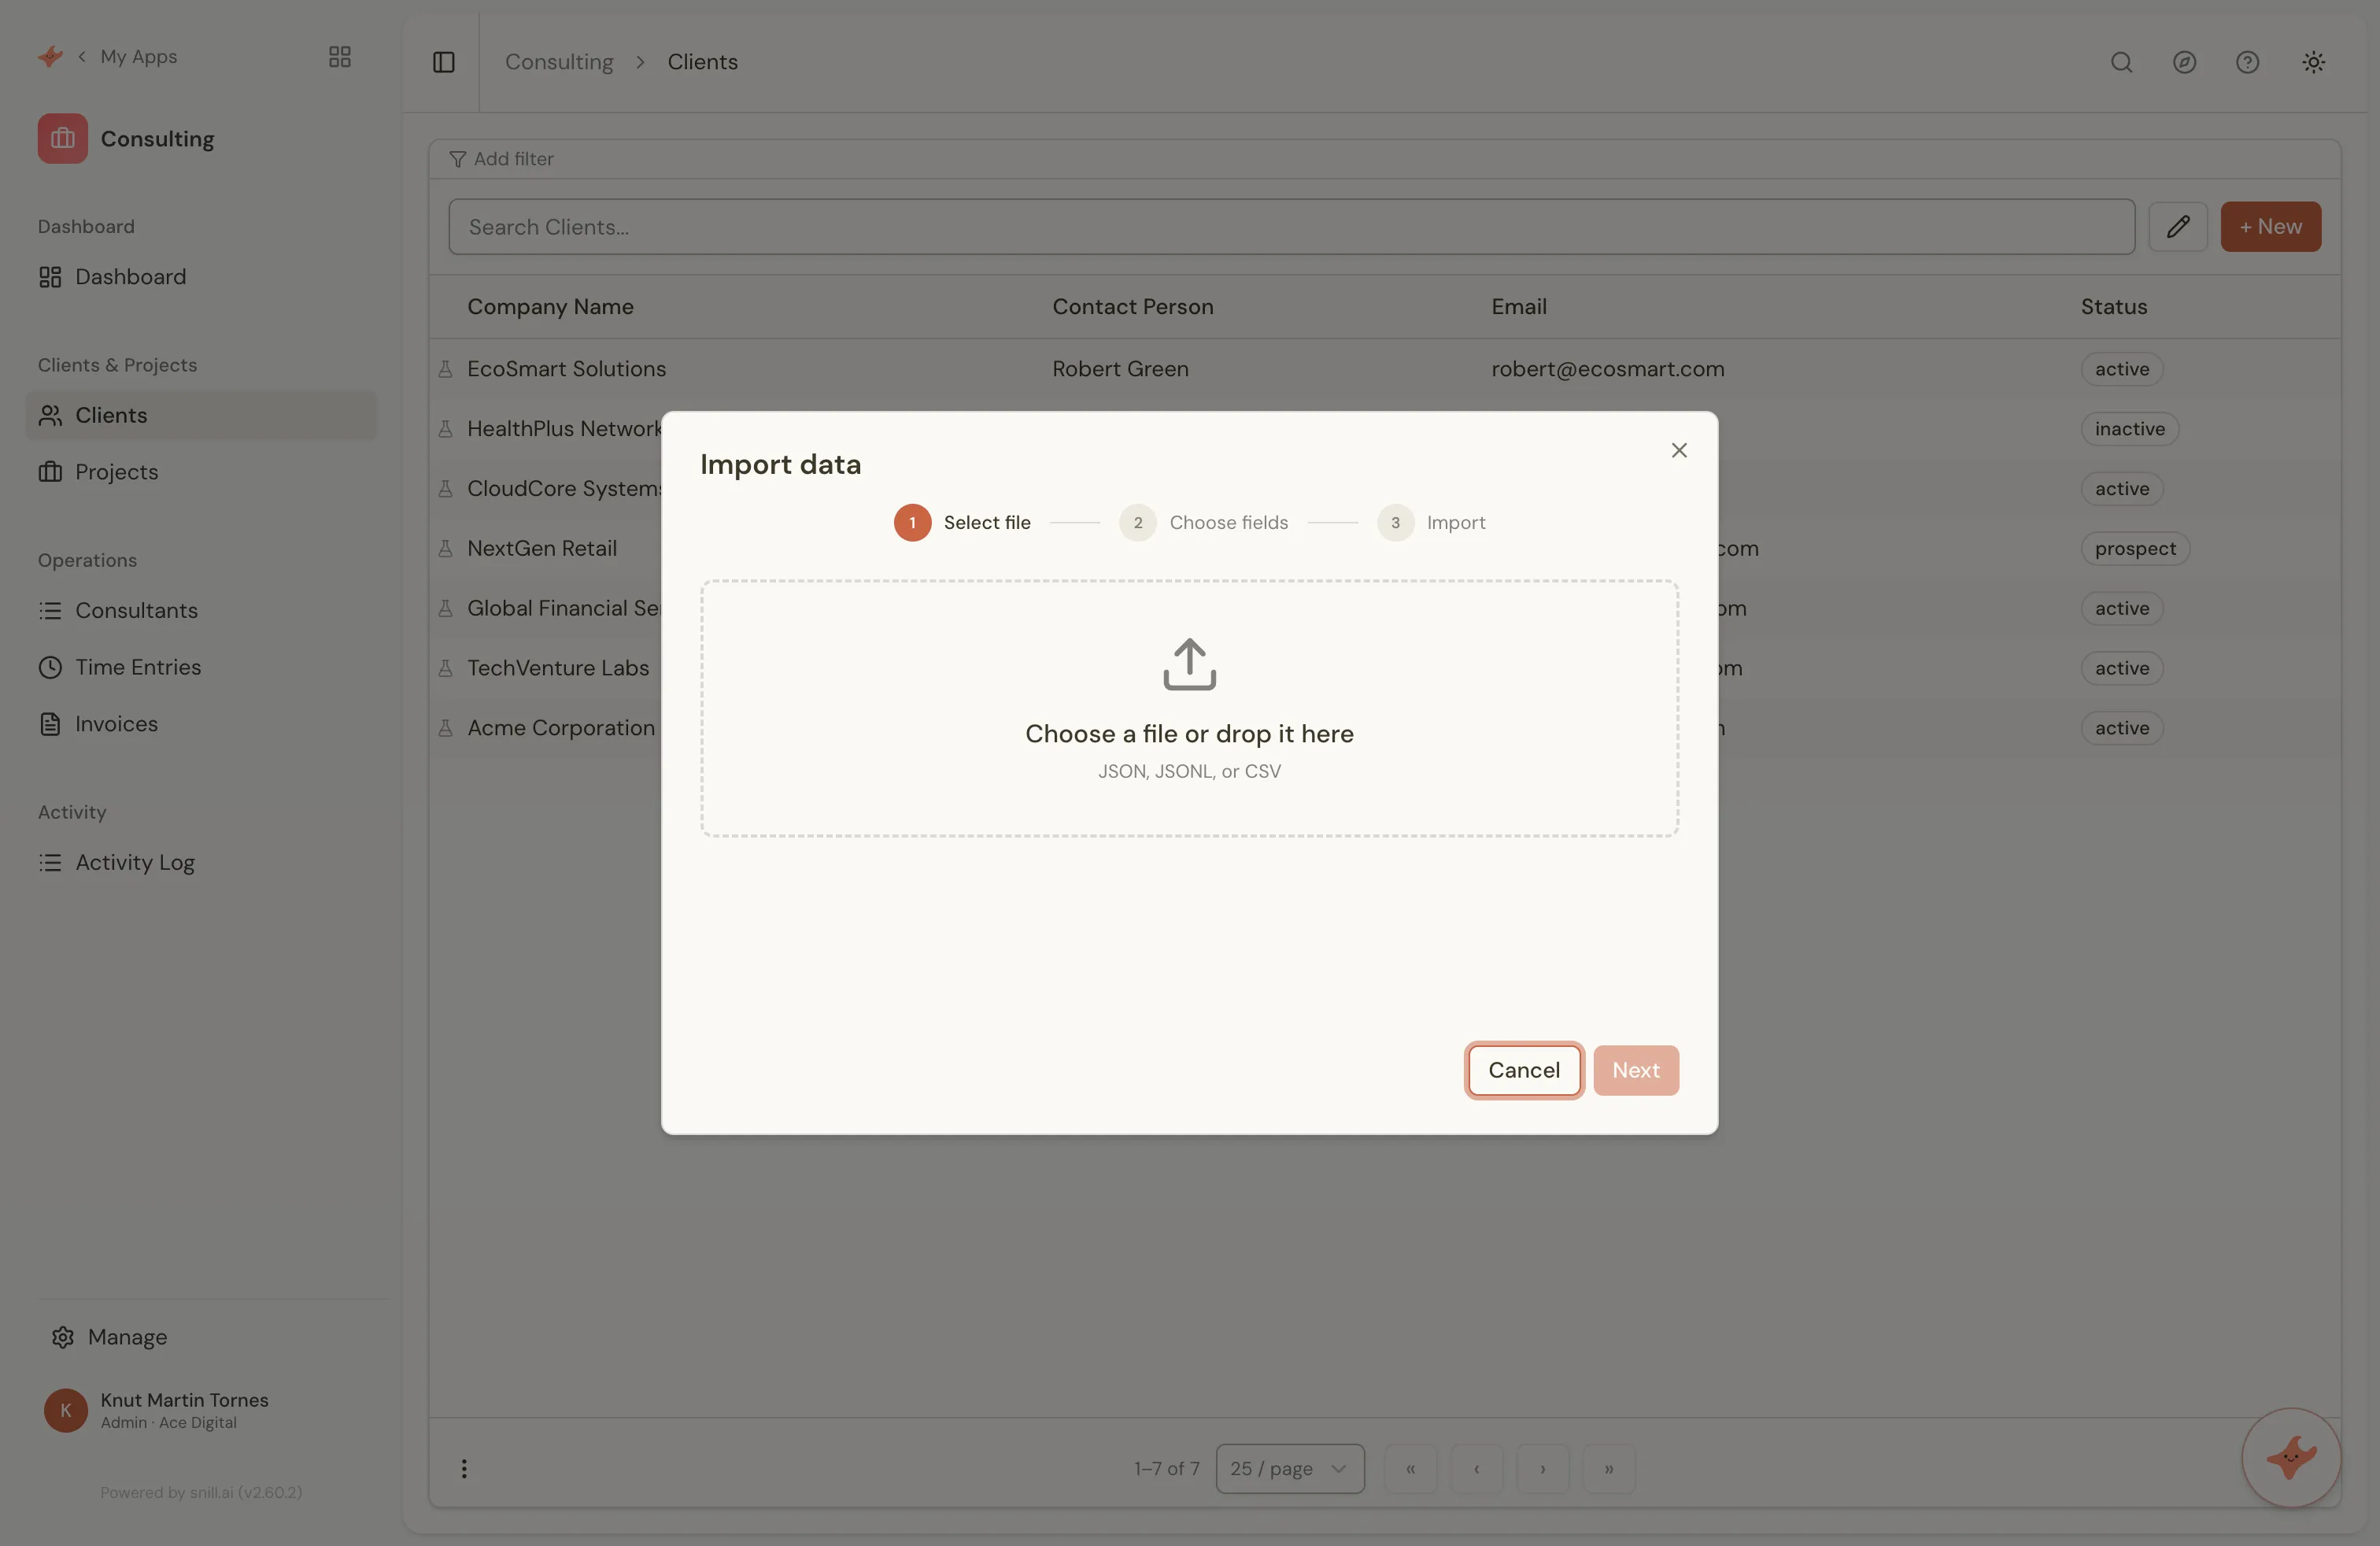
Section titled “Importing data”You can import records into any collection from CSV or JSON files. The import wizard guides you through three steps:
- Upload — select your CSV or JSON file
- Map fields — match columns from your file to fields in the collection. The wizard handles type coercion (e.g. converting text to numbers or dates) and can extend dropdown options if your data contains new values.
- Review and import — preview the data before importing. Large imports are processed in the background.
After importing, newly added records are highlighted in the list view so you can verify the results.
Exporting data
Section titled “Exporting data”Export records from any collection as CSV or JSON. The export includes the currently filtered/searched data, so you can narrow down what you export.
Scan to fill
Section titled “Scan to fill”Upload a photo or PDF and let AI fill in a new record for you.
Scan to fill lets anyone add a record by uploading a photo or PDF — a receipt, invoice, contract, business card, or an incident photo — and the AI reads it and drafts the record’s fields. You review the draft and save; nothing is created automatically. This is what powers the “AI receipt scanning” and “AI photo scanning” you’ll see in templates like Expense, Contracts, and Incident Reporting.
When it’s enabled on a collection, the new-record form gains a “Scan / upload to fill” button. Drop in a file and the matching fields are filled in for you to check.
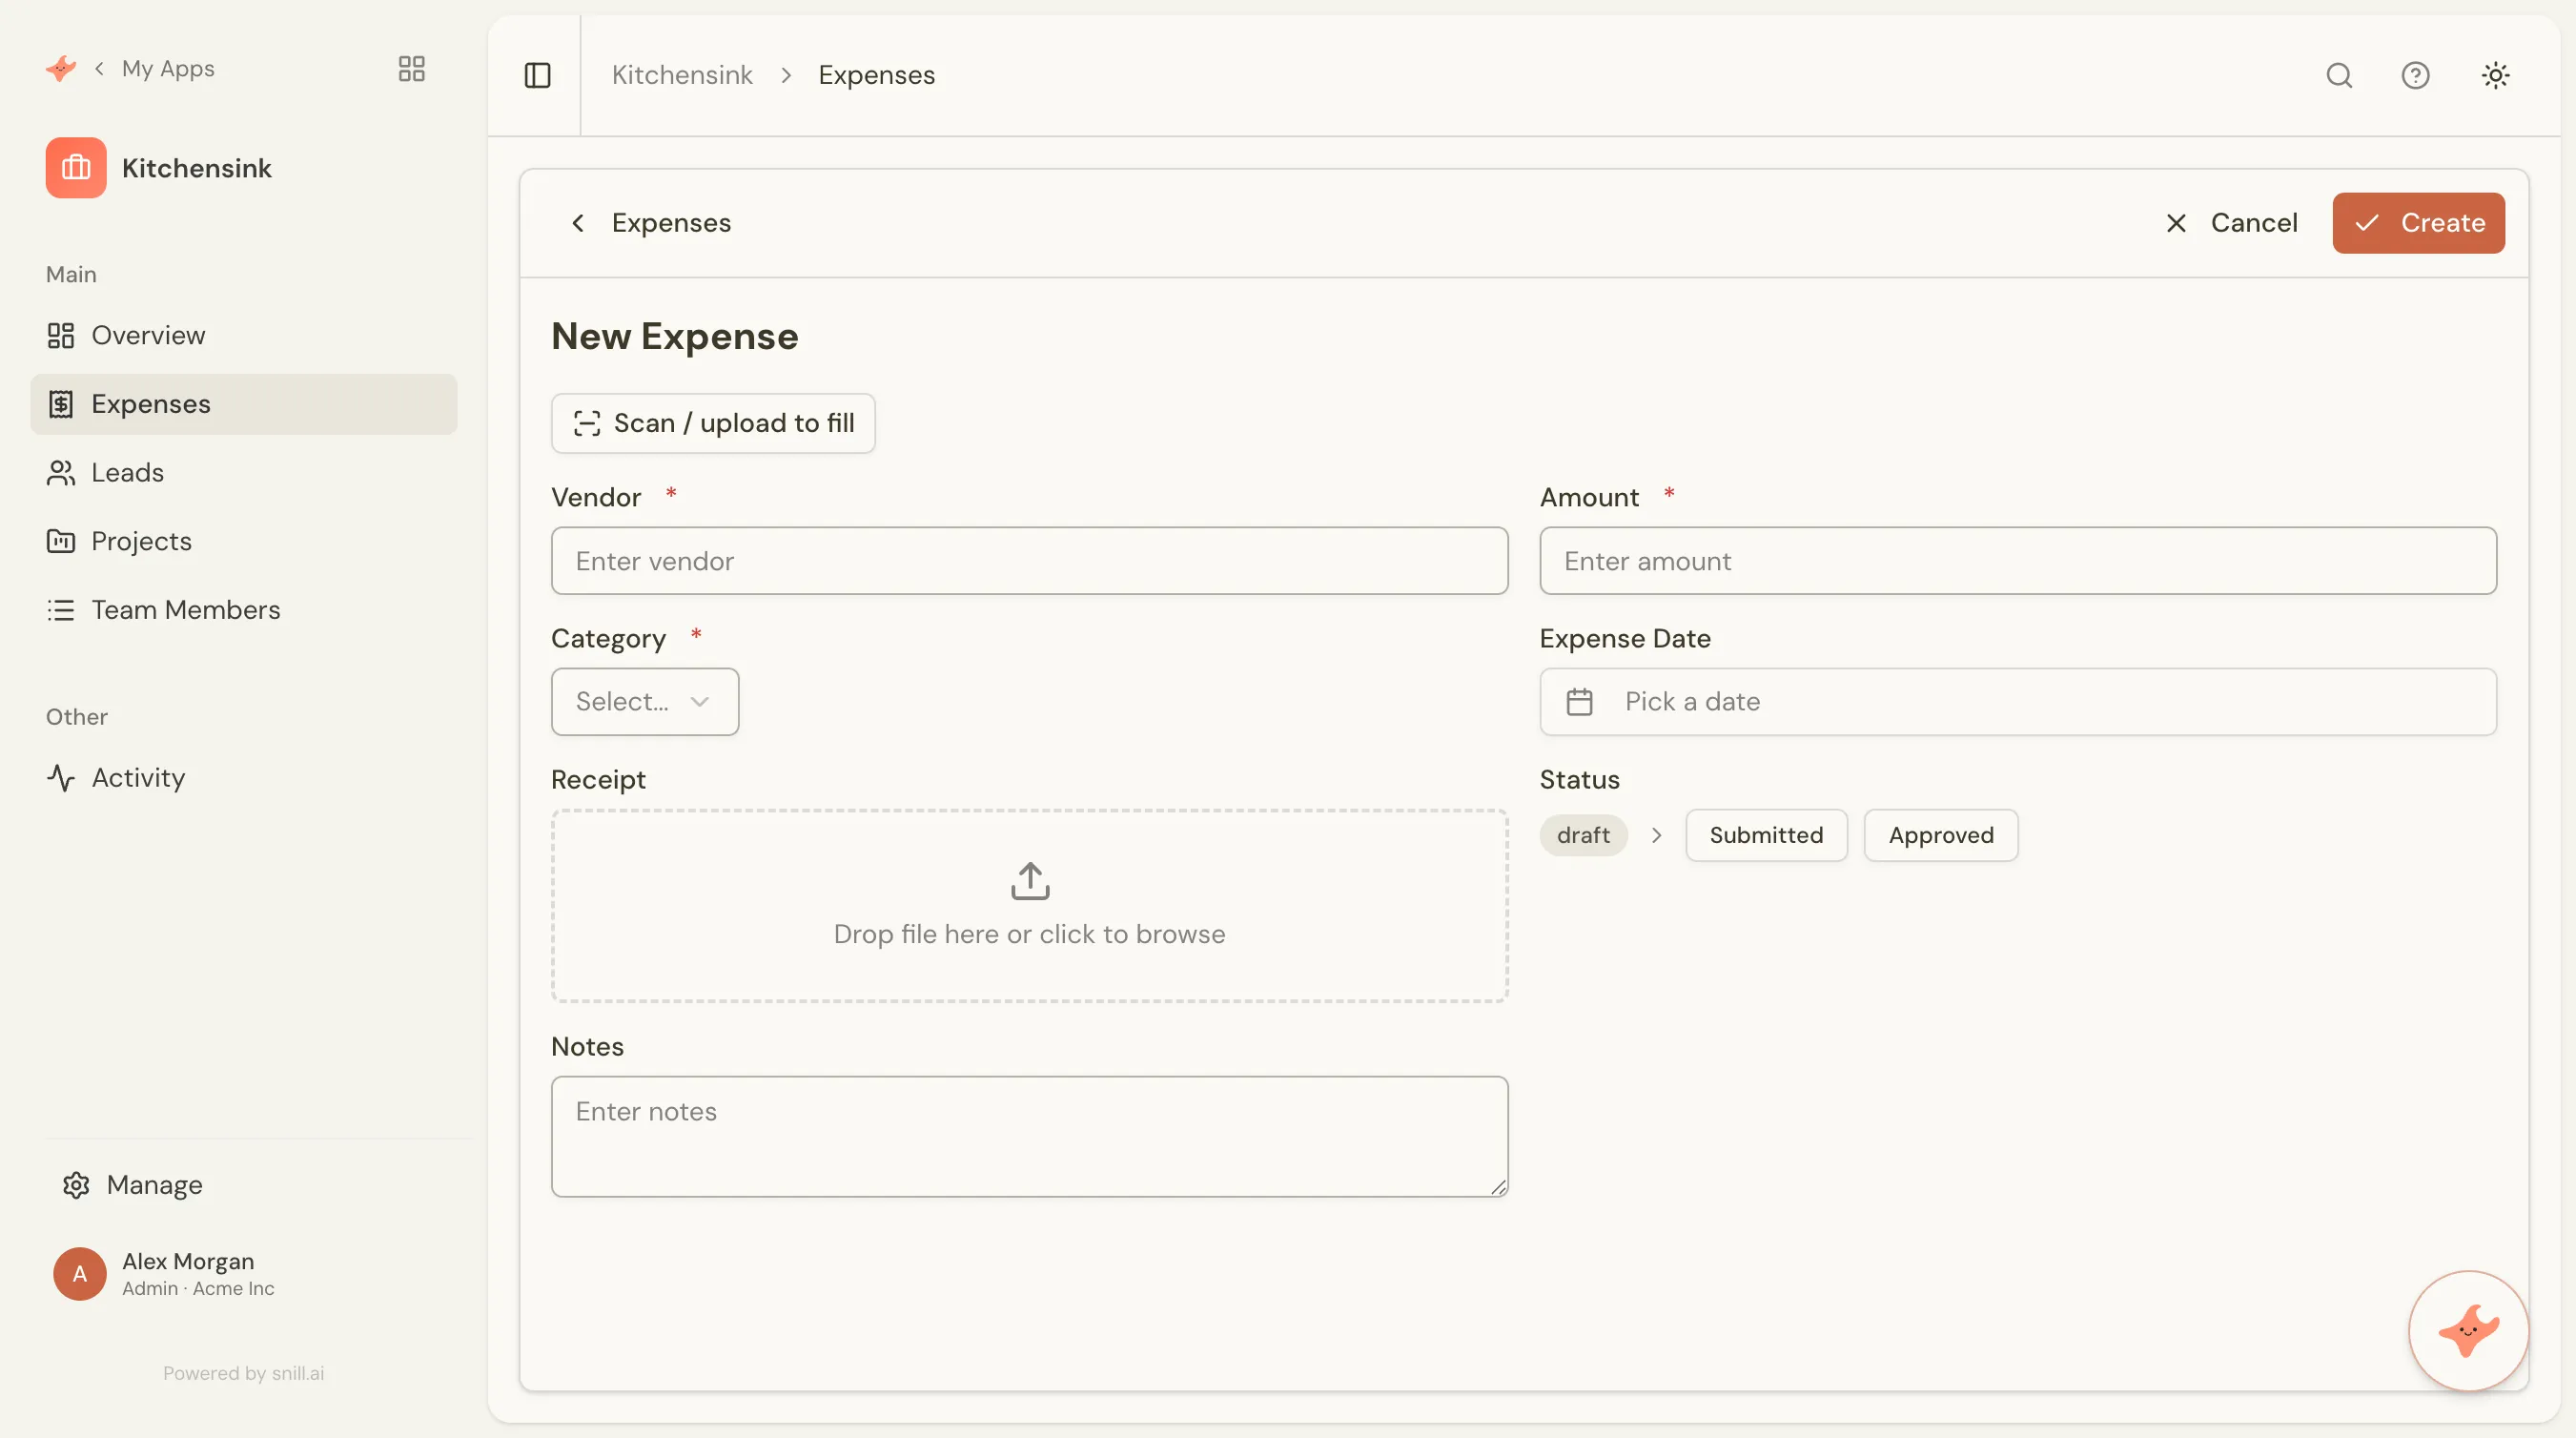
Enabling it on a collection
Section titled “Enabling it on a collection”Scan to fill is off by default and turned on per collection by an admin — just ask the AI (“let people scan a receipt to fill in expenses”) or configure it in the visual Appmodel Editor. You can control:
| Option | What it does |
|---|---|
| Accepted files | Which file types to allow — PDF and JPEG, PNG, WebP, and GIF images are supported. |
| Store the file | Optionally keep the uploaded source file in a file field on the record (e.g. the receipt itself). |
| Fields to extract | Limit extraction to specific fields, or let it use all eligible fields (the default). |
| Instruction | An optional hint for the AI, e.g. “Total includes tax.” |
| Model | A faster, cheaper model by default, or a more accurate one for noisy or complex documents (such as picking an invoice grand total over a line item). |
What gets filled in
Section titled “What gets filled in”The feature is schema-driven: the AI fills your collection’s own editable fields, so it works for any app — only your data model differs. It extracts plain text, number, and true/false fields — plus single-choice lookups: it reads the human-readable value (e.g. “Acme Inc”) and links it to the matching record when exactly one matches, otherwise leaving the field blank rather than guessing a wrong link. It also:
- maps fields by meaning, not by label, so documents in any language work;
- respects each field’s format (dates become
YYYY-MM-DD) and only picks valid dropdown options; - normalizes local number formats (e.g.
1 234,50) and strips currency symbols and separators; - leaves fields it can’t determine blank for you to fill in.
It skips system, calculated, auto-generated, template, and hidden fields, as well as multi-select lookups, user references, and file fields — and you can exclude any individual field from extraction. A clear field description (e.g. “the invoice grand total, not a line item”) noticeably improves accuracy — it’s passed to the AI as the field’s hint.
Limits
Section titled “Limits”Uploads are capped at 10 MB, and each scan counts against your organization’s daily AI limit — the same budget as the Data Assistant.
Tip
Extraction never saves on its own — it returns a draft you confirm. Add or correct anything before saving the record.
Email to record
Section titled “Email to record”Forward an email to a collection and Snill turns it into a record — automatically.
Give a collection its own inbound email address, and any message sent (or forwarded) to it becomes a new record: the sender, subject, body, and attachments are mapped onto fields, with optional AI extraction of the first attachment. It’s a hands-off way to turn inbound leads, support requests, or forwarded invoices into structured records — no one has to retype anything.
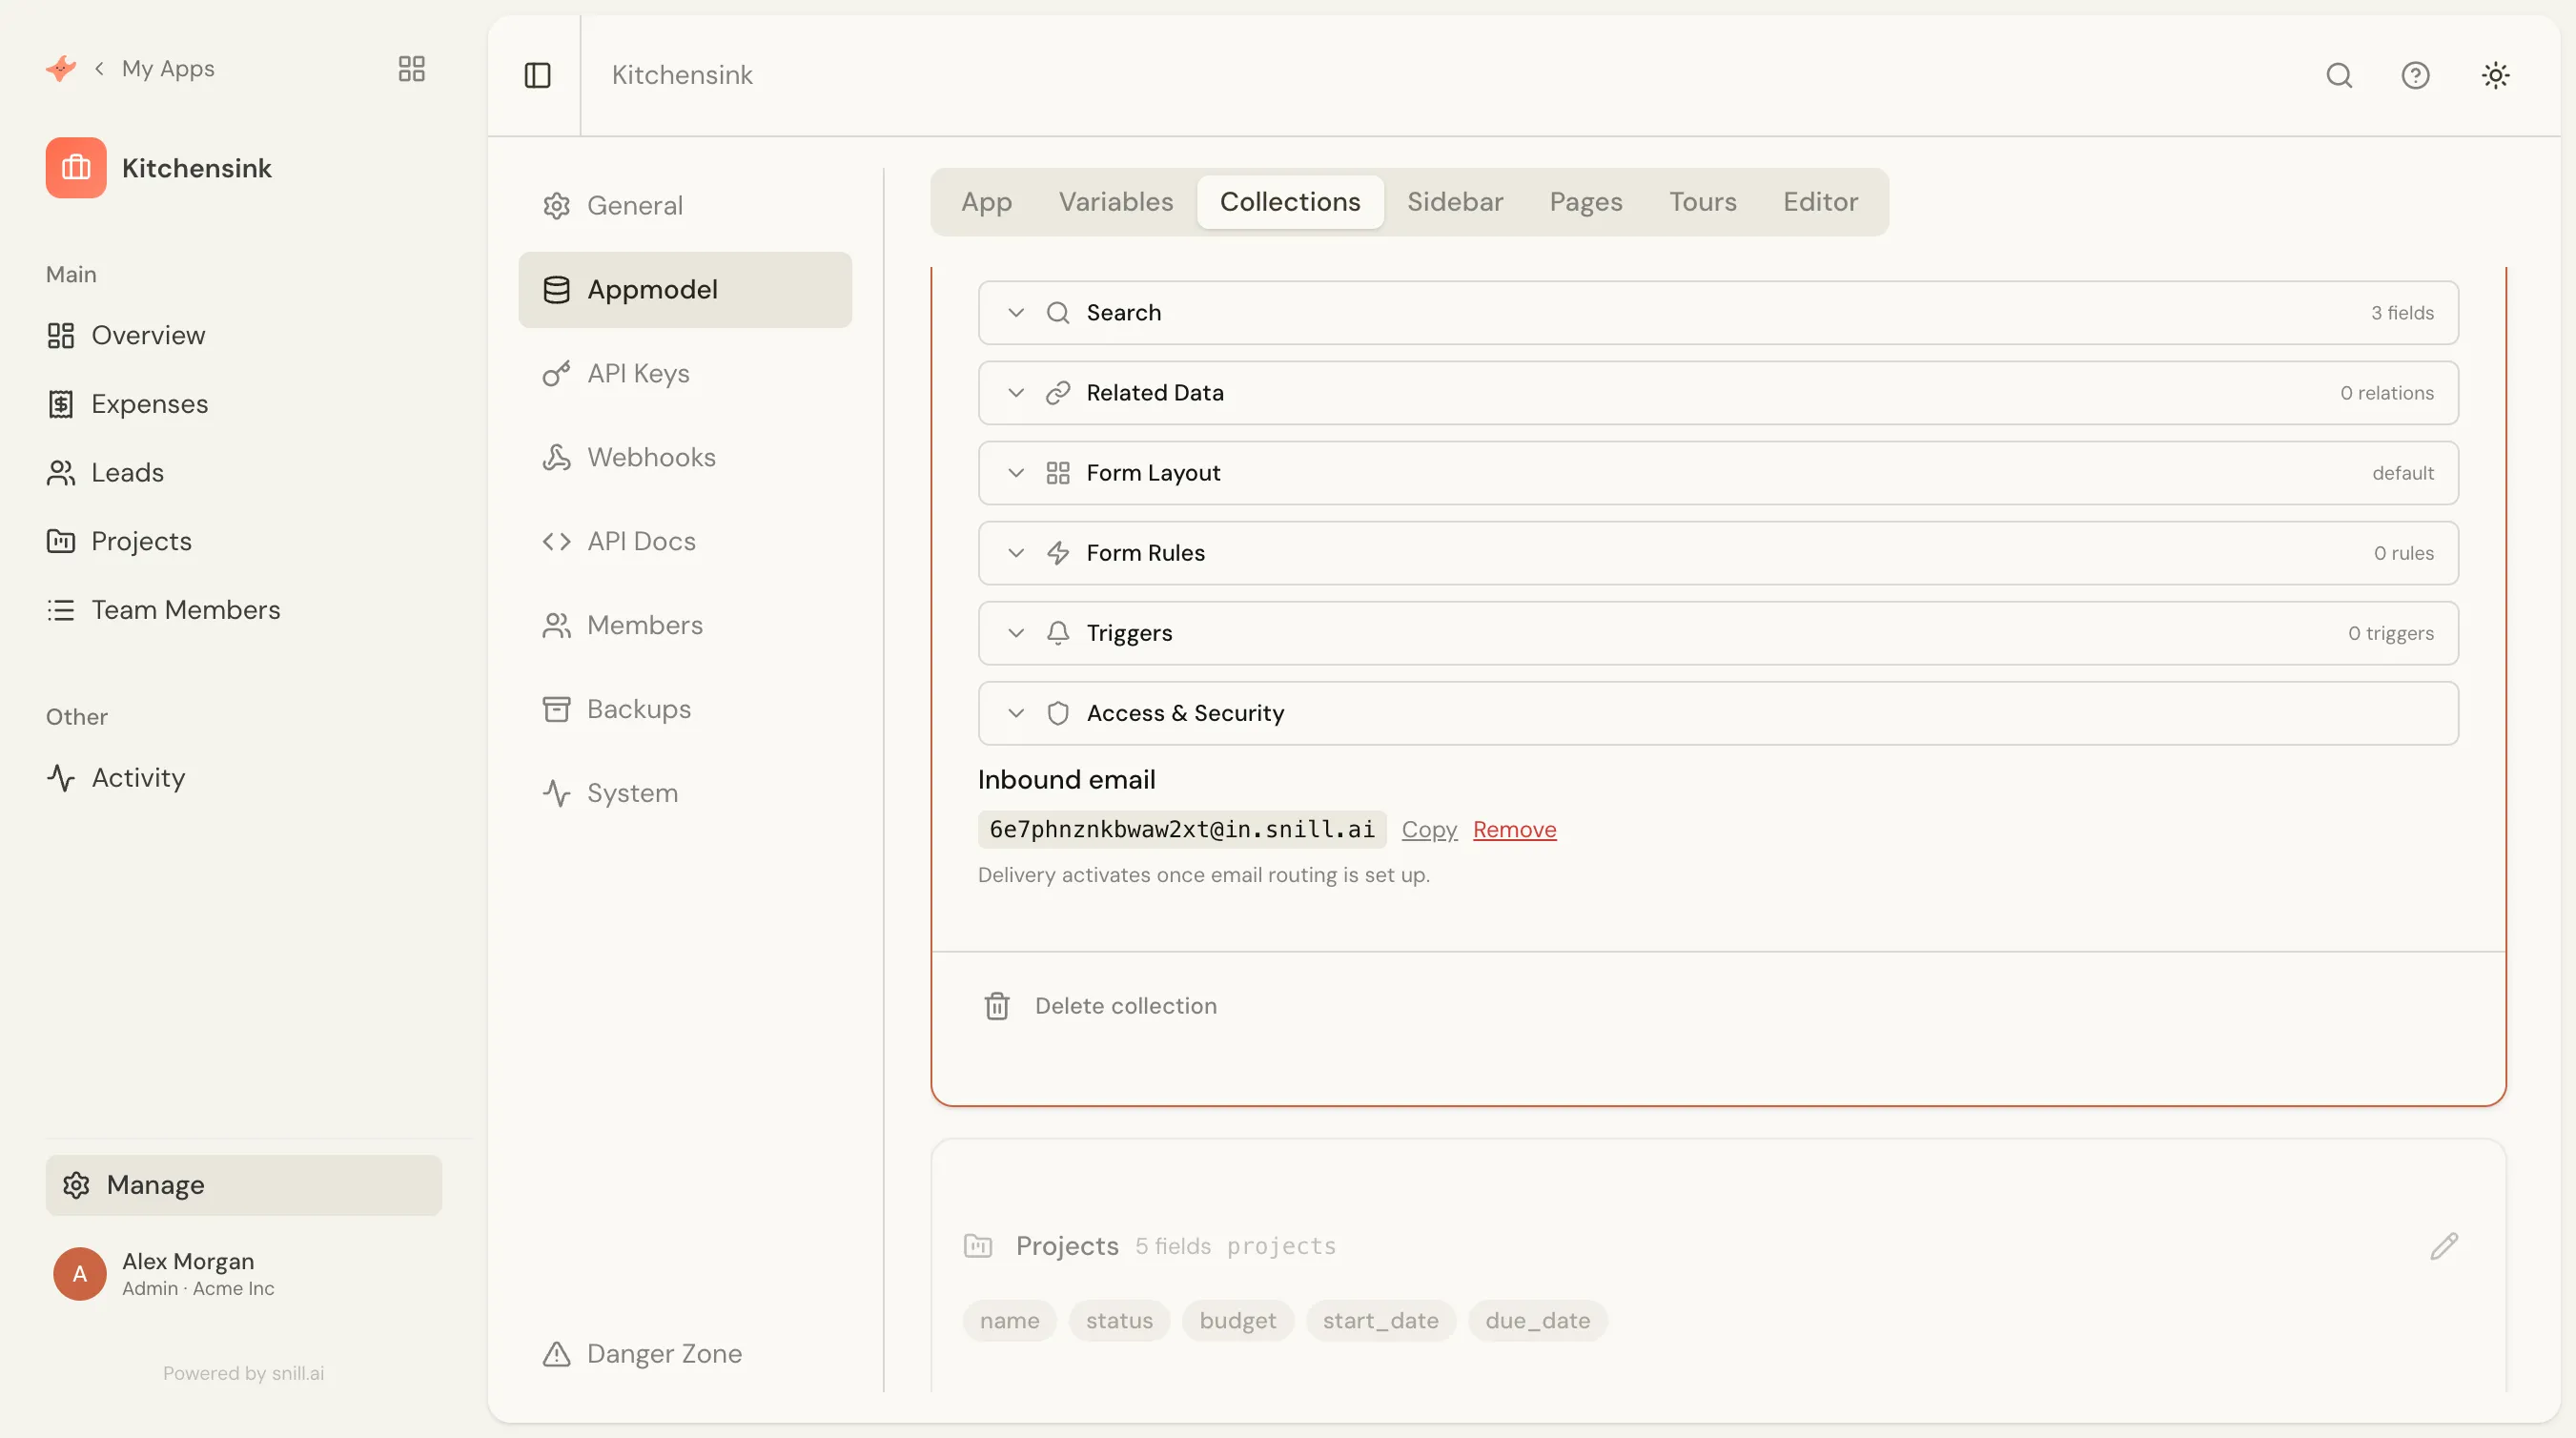
…@in.snill.ai) — forward or send mail to it and Snill creates a record from every message.Setting it up
Section titled “Setting it up”Email intake is off by default and configured per collection by an admin:
- Provision an address — generate a unique inbound address for the collection (or just ask the AI). You get an address like
a1b2c3@in.snill.aito hand out or forward mail to. The address is managed for you — remove it and mail sent there is silently ignored. - Map the email onto fields — tell Snill which parts of the email go where, and set any fixed defaults. Ask the Data Assistant (“turn emails to this address into leads — sender into email, subject into title, body into notes, and set status to new”) or configure it in the Appmodel Editor.
| Option | What it does |
|---|---|
| Field mapping | Route email parts to fields — the sender address, sender name, subject, and plain-text body each map to a field of your choice. |
| Default values | Fixed values applied to every emailed record (e.g. set status to “new” and source to “email”). |
| Attachments | Store all attachments in an array file field on the record. |
| Scan the attachment | Optionally run Scan to fill on the first attachment to extract field values, reusing this collection’s scan settings. |
How it behaves
Section titled “How it behaves”- Precedence — default values are applied first, then any scanned values, and finally the mapped email parts, so a value from the email itself wins over a scanned or default one.
- Creating the record fires the same triggers, webhooks, and notifications as any other create — your automations run on emailed records too.
- No duplicates — repeated deliveries of the same message are de-duplicated automatically.
- A collection with an address but no mapping configured is simply skipped, so you never get stray records. Attachment scanning counts against your organization’s daily AI limit; over the limit, the record is still created — just without extraction.
Tip
Because creating a record runs your normal triggers and webhooks, an emailed lead can kick off the same CRM or ATS automations as one added by hand — assign an owner, send an acknowledgement, notify a channel.
Themes
Section titled “Themes”Change the look and feel of your app with a single setting.
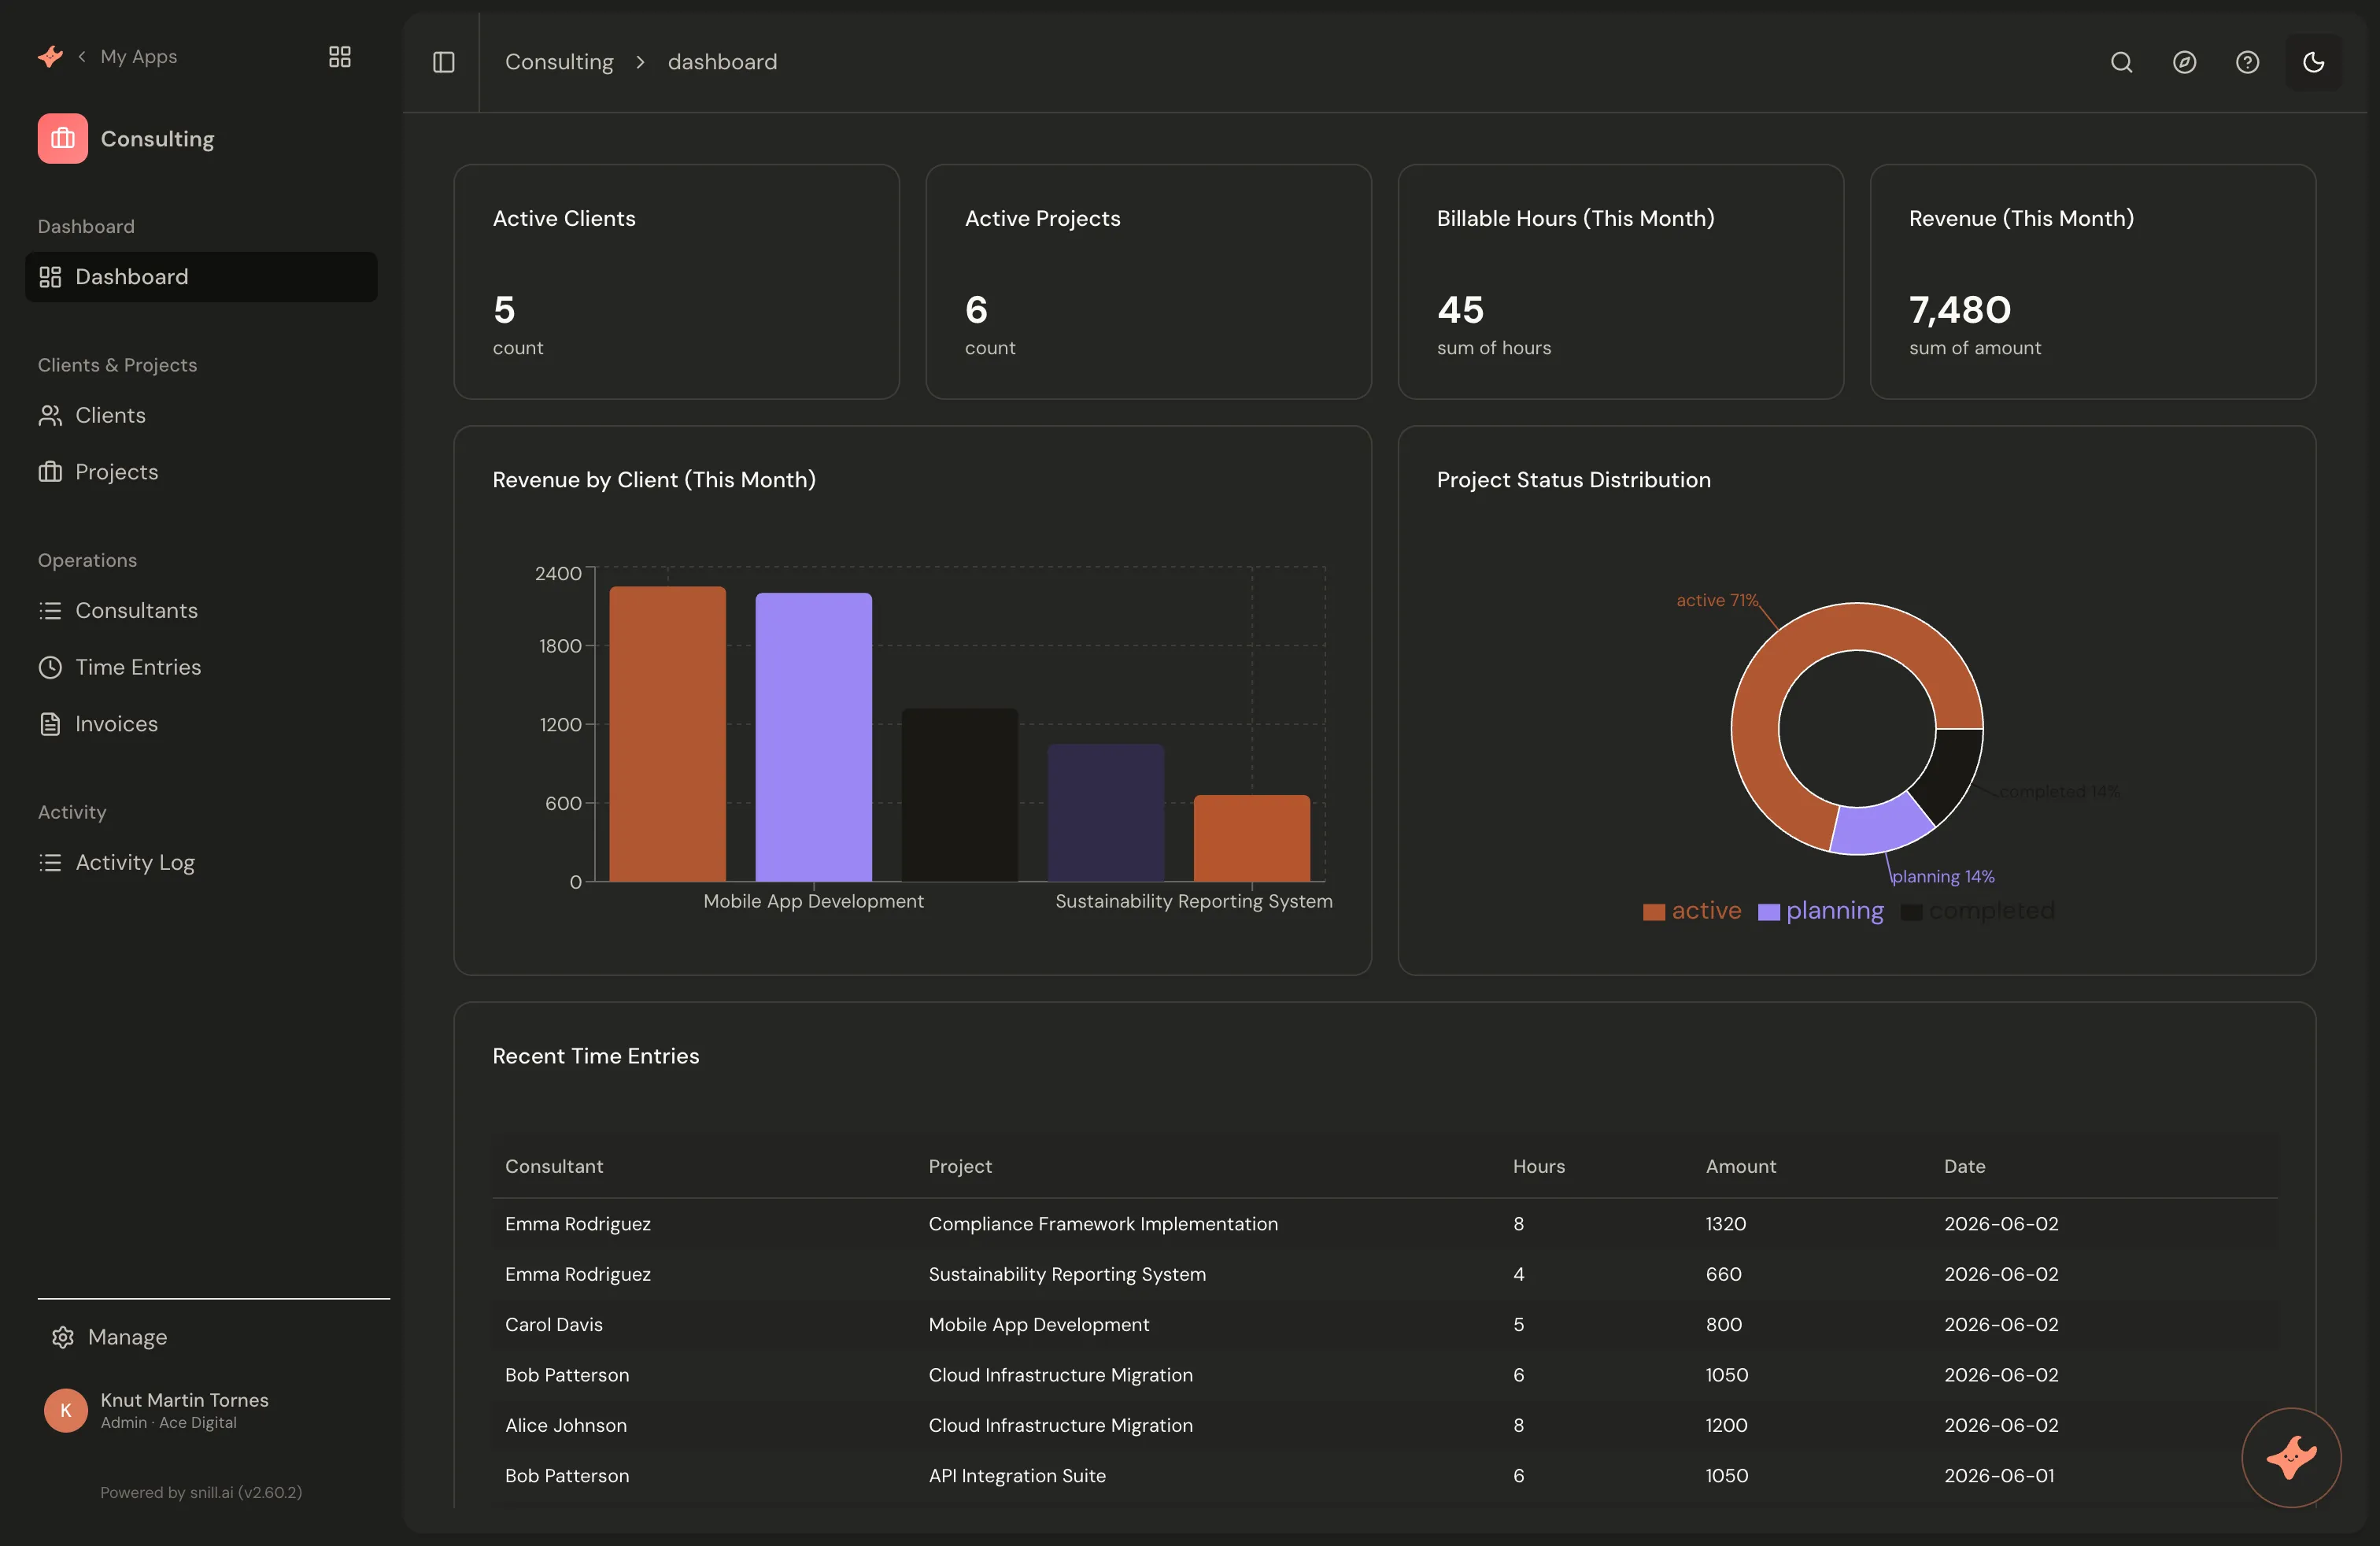
Snill comes with several built-in visual themes that change the colors and styling of your app. You can select a theme in the app settings or ask the AI to apply one.
The default theme works well for most use cases. Other options include a clean neutral grayscale theme and several color themes. Themes let you match your app to your brand or personal preference.
Languages
Section titled “Languages”Two separate things can be in a different language, and you set them independently.
- Snill’s interface — the menus, buttons and Manage screens you work in. It follows your browser language on first load, so a Norwegian browser gets Norwegian with nothing to configure, and the choice follows you across devices.
- Your app — the labels, page titles and dropdown options the people using what you built see. Set per app, with each user picking their own from the app sidebar.
They don’t have to match. A German consultant can build a Norwegian app: their own interface in German, the app in Norwegian for the crew using it.
Which languages
Section titled “Which languages”The interface ships in 12 languages. Apps can be translated into 28. Everything in the first column is also available for apps.
| Language | Snill’s interface | Your app |
|---|---|---|
| English | ✓ | ✓ |
| Norsk (Norwegian) | ✓ | ✓ |
| Svenska (Swedish) | ✓ | ✓ |
| Dansk (Danish) | ✓ | ✓ |
| Suomi (Finnish) | ✓ | ✓ |
| Deutsch (German) | ✓ | ✓ |
| Nederlands (Dutch) | ✓ | ✓ |
| Français (French) | ✓ | ✓ |
| Español (Spanish) | ✓ | ✓ |
| Português (Portuguese) | ✓ | ✓ |
| Italiano (Italian) | ✓ | ✓ |
| Polski (Polish) | ✓ | ✓ |
| Norsk nynorsk (Norwegian Nynorsk) | ✓ | |
| Íslenska (Icelandic) | ✓ | |
| Čeština (Czech) | ✓ | |
| Magyar (Hungarian) | ✓ | |
| Română (Romanian) | ✓ | |
| Ελληνικά (Greek) | ✓ | |
| Türkçe (Turkish) | ✓ | |
| Русский (Russian) | ✓ | |
| Українська (Ukrainian) | ✓ | |
| 中文 (Chinese) | ✓ | |
| 日本語 (Japanese) | ✓ | |
| 한국어 (Korean) | ✓ | |
| हिन्दी (Hindi) | ✓ | |
| ไทย (Thai) | ✓ | |
| Tiếng Việt (Vietnamese) | ✓ | |
| Bahasa Indonesia (Indonesian) | ✓ |
Not available yet. Right-to-left languages, including Arabic and Hebrew, are not offered. Brazilian Portuguese currently resolves to European Portuguese rather than being its own option.
How app translation works
Section titled “How app translation works”An app can be shown in several languages. Translation changes only what’s rendered in the browser — field labels, collection and page titles, the display of single-choice options, and tour/help text. Your stored data never changes: field keys, the underlying values behind dropdown options, and record content stay exactly as you authored them. That means filters, formulas, and the REST API behave identically in every language — status = "paid" matches whether the user sees “Paid”, “Betalt”, or “Bezahlt”.
- Source-keyed translations — the keys are your app’s own authored strings, and each language maps them to a translation. Anything you haven’t translated falls back to the original, so a half-translated app still works.
- Option display only — for single-choice fields, only the label a user sees is translated; the stored value is untouched, so your queries and reports stay stable.
- Per-user selection — each person can switch the display language from the app sidebar, and the whole app re-renders in their choice. The app’s default locale is what unset users (and trigger emails) get.
- Localized dates — dates are formatted for the chosen language across the whole app (lists, forms, charts, and PDFs), so a date reads naturally in each user’s language. The stored value is unchanged — only its display.
Manage → Languages
Section titled “Manage → Languages”Add and edit languages under Manage → Languages (admin only). From here you can add a locale, pick the app’s default language, and edit any string inline in the translation table.
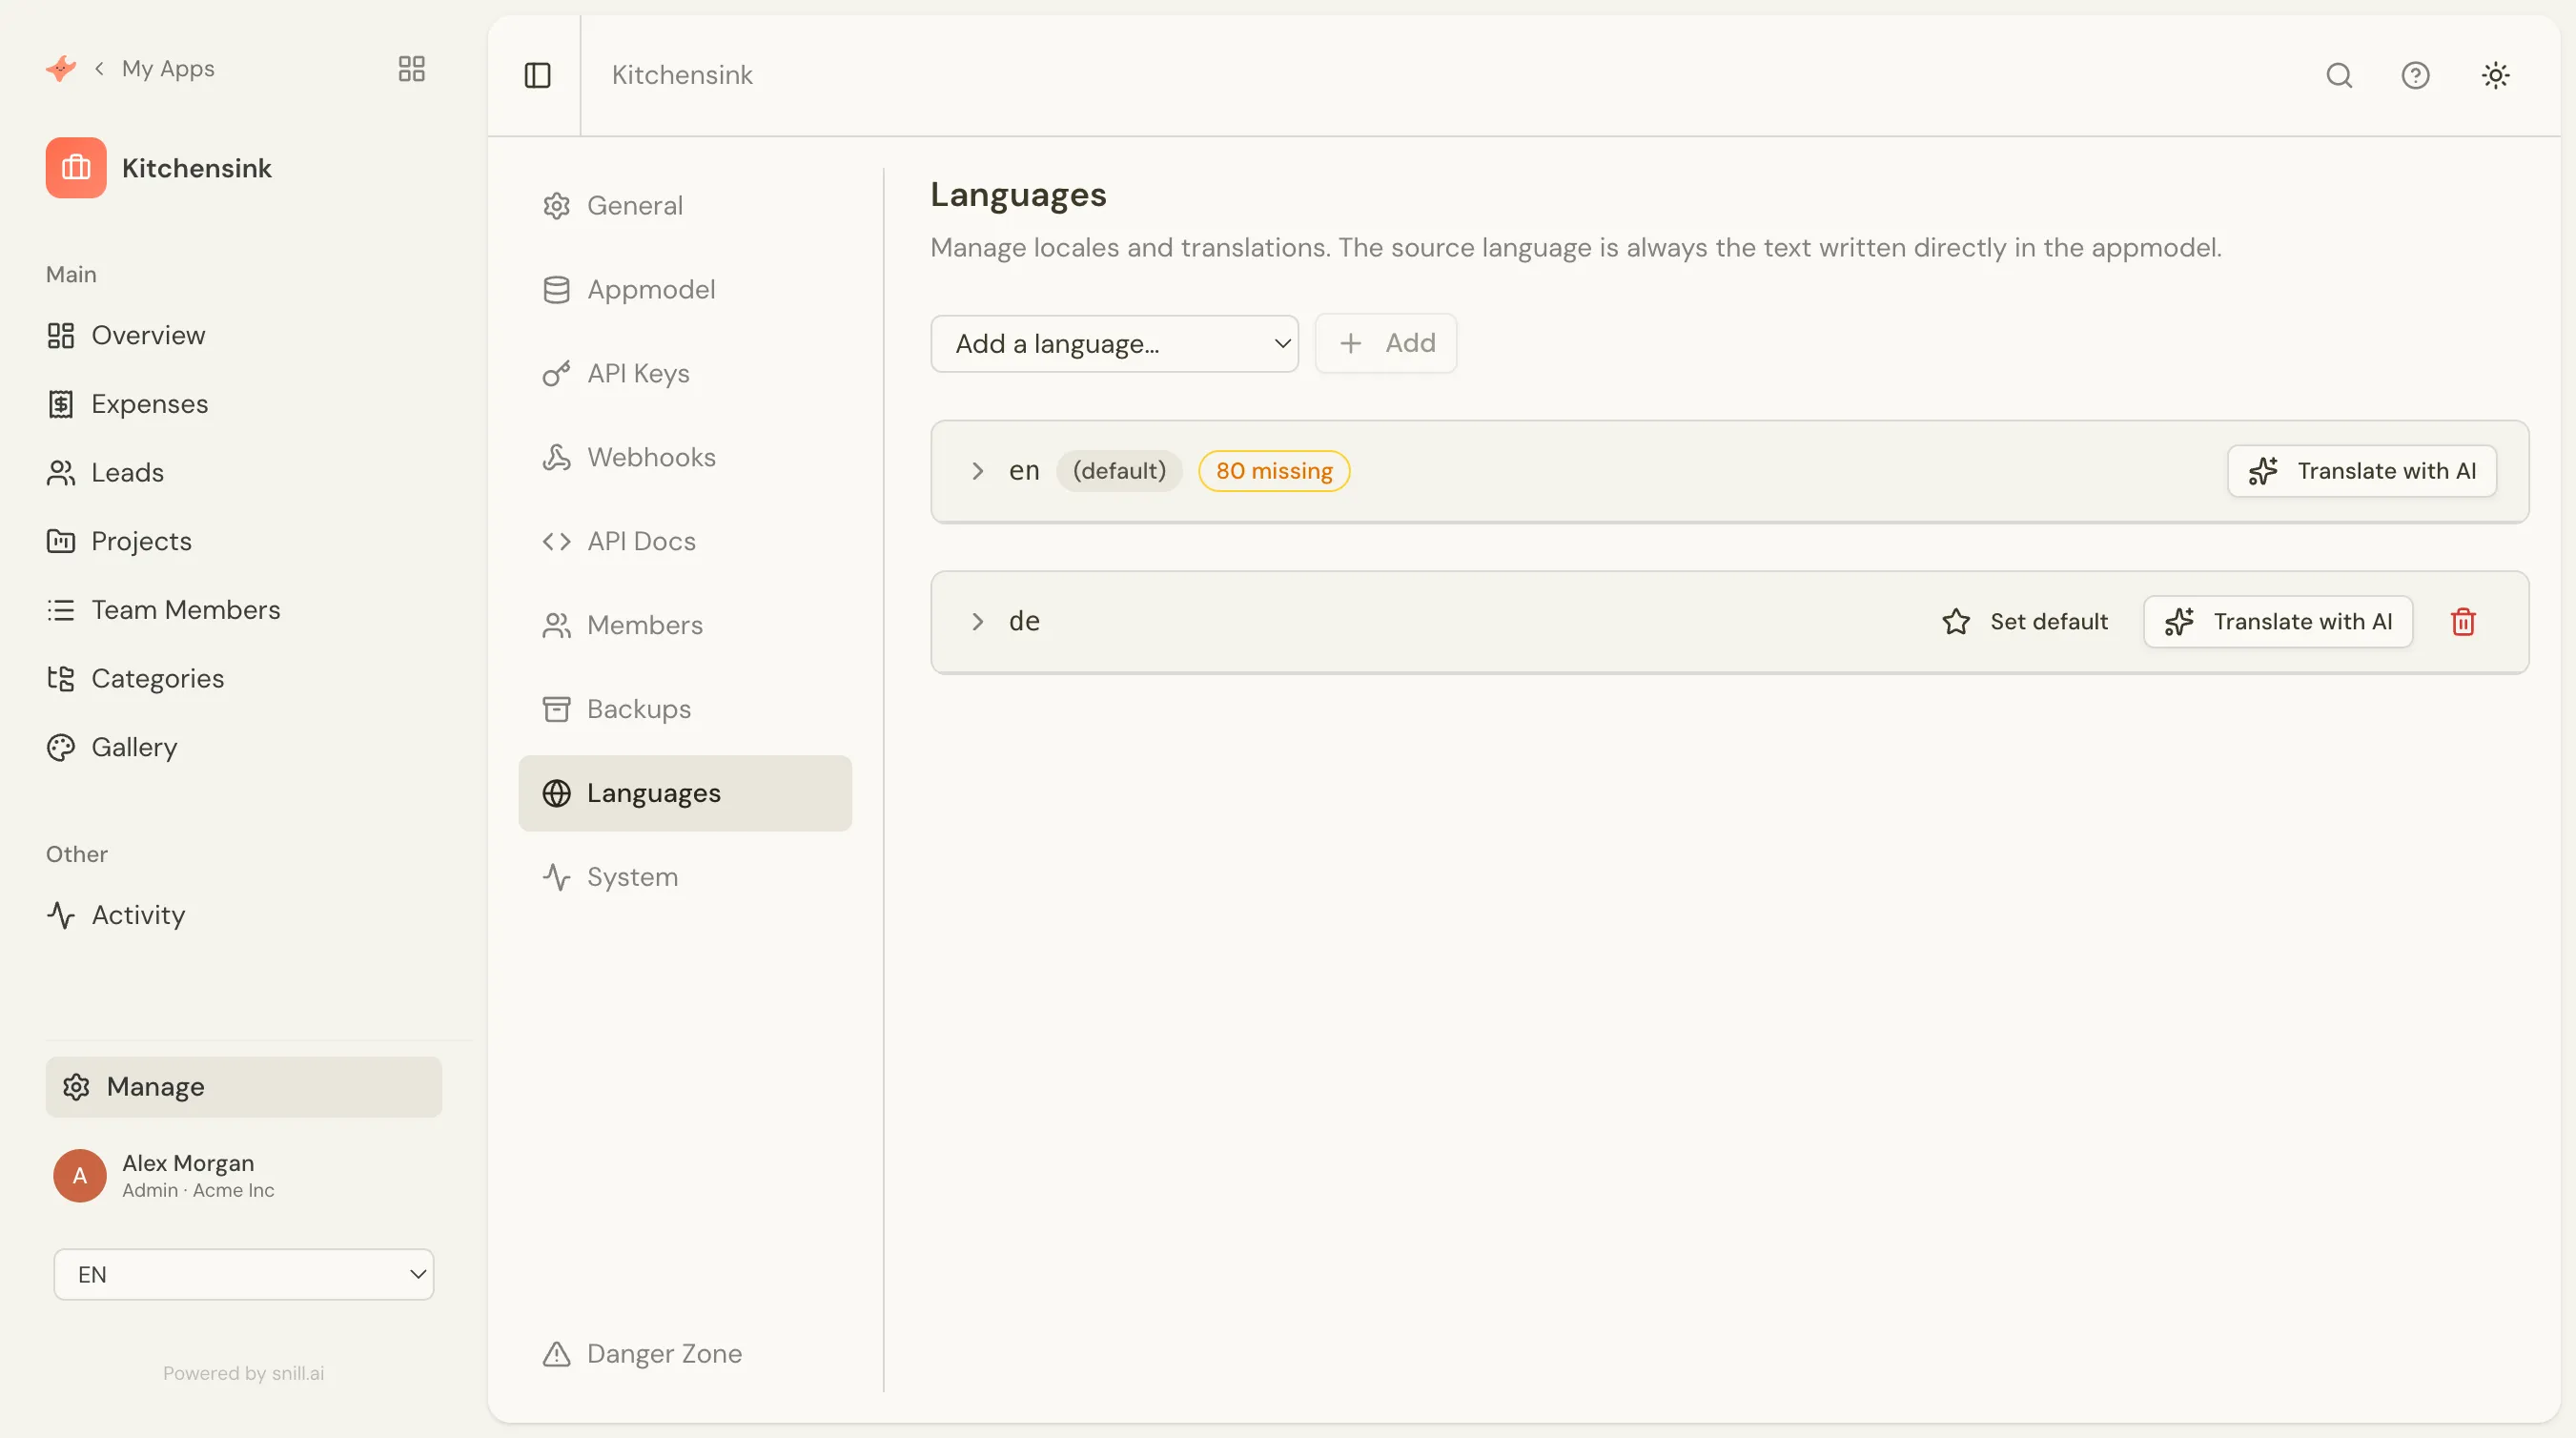
Expand a locale to open its translation table — every authored string in one column, its translation editable beside it. Edit any cell inline to override a translation, and untranslated cells fall back to the source string.
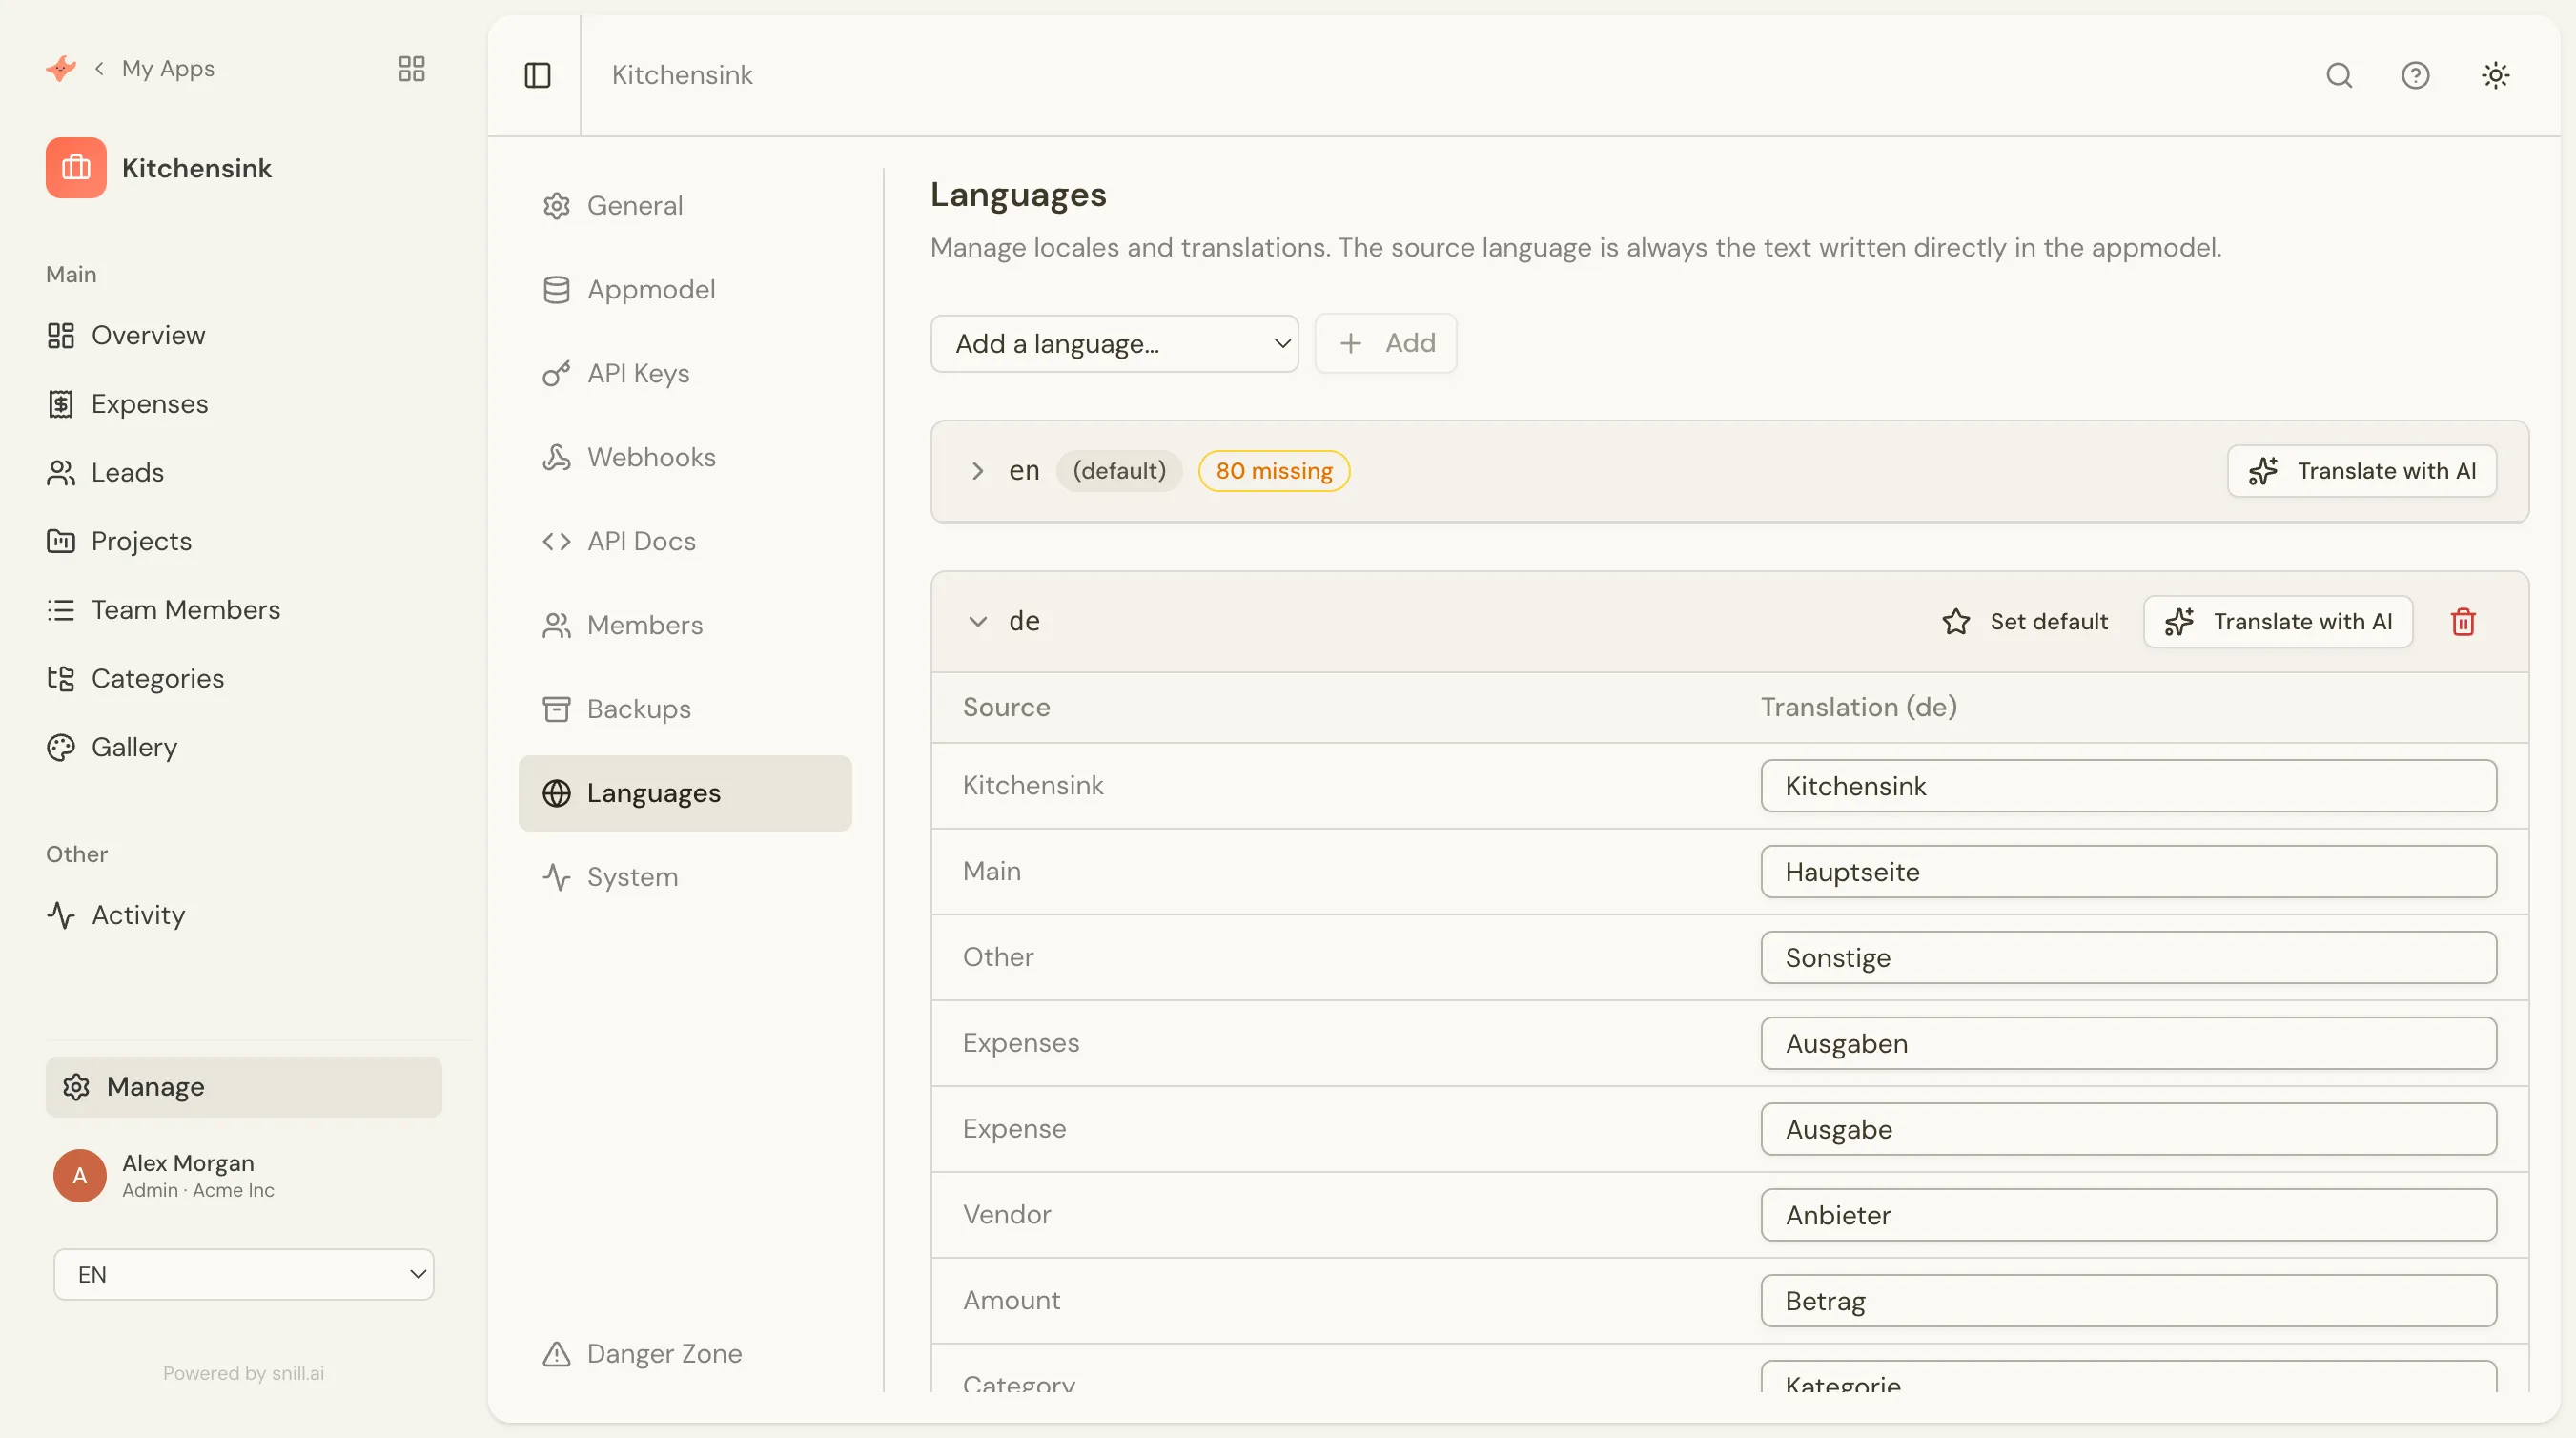
Translate with AI
Section titled “Translate with AI”Rather than filling the table by hand, click “Translate with AI” to translate a whole language in one pass — it only fills what’s missing, so any manual overrides you’ve made are preserved. You can also just ask the assistant in AI chat, e.g. “translate this app to German”, and it translates the complete app — every label, title, and option — to the language you name.
Note
Trigger emails render their subject and body in the app’s default language when translations exist.
Members & Billing
Section titled “Members & Billing”Snill is structured around organizations — your team’s container for projects, members, and billing.
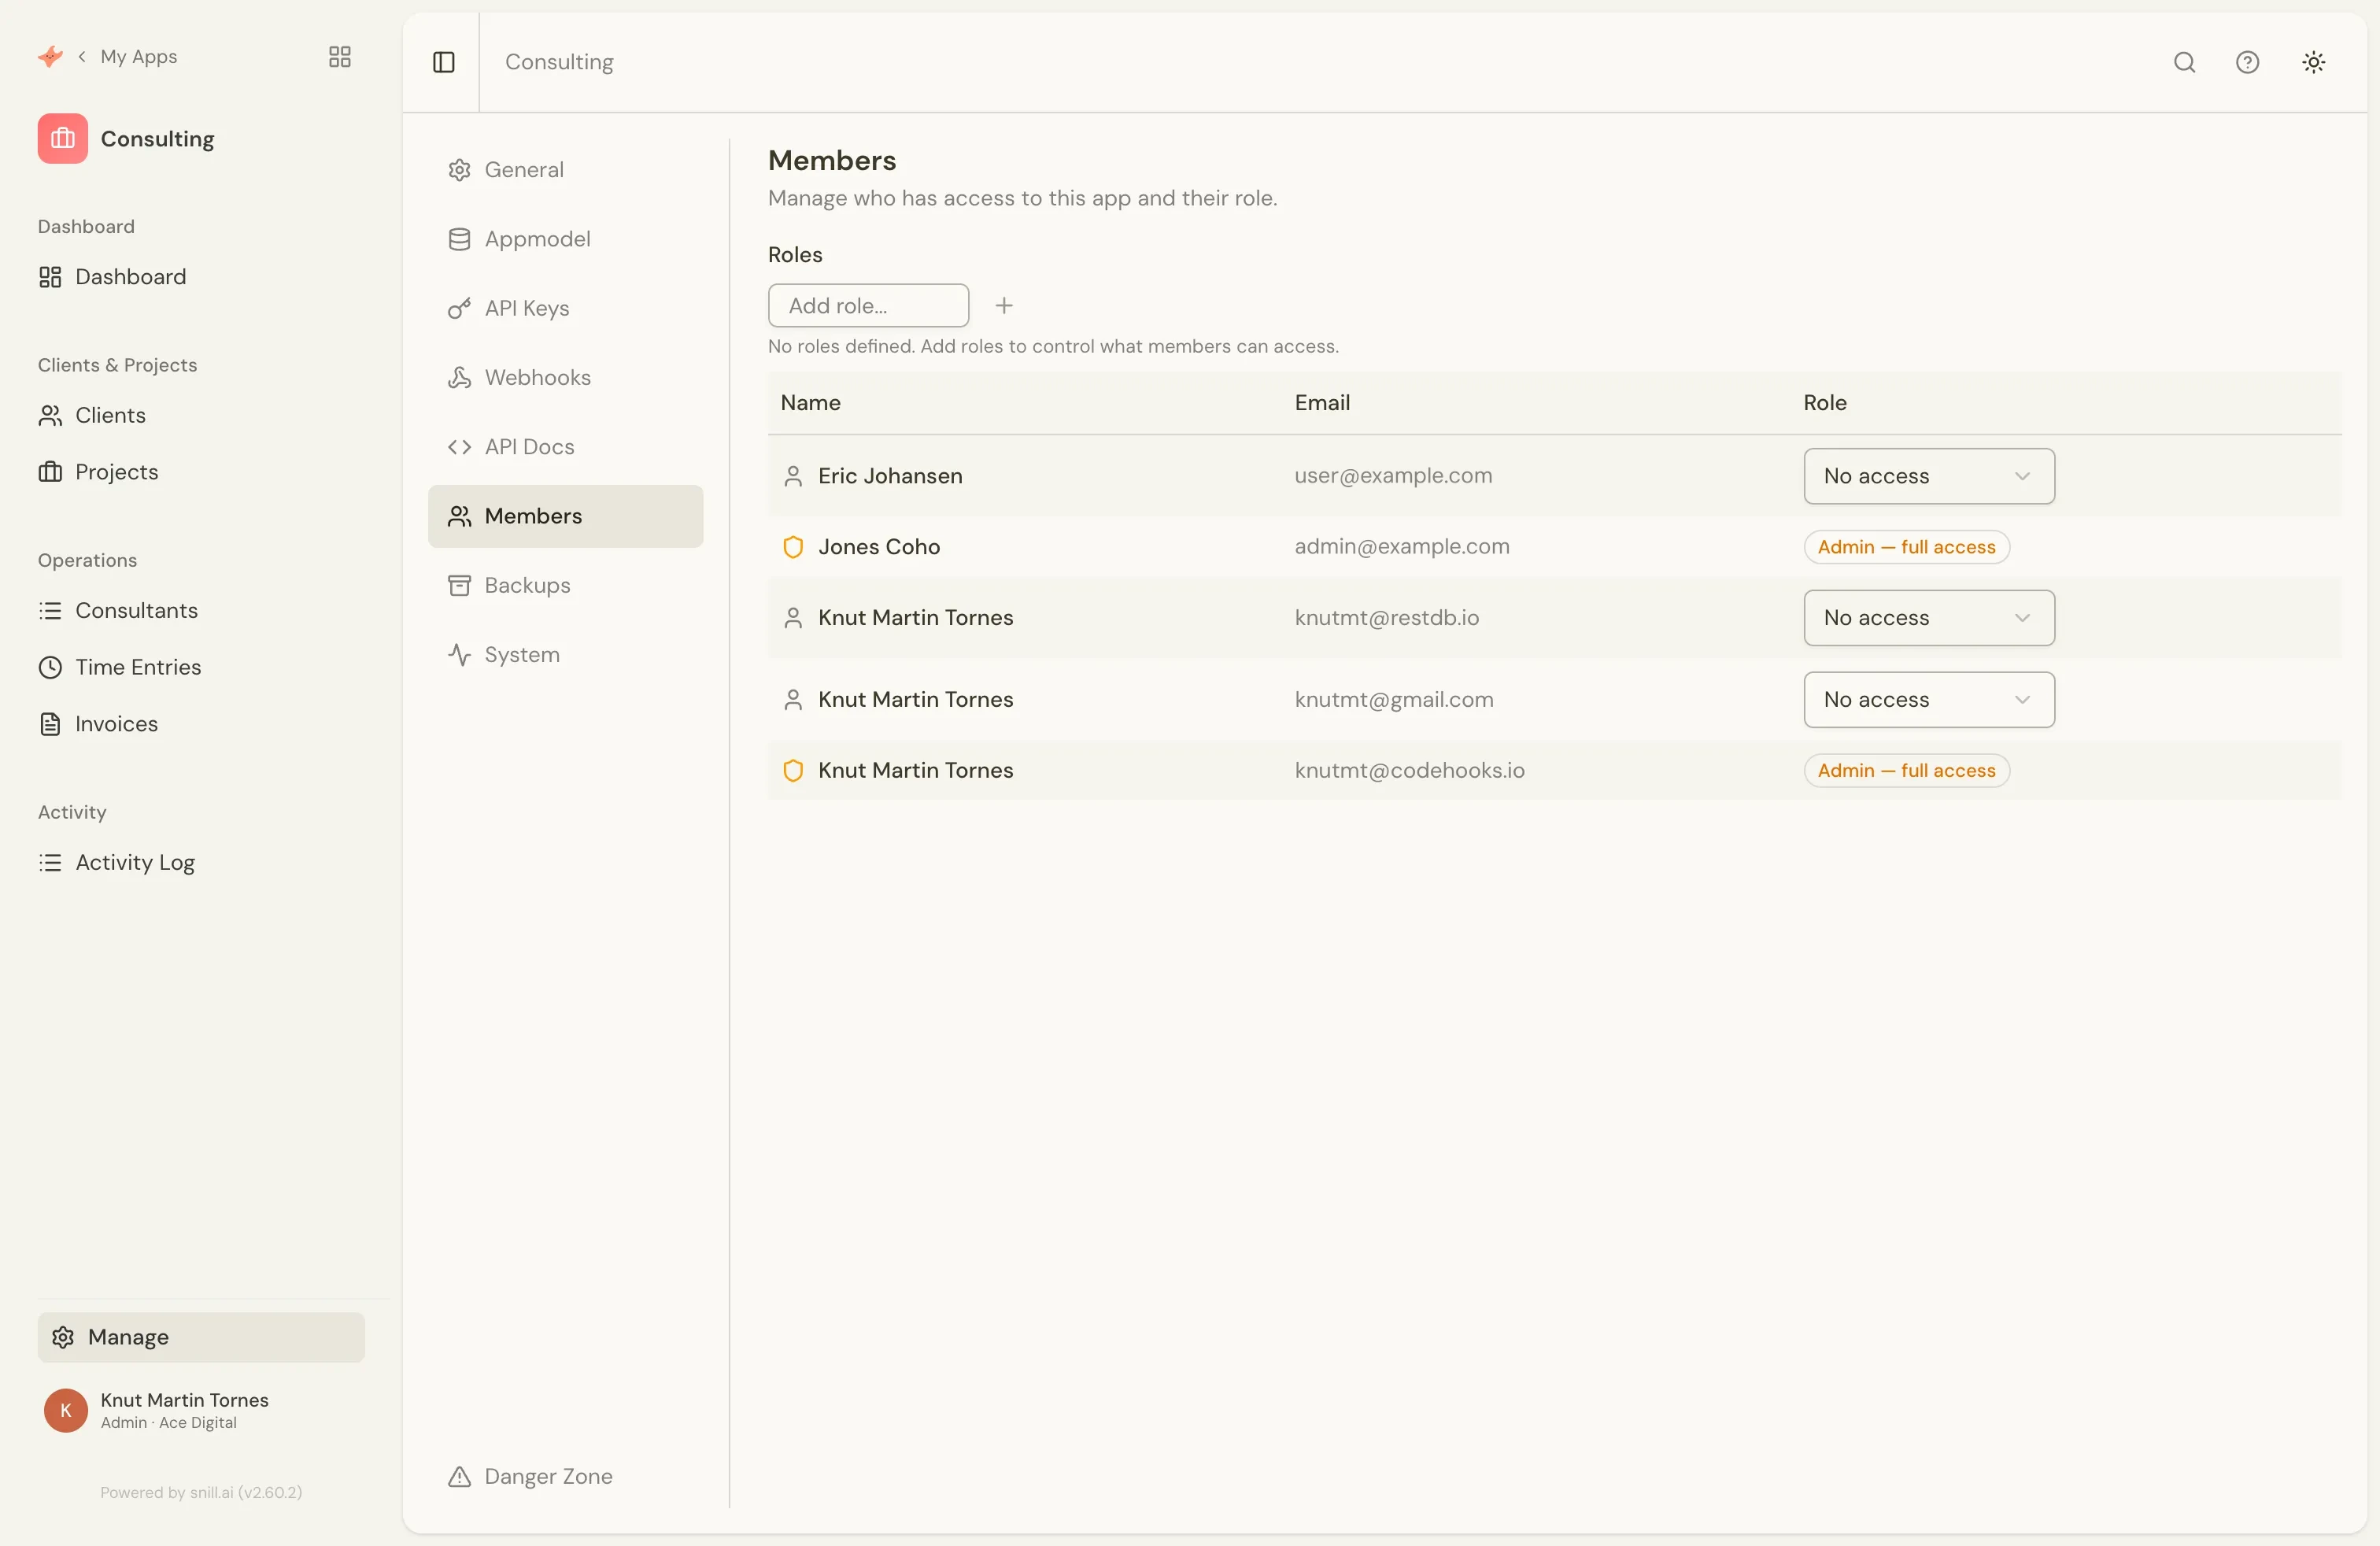
An organization is the top-level workspace. It contains one or more projects (each project is one app) and a list of members. Members have roles at the organization level:
- Admin — manages billing, invites and removes members, and can delete the organization.
- Member — uses projects and their data, but cannot manage the organization itself.
Inside each project you can also define your own custom roles (e.g. “manager”, “viewer”, “sales”) used by access control rules — see Access control for collection-level and field-level permissions.
Billing & usage
Section titled “Billing & usage”Billing is at the organization level. The Free plan is for solo operators; the Pro plan is $19 per user / month and unlocks team members, higher limits, and the REST API. Manage subscription, payment method, and invoices under Settings → Billing (admins only).
| Free | Pro — $19 / user / mo | |
|---|---|---|
| Users | 1 | Unlimited |
| Apps (projects) | 2 | Up to 100 |
| Records | 1,000 | 100,000 |
| File storage | 100 MB | 50 GB |
| AI requests | 10 / day | 50 / user / day |
The REST API, webhooks, and scoped API keys are included on every plan, rate-limited to 60 requests per minute per key — see API & Integrations.
Usage is tracked across the whole organization — record count, storage, and AI requests. All members can review usage under Settings → Usage.
API & Integrations
Section titled “API & Integrations”Every Snill app comes with a complete REST API — auto-generated from your data model, with scoped API keys and OpenAPI/Swagger documentation built in.
Base URL and live spec
Section titled “Base URL and live spec”The API is served from a single host, regardless of which app it serves — the API key tells Snill which app to operate on. Each collection in your data model becomes a CRUD endpoint:
https://api.snill.ai/v1/data/{collection}An interactive Swagger UI — with all your collections, fields, and types — is available at https://api.snill.ai/v1/docs/ui. The raw OpenAPI 3.0 spec is at https://api.snill.ai/v1/docs and is auto-generated from your data model. The spec is scoped to the API key you use, so a key with limited scopes only sees the collections and operations it can call.
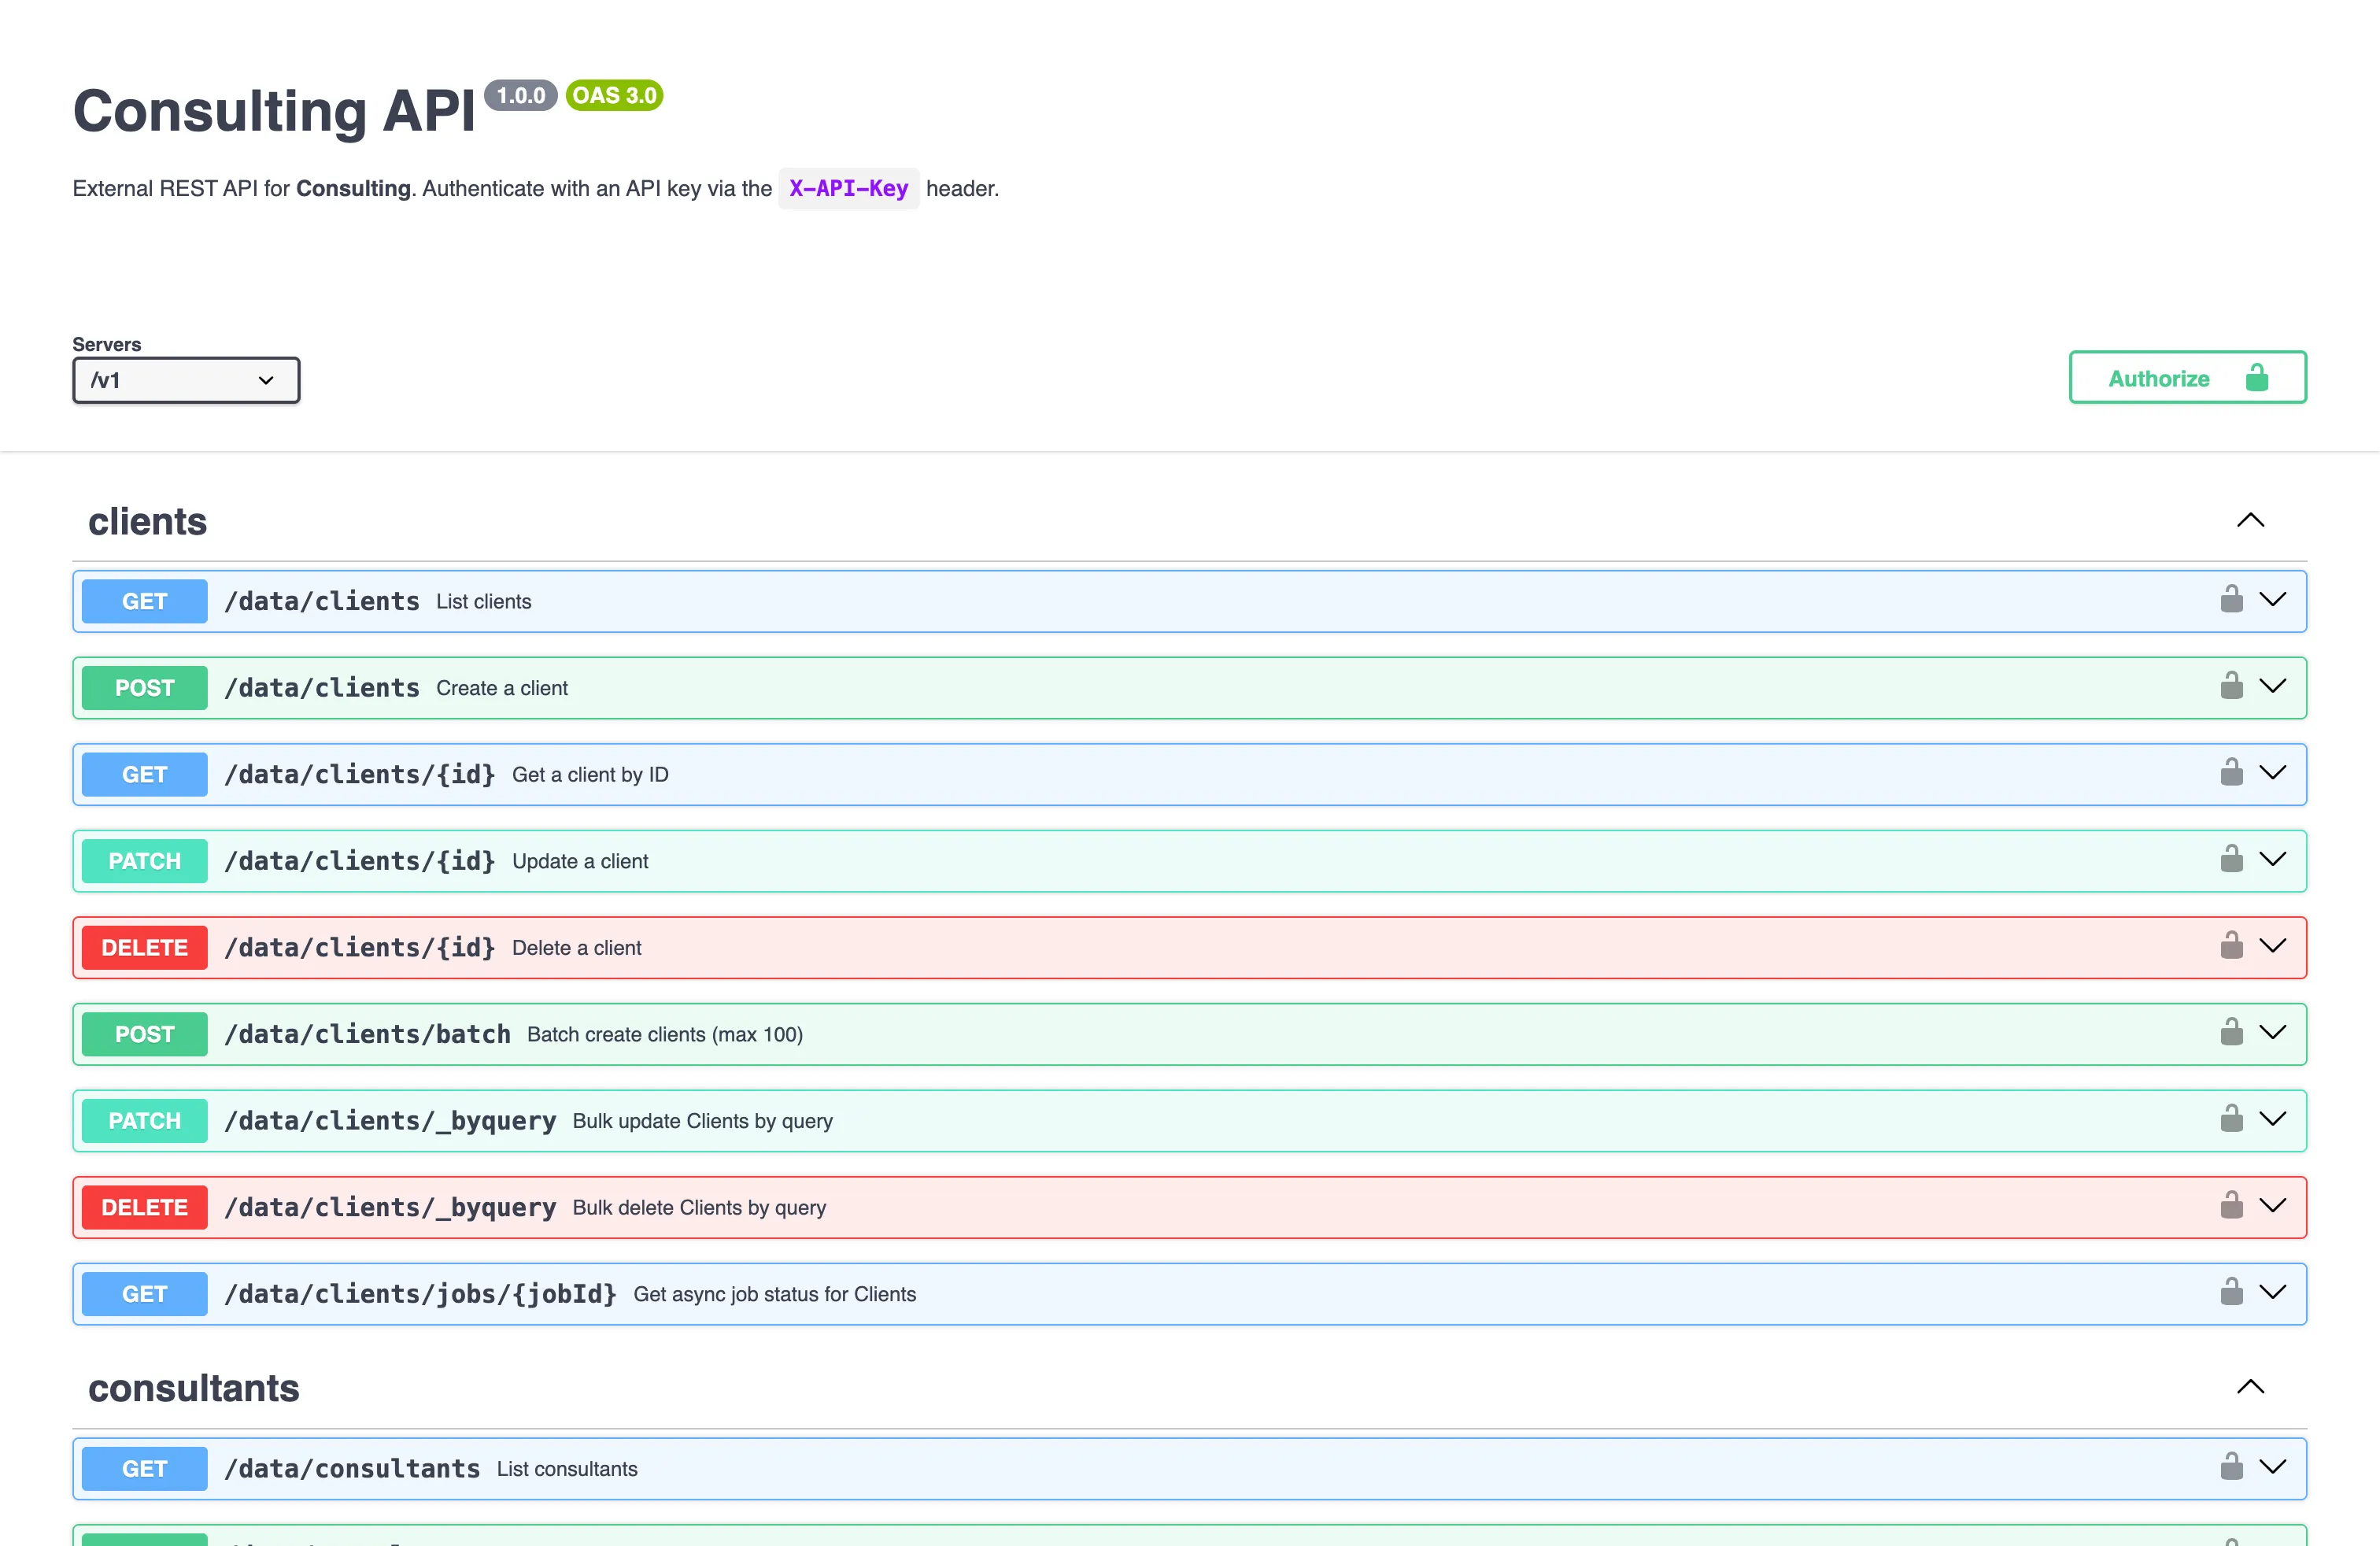
An excerpt from a typical app’s spec looks like this:
{ "openapi": "3.0.0", "info": { "title": "Customers app", "version": "1.0.0" }, "servers": [{ "url": "/v1" }], "paths": { "/data/customers": { "get": { "summary": "List customers", "parameters": [ { "name": "q", "in": "query", "schema": { "type": "string" } }, { "name": "sort", "in": "query", "schema": { "type": "string" } }, { "name": "limit", "in": "query", "schema": { "type": "integer" } }, { "name": "offset", "in": "query", "schema": { "type": "integer" } } ], "responses": { "200": { "description": "OK" } } }, "post": { "summary": "Create a customer", ... } }, "/data/customers/{id}": { "get": { "summary": "Get a customer" }, "patch": { "summary": "Update a customer" }, "delete": { "summary": "Delete a customer" } } }}Note that paths are relative to servers[0].url — so the full URL for the list endpoint above is https://api.snill.ai/v1/data/customers. Most OpenAPI tools (and AI assistants) handle the join automatically.
Using the spec with AI assistants
Section titled “Using the spec with AI assistants”Because the OpenAPI spec is auto-generated and complete, you can hand it directly to an AI coding assistant — Claude, Codex, Cursor, ChatGPT, and others — and have it write integrations or query your data without reading the API surface yourself.
Fetch your spec once with your API key:
curl -H "X-API-Key: snill_01ARZ3NDEKTSV4RRFFQ69G5FAV_..." https://api.snill.ai/v1/docs > snill-spec.jsonThen paste the spec into a prompt and describe what you want. For example:
- “Here’s my Snill API spec [paste]. Write a Python script that fetches all overdue invoices and posts a Slack summary every Monday.”
- “Here’s my Snill API spec [paste]. Import these customer rows from this CSV [paste], deduping on email.”
- “Here’s my Snill API spec [paste]. Build me a one-off report of revenue by service line for last quarter.”
The assistant uses the spec to pick the right endpoints, headers, and query syntax — no manual API reading required.
Authentication
Section titled “Authentication”External callers authenticate with an API key. You manage keys under Manage → API Keys in your app. Pass the key in either header on every request:
X-API-Key: snill_01ARZ3NDEKTSV4RRFFQ69G5FAV_a1b2c3d4e5f6789012345678901234abAuthorization: Bearer snill_01ARZ3NDEKTSV4RRFFQ69G5FAV_a1b2c3d4e5f6789012345678901234abKeys can be granted one of two scope shapes:
- Full — read, create, update, and delete on every collection.
- Per-collection — an explicit list of allowed operations per collection. For example, a key scoped to
{ "customers": ["read"], "invoices": ["read", "create"] }can list and fetch customers, list/fetch/create invoices, and do nothing else.
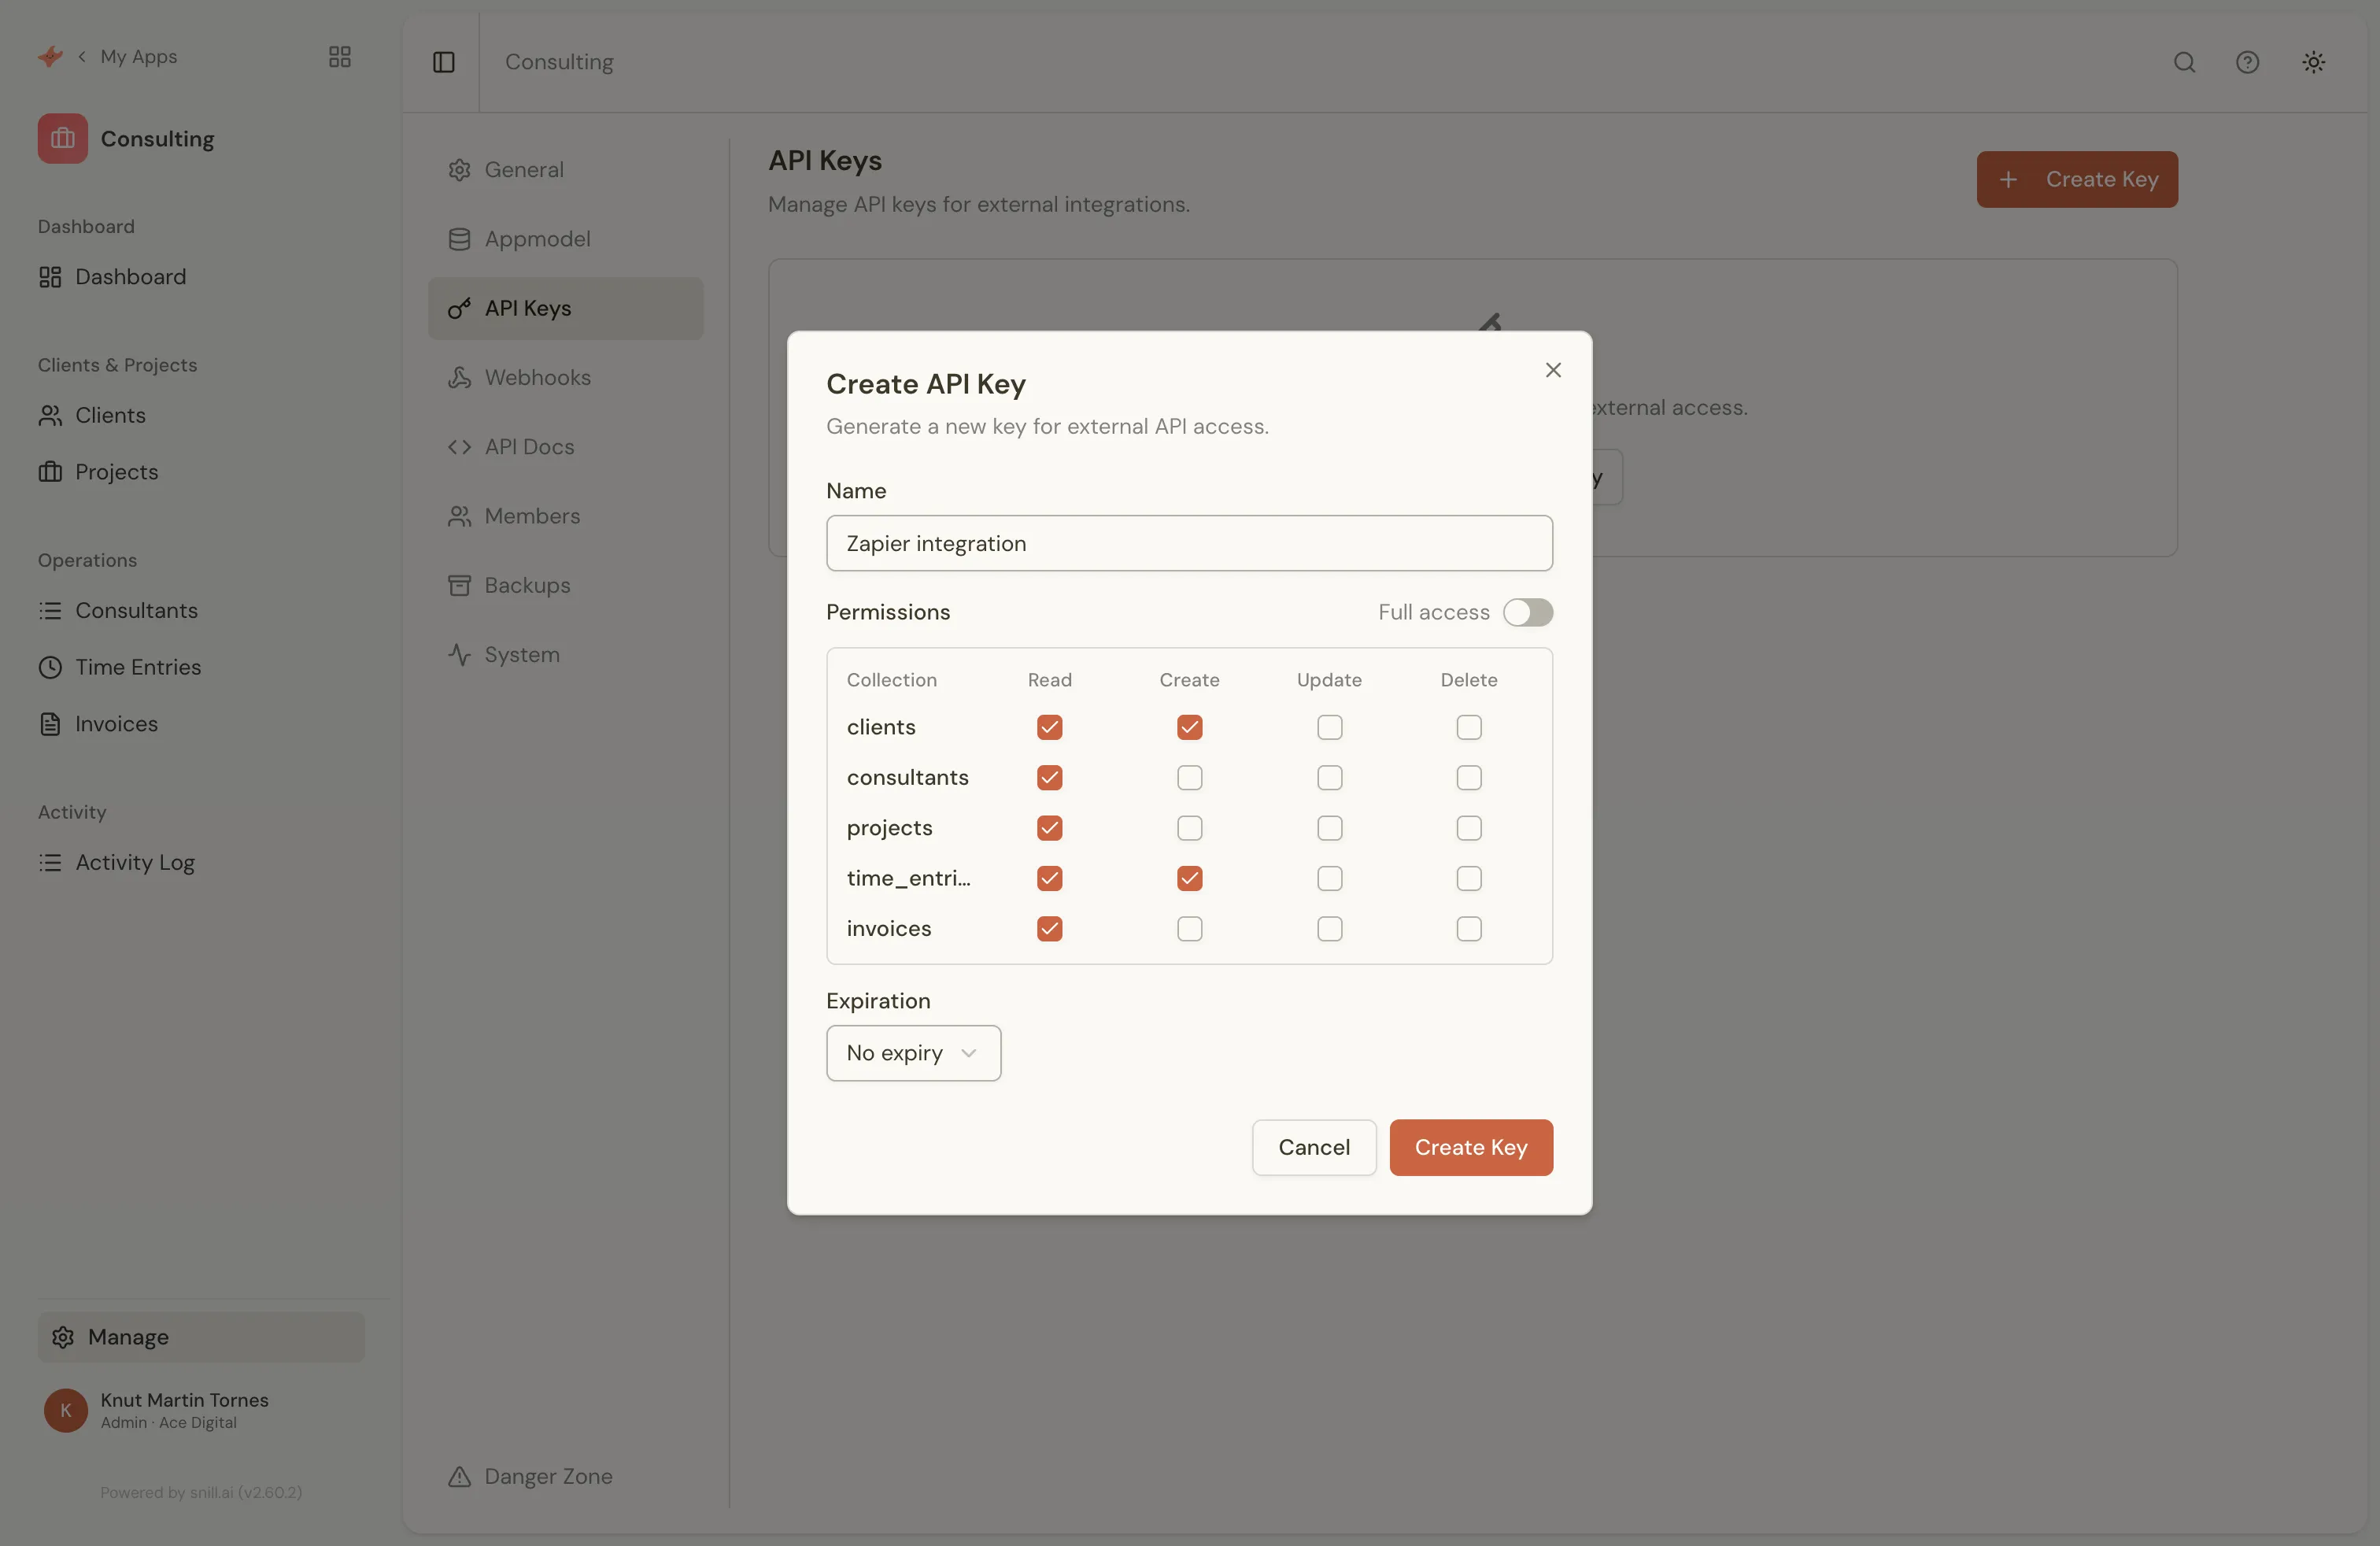
Keys can be deactivated at any time or set to expire on a specific date. All requests are rate-limited to 60 requests per minute per key (current usage is returned in the X-RateLimit-Limit and X-RateLimit-Remaining response headers).
CRUD endpoints
Section titled “CRUD endpoints”The examples below use a customers collection. Substitute your own collection name in the URL.
List records
GET /v1/data/customers ?q={"status":"active"} # filter (JSON, URL-encoded) &sort=-createdAt # sort (- prefix means descending) &limit=20&offset=0 # pagination (default 20, max 1000)Returns a JSON array of records. The response also includes X-Total-Count and X-Has-More headers so you can paginate without re-counting.
Get one record
GET /v1/data/customers/{id}Create a record
POST /v1/data/customersContent-Type: application/json
{ "name": "Acme", "email": "contact@acme.com" }
Returns 201 Created with the full record — including auto-generated fields, calculated fields, and resolved lookups.
Update a record
PATCH /v1/data/customers/{id}Content-Type: application/json
{ "name": "Acme Inc" }
Partial — only fields in the body are updated. Returns the merged record. (Snill does not support PUT; PATCH is the only update verb.)
Delete a record
DELETE /v1/data/customers/{id}Returns 204 No Content.
Create many at once (batch)
POST /v1/data/customers/batchContent-Type: application/jsonIdempotency-Key: 7c1e...        # optional — makes retries safe for 24h
{ "records": [ { "name": "Acme" }, { "name": "Globex" } ] }
Creates up to 100 records in one call. Returns 201 if all succeeded, or 207 Multi-Status with a per-record results array if some failed.
Bulk update by query
PATCH /v1/data/customers/_byquery?q={"status":"trial"}Content-Type: application/json
{ "$set": { "status": "active" }, "$inc": { "loginCount": 1 } }
Updates every record matching q with $set, $inc, $unset, or $rename. Safety rails: an empty query requires ?confirm=customers, and ?dry=true returns the match count without writing. Up to 100 matches run synchronously (200); larger sets run asynchronously and return 202 with a jobId.
Bulk delete by query
DELETE /v1/data/customers/_byquery?q={"status":"archived"}Same matching and safety rails as bulk update.
Poll an async job
GET /v1/data/customers/jobs/{jobId}Returns the progress and status of a bulk job started by _byquery — match count, processed count, and any per-record errors.
Include related records and metadata
Add ?expand=related to a list or get request to bundle each related collection’s first page of child records under a _related key (their file fields are returned as fetchable URLs too). Add ?metafields=true to include internal fields (_search, _dirty) that are stripped by default.
Querying and filtering
Section titled “Querying and filtering”Pass filter conditions as a JSON object in the q parameter (URL-encoded). Snill supports operators familiar from MongoDB:
$eq,$ne— equal / not equal$gt,$gte,$lt,$lte— numeric and date comparisons$in,$nin— match against a list$exists— field is present or not$regex— regular expression match (add$options: "i"for case-insensitive)$elemMatch— match an element inside an array field$contains,$ncontains— an array field includes / doesn’t include a value$containsAny— an array field includes at least one value from a list (e.g.{"tags":{"$containsAny":["urgent","flagged"]}})$and,$or,$nor,$not— combine conditions
Sort with ?sort=name (ascending) or ?sort=-createdAt (descending). Combine multiple fields with commas: ?sort=status,-createdAt.
Paginate with ?limit=20&offset=40. The maximum limit is 1000; the default is 20.
Pagination is mandatory — there’s no “fetch all” endpoint. For large collections, iterate with offset to walk through results in batches. The X-Total-Count header on every response tells you when you’re done.
Relative date tokens. Date filters accept symbolic tokens that Snill resolves server-side, so you never have to compute dates in your client:
GET /v1/data/invoices?q={"dueDate":{"$gte":"$MONTH_START","$lte":"$MONTH_END"}}Available tokens include $TODAY, $YESTERDAY, $TOMORROW, $WEEK_START/$WEEK_END, $MONTH_START/$MONTH_END, $QUARTER_START/$QUARTER_END, and $YEAR_START/$YEAR_END — each with $LAST_* and $NEXT_* variants (e.g. $NEXT_MONTH_START) — plus the parametric $DAYS_AGO:N / $MONTHS_AGO:N and their forward $DAYS_FROM_NOW:N / $MONTHS_FROM_NOW:N.
Files & media
Section titled “Files & media”File and image fields are stored internally as paths but returned as fetchable URLs in API responses:
{ "_id": "01J...", "name": "Acme Ltd", "logo": "https://api.snill.ai/v1/files/org_...%2Fuploads%2Fabc_logo.jpg.display.webp"}Fetch a file with GET /v1/files/<urlencoded-path> and your API key (any read scope). A few things to know:
- Images are returned as a resized
.display.webpvariant for efficient rendering; add?download=1for the original as a file attachment. - Array file fields return an array of URLs. With
?expand=related, file fields on the included child records are returned as fetchable URLs too. - Range requests are supported — send a
Range: bytes=...header to stream or seek (e.g. video) and the response is206 Partial Content. - Uploading files happens in the app — uploading through the public API isn’t available today. The external API serves media for reading.
Errors
Section titled “Errors”Errors return a JSON body with a human-readable message and a stable code:
{ "error": "API key does not have read access to this collection", "code": "SCOPE_DENIED"}Common codes you’ll see:
| Code | Status | Meaning |
|---|---|---|
MISSING_API_KEY | 401 | No X-API-Key or Authorization header on the request. |
INVALID_API_KEY | 401 | The key isn’t recognized. |
KEY_INACTIVE | 403 | The key has been deactivated. |
KEY_EXPIRED | 403 | The key’s expiresAt date has passed. |
SCOPE_DENIED | 403 | The key doesn’t have the required operation on this collection. |
RATE_LIMIT_EXCEEDED | 429 | You’ve exceeded 60 requests per minute on this key. |
Beyond these coded errors, standard HTTP statuses apply:
400— invalid query or body, a malformed operator, or a bulk write missing its?confirm=guard.402— a plan limit was reached (records, storage, AI calls, or projects). The body includes"upgrade": true.404— record, file, or collection not found (also returned for cross-tenant file access).409— a uniqueness conflict, or a reference constraint blocking a delete.207— multi-status: a batch or bulk operation partially succeeded (per-item errors in the body).206— partial content: aRangerequest on a file was served.
Outbound webhooks
Snill can also push notifications outward — POSTing record changes to URLs you configure, with HMAC-signed payloads. See Webhooks for details.
Webhooks
Section titled “Webhooks”Notify external systems when data in your app changes.
Outbound webhooks let you POST a payload to any HTTPS URL whenever a record is created, updated, or deleted — and when custom events fire from triggers or action buttons. You configure them under Manage → Webhooks: pick the collection, the events to listen for, and the URL to call. Up to 10 webhooks per project.
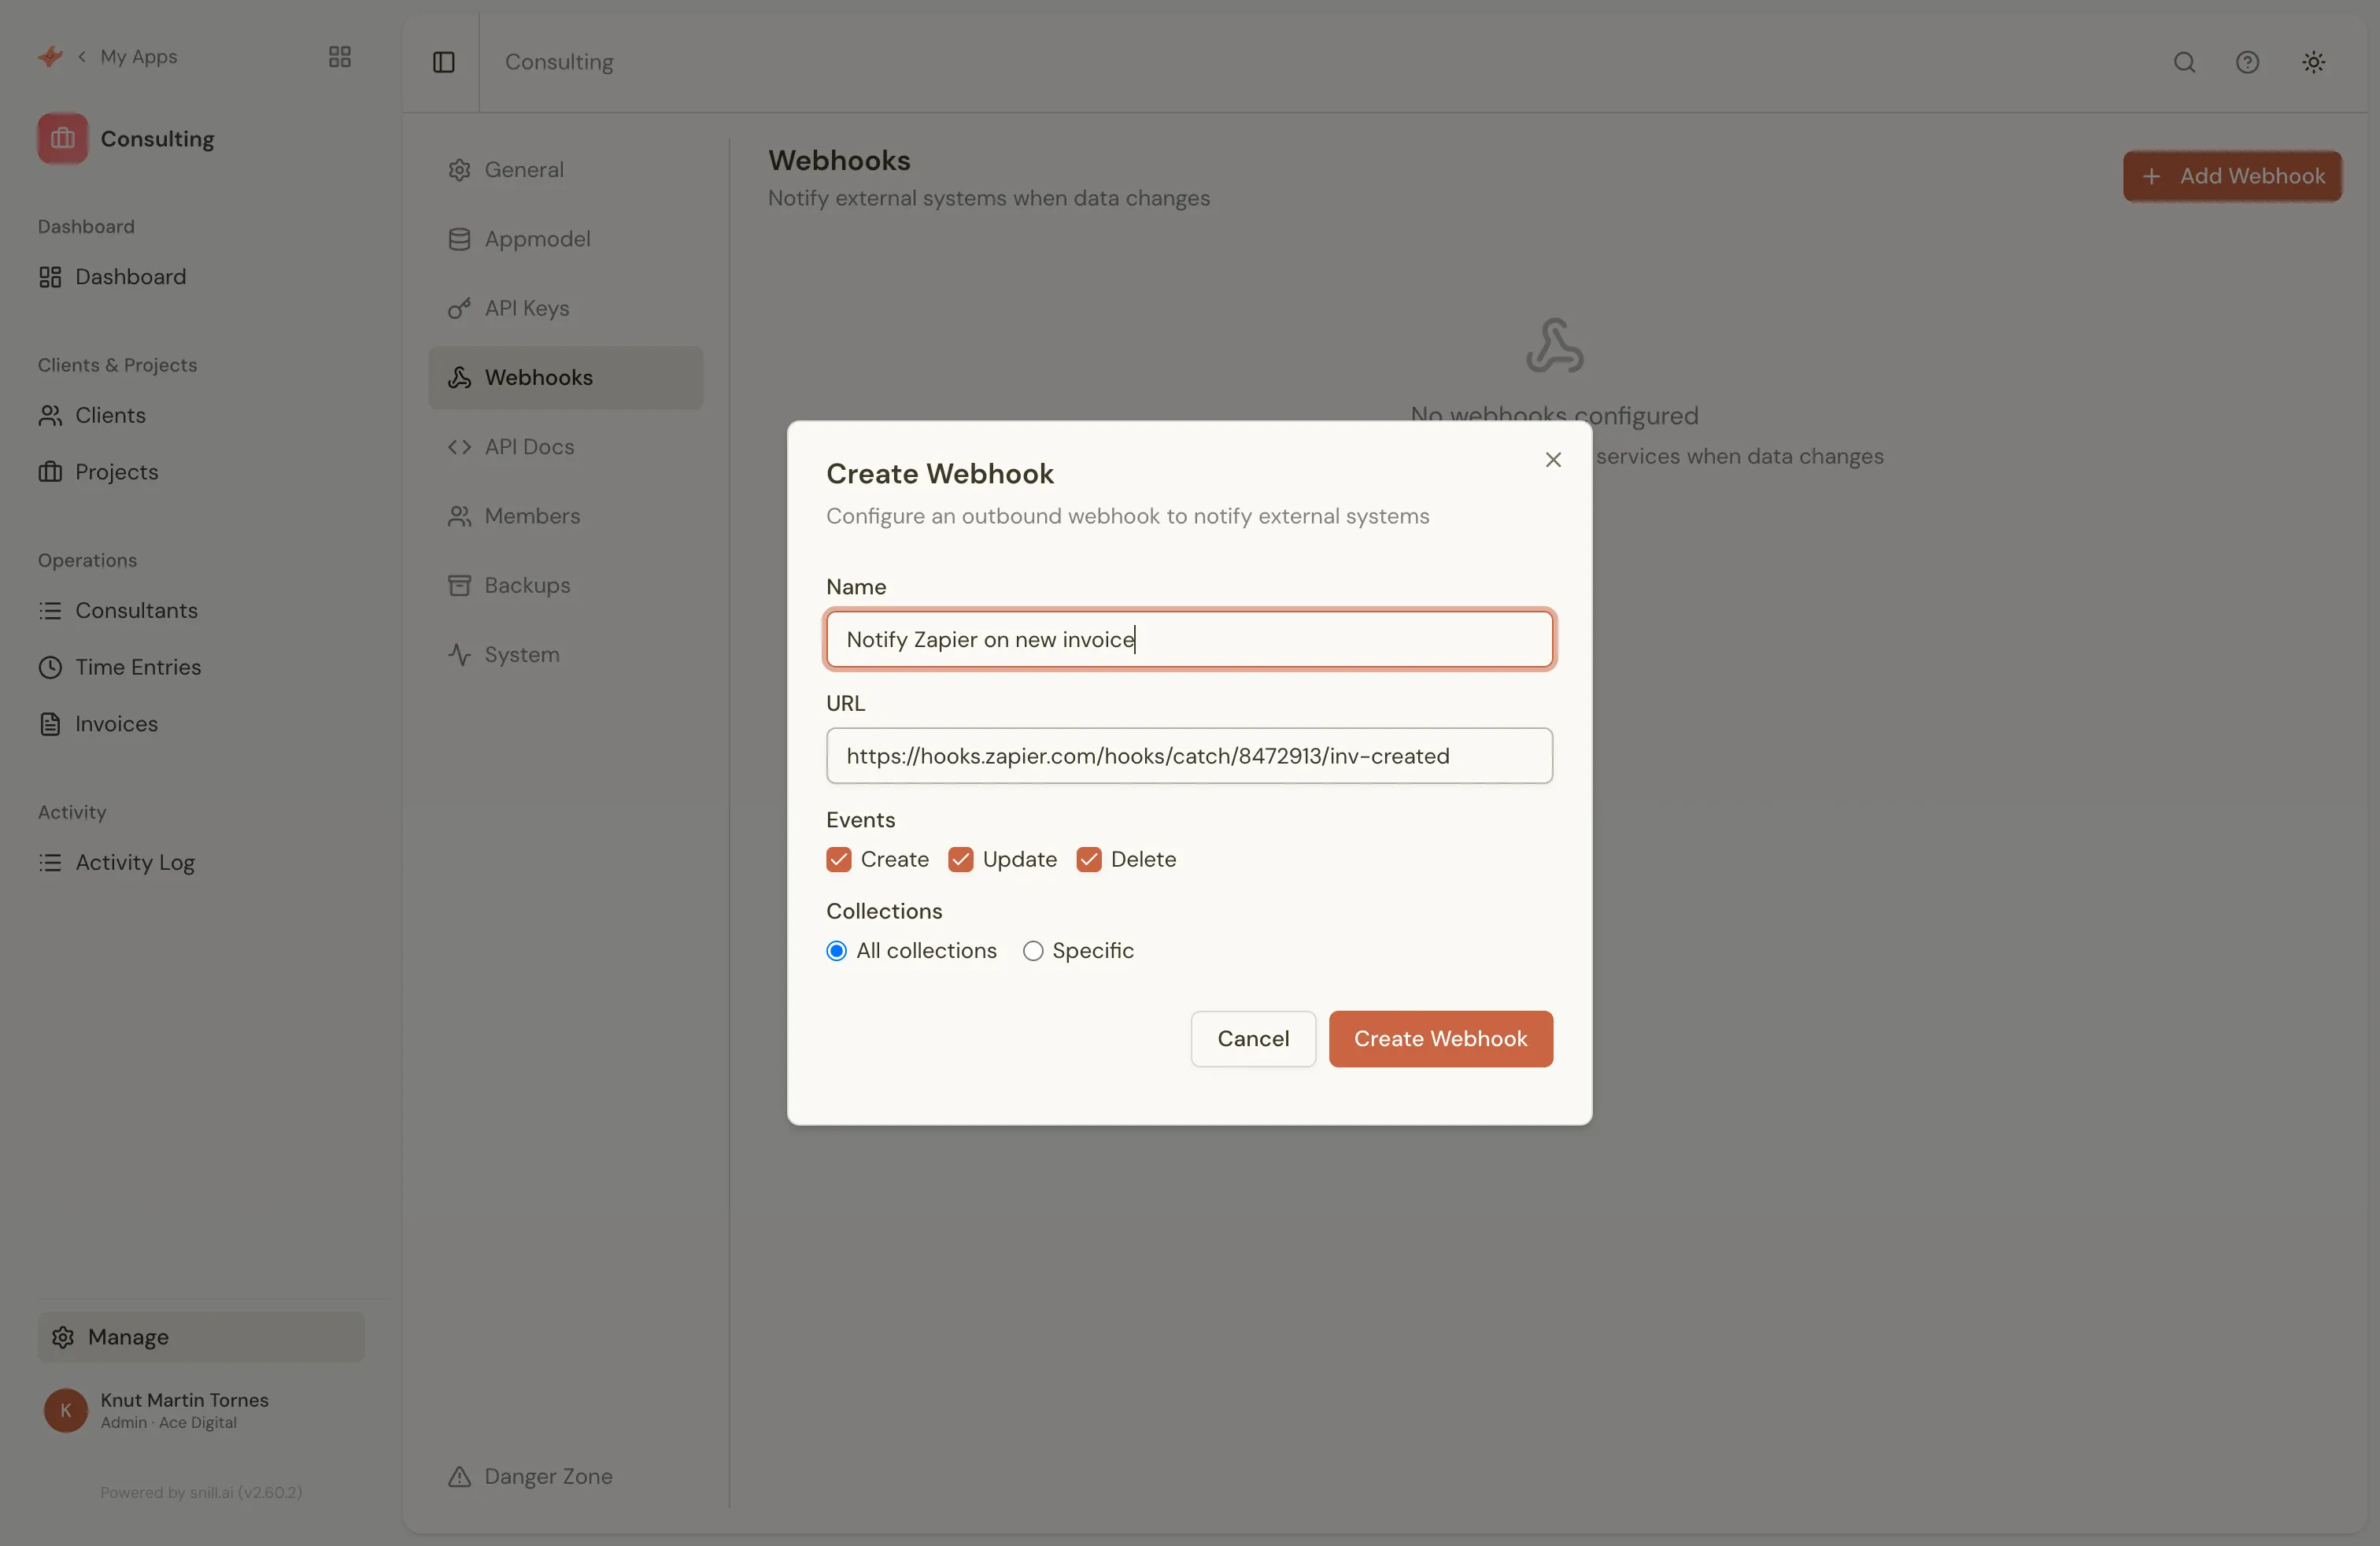
Each delivery is a JSON POST (with a User-Agent: Snill-Webhooks/1.0 header) containing the event name, collection name, the current record, the previous record for updates, and a project identifier. On delete the record data is null; aggregate-trigger events instead carry the aggregateValue and the threshold that fired. The request is signed with an X-Snill-Signature: sha256=... header — an HMAC-SHA256 of the raw request body using the webhook’s secret. Verify the signature on your end before trusting the payload.
Each delivery times out after about 10 seconds; deliveries are queued and retried on failure. Delivery history (status, response code, latency) is visible in the Webhooks tab, where you can also send test events while developing your integration.
Verifying signatures
Section titled “Verifying signatures”Every delivery includes an X-Snill-Signature header. Verify it by computing HMAC-SHA256 of the raw request body using your webhook’s secret, and comparing it to the header value:
const crypto = require('crypto');
function verifyWebhook(rawBody, signature, secret) {  const expected = 'sha256=' + crypto    .createHmac('sha256', secret)    .update(rawBody)    .digest('hex');  return crypto.timingSafeEqual(    Buffer.from(signature),    Buffer.from(expected)  );}
# Pythonimport hmac, hashlib
def verify_webhook(raw_body, signature, secret):    expected = 'sha256=' + hmac.new(        secret.encode(), raw_body, hashlib.sha256    ).hexdigest()    return hmac.compare_digest(signature, expected)
Always verify against the raw request body, not a re-serialized object — even a whitespace difference will change the hash. Use constant-time comparison (timingSafeEqual / compare_digest) to prevent timing attacks.
Triggers
Section titled “Triggers”Fire custom events on data changes — or on a schedule — declaratively, no code required.
Triggers are rules attached to a collection that emit named events when conditions are met. Three kinds:
- Record triggers — fire on create, update, or delete with an optional condition. For example: “Fire
order-approvedonly whenstatuschanges toapproved.” - Aggregate triggers — fire when a count, sum, average, min, or max across a collection crosses a threshold. For example: “Fire
low-stock-alertwhen the count of products withstock < 10exceeds 5.” - Schedule triggers — fire on time rather than on a change. Either relative to a date field on the record, or on a recurring cadence. For example: “Email the owner 30 days before a contract’s
end_date,” or “every day, flag any invoice whosestatusis stilloverdue.”
A trigger can also send an email directly via its notify action — to a user/email field on the record, or the record’s owner ($OWNER / _createdBy) — with $(field) values interpolated into the subject and body. For example, email the record’s owner when an order’s status becomes shipped.
How schedule triggers work. They run on a daily cycle and are day-granular — there’s no time-of-day or cron syntax; the platform owns when within the day they run. Two forms: relative — fire once, a set number of days before or after a date field (e.g. 30 days before end_date, or the day after due_date for an overdue notice); and recurring — every N days, weekly on a chosen weekday, or monthly on a day-of-month. An optional condition gates each record, the same notify and webhook actions apply, and a given trigger fires at most once per record per day. Tip: for anything keyed to “today” (e.g. “30 days before due”), use the relative form — it lets the engine handle the date math reliably.
You can set up a trigger just by asking the Data Assistant, or visually in the Appmodel Editor — no code needed. The events they emit are picked up by webhooks (so external systems can react) and recorded in the activity log (for debugging and audit).
Variables
Section titled “Variables”The $ tokens you can use in filters, formulas, templates, and pages — and where each one works.
The key thing to understand: the same $ syntax is resolved by different engines depending on where you use it, and availability differs by context. There are three token systems, plus your own app-defined variables.
1. Filter & report-query variables
Section titled “1. Filter & report-query variables”Used in list filters, dashboard/page widget queries, and page-parameter defaults. All dates resolve in UTC to YYYY-MM-DD.
Fixed dates
| Variable | Resolves to |
|---|---|
$TODAY | Today |
$YESTERDAY | Yesterday |
$TOMORROW | Tomorrow |
Periods — start/end pairs, use with $gte/$lte:
| Variable | Resolves to |
|---|---|
$WEEK_START / $WEEK_END | Current ISO week (Monday–Sunday) |
$LAST_WEEK_START / $LAST_WEEK_END | Previous ISO week |
$NEXT_WEEK_START / $NEXT_WEEK_END | Next ISO week |
$MONTH_START / $MONTH_END | Current month (first–last day) |
$LAST_MONTH_START / $LAST_MONTH_END | Previous month |
$NEXT_MONTH_START / $NEXT_MONTH_END | Next month |
$QUARTER_START / $QUARTER_END | Current quarter |
$LAST_QUARTER_START / $LAST_QUARTER_END | Previous quarter |
$NEXT_QUARTER_START / $NEXT_QUARTER_END | Next quarter |
$Q1_START…$Q4_END | Fixed calendar quarters (Q1=Jan–Mar … Q4=Oct–Dec) of the current year |
$YEAR_START / $YEAR_END | Current year (Jan 1 – Dec 31) |
$LAST_YEAR_START / $LAST_YEAR_END | Previous year |
$NEXT_YEAR_START / $NEXT_YEAR_END | Next year |
Relative — parameterized:
| Variable | Resolves to |
|---|---|
$DAYS_AGO:N | N days ago, e.g. $DAYS_AGO:30. Negative N goes forward ($DAYS_AGO:-7 = 7 days from now) |
$MONTHS_AGO:N | N months ago, e.g. $MONTHS_AGO:3. Negative goes forward |
$DAYS_FROM_NOW:N | N days from now, e.g. $DAYS_FROM_NOW:7. Negative goes back |
$MONTHS_FROM_NOW:N | N months from now, e.g. $MONTHS_FROM_NOW:3. Negative goes back |
User context — server-side only, require a logged-in user:
| Variable | Resolves to |
|---|---|
$loggedOnUser | Current user’s ID |
$loggedOnUserRole | Current user’s project role (e.g. manager) |
Note
User tokens resolve only when user context exists; without it they’re left unchanged — deliberately not substituted with an empty string, which would silently match the wrong rows.
Example — “my records due this quarter”:
{ "assigned_to": "$loggedOnUser", "due_date": { "$gte": "$QUARTER_START", "$lte": "$QUARTER_END" } }2. Formula, default, template & rule variables
Section titled “2. Formula, default, template & rule variables”Used in calculated-field formulas, field defaults, display templates, and form rules. This is a smaller, different set — the period/quarter tokens above do not exist here.
| Variable | Resolves to |
|---|---|
$NOW | Current timestamp (full ISO datetime) |
$TODAY | Today (YYYY-MM-DD) |
$YESTERDAY | Yesterday |
$TOMORROW | Tomorrow |
$USER | Current user’s ID |
$loggedOnUser | Current user’s ID (alias of $USER) |
$loggedOnUserEmail | Current user’s email |
$date | Alias of $TODAY |
$datetime | Alias of $NOW |
Example — a form rule that stamps who approved a record and when:
"set": { "approvedAt": "$NOW", "approvedBy": "$USER" }Note
$loggedOnUserRole and the period/relative tokens ($MONTH_START, $DAYS_AGO:N, quarters…) are not available in formulas — only in filters and queries (system 1).
3. Page-component & record context tokens
Section titled “3. Page-component & record context tokens”Used in page component query fields.
| Token | Resolves to |
|---|---|
$param.KEY | The current value of page-parameter KEY from the filter bar (e.g. $param.dateFrom, $param.status). Changing the param re-fetches the components that reference it |
$record.FIELD | The current record’s field — used when a component is embedded inside a form, to filter related data by the open record |
{ "status": "$param.status", "_createdAt": { "$gte": "$param.dateFrom", "$lte": "$param.dateTo" } }4. App-defined variables
Section titled “4. App-defined variables”Any constant you define under your app’s variables becomes $<name> in formulas, defaults, and templates — e.g. $vat, $taxRate, $companyName, $hourlyRate.
"variables": { "vat": "1,25", "companyName": "Acme AS" }- Referenced as
$vatin a calculated field, and so on. - String values holding numbers (including European comma decimals like
"1,25") are auto-coerced to numbers in formulas. - Changing a variable triggers recalculation of every collection whose formulas reference it.
5. Other reserved $ forms
Section titled “5. Other reserved $ forms”Not variables, but worth knowing:
| Token | Meaning |
|---|---|
$OWNER | In a trigger’s notify recipient → the record creator (_createdBy) |
$users | The virtual users collection, referenced by lookup fields |
$gte, $lte, $in, $regex, $or, … | MongoDB-style query operators in filters (not app variables) |